How to create an image for PYNQ Bootcamp
This guide will walk you through the process of setting up your SD card and the KRIA-SOM board for the PYNQ-DPU environment. If your SD card already has a suitable image installed, you can skip directly to the (Getting Started with PYNQ Bootcamp) step.
The KRIA-SOM AI Starter Kit is designed to help you get started with AI projects by leveraging the PYNQ-DPU environment. The KRIA-SOM module uses an Ubuntu-based image, which you can download from the AMD website and flash onto an SD card.
Once you have the KRIA-SOM image installed on your SD card, you can enhance your development experience by installing the PYNQ-DPU package. This package is available on GitHub and comes with easy-to-use install scripts. The PYNQ-DPU environment provides access to a wide range of AI models, example projects, and PYNQ peripherals, enabling you to quickly get started with your AI and machine learning projects.
Troubleshooting:
Setting Up Your SD Card
- Download Balena Etcher from https://etcher.balena.io/
- Download the latest Ubuntu image for AMD-Xilinx from https://ubuntu.com/download/amd-xilinx
- Insert the SD card into your computer.
- Run BalenaEtcher as Administrator.
- Flash the image to your SD card using Balena Etcher. (This may take a second try if the flash fails the first time.)
Update the KRIA Boot Binary
Preparation
- The upcoming steps will require a USB UART connection. If you are using Windows 11, you will need to download the USB-UART drivers.
- Download the 2022.1 boot binary at: https://xilinx-wiki.atlassian.net/wiki/spaces/A/pages/1641152513/Kria+K26+SOM (Search the page for "Boot Firmware Updates")
- Follow the steps to set up UART found here: KRIA-SOM UART Setup
- Connect Ethernet cable from KRIA board to a Windows host laptop or PC.
-
Configure host network settings:
- Press Win+R, type
ncpa.cpland press OK. - Click on the unidentified ethernet connection.
- Select Properties.
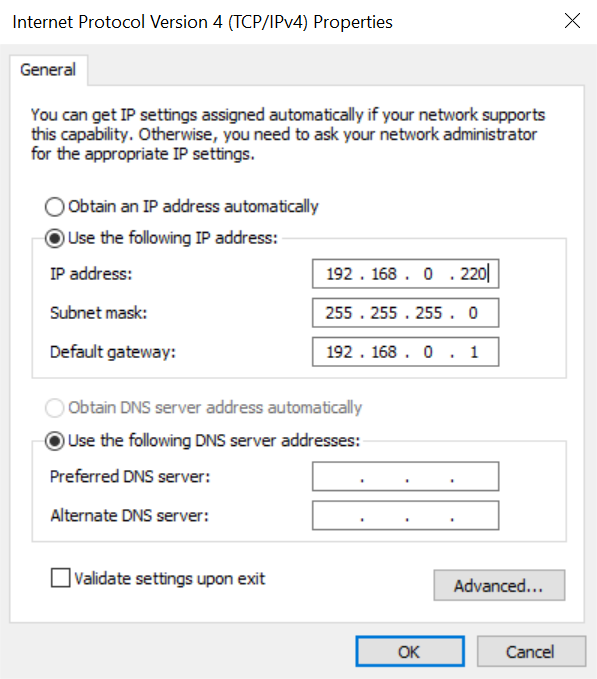
- Double Click on "Internet Protocol Version 4".
- Configure with the following settings:
- IP address: 192.168.0.220
- Subnet mask: 255.255.255.0
- Default gateway: 192.168.0.1
- Click OK or close on all network windows.
- Press Win+R, type
- Hold down the FWUEN button (located about 2 inches below the power connector) and power cycle the KRIA by unplugging/plugging it back in to enter recovery mode.
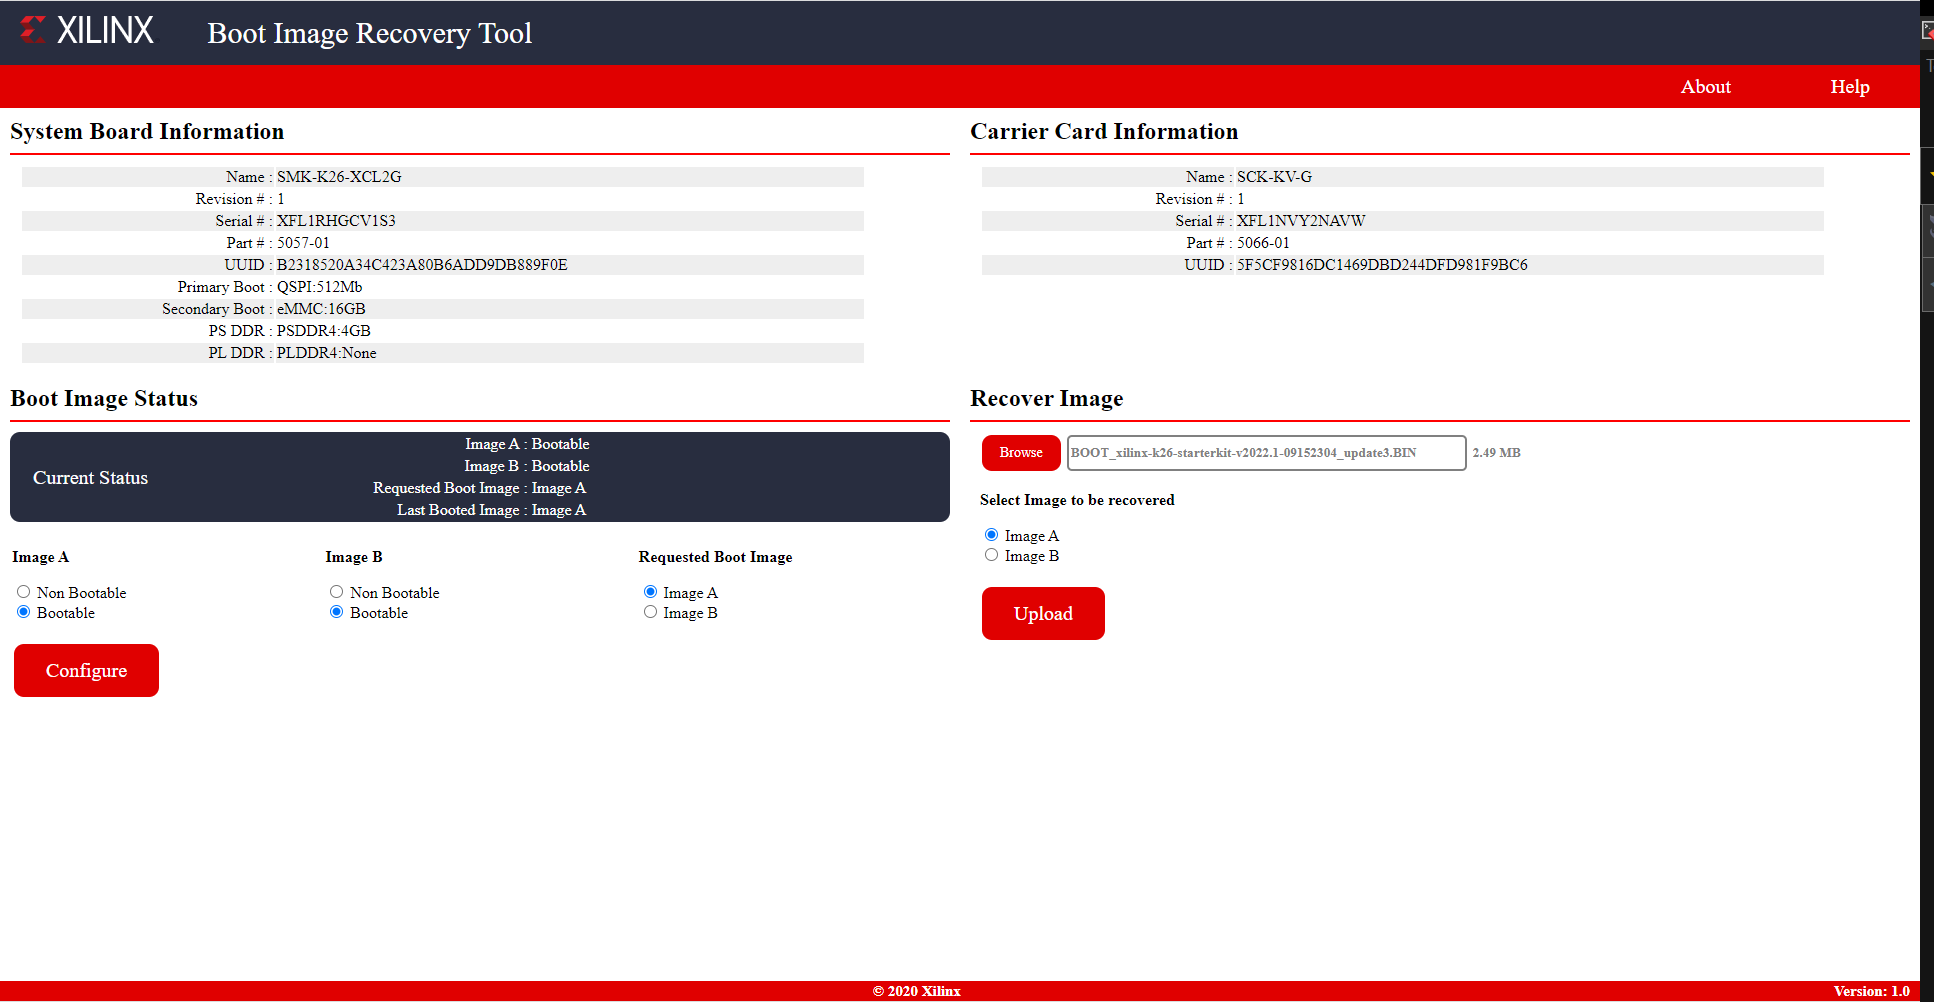
- You should see a message on the UART terminal directing you to point your browser to an IP.
- Select settings:
- Image A: Bootable
- Image B: Bootable
- Request Boot Image: Image A
- Select Image to be recovered: Image A
- Browse to and select the image downloaded earlier.
- Press upload, and address any pop-ups during download. If the Upload fails, simply reselect the settings again and retry until it works. (It might fail and take 2 or 3 tries.)
- Press the reset button on the board, and the process is complete!
Software Setup
Preparation
- There are two methods to set up the development software:
- Using the board itself, necessitating a monitor, mouse, and keyboard connection.
- Using a computer, requiring a UART connection to the board. KRIA-SOM UART Setup
- Once a connection has been established, connect the power adaptor to boot the KRIA. Login using the following credentials:
- Username:
ubuntu - Password:
ubuntu - Optional: change the password to
pynqbootcamp - Connect board to network for internet access:
- Connect an ethernet cable between the board and a port in your router
- Make sure network is established using
ifconfigorping 8.8.8.8
Xilinx Development and Demonstration Set Up
- Install the xlnx-config snap using:
sudo snap install xlnx-config --classic --channel=2.x - Now run the following command to install KRIA Specific PPAs:
sudo xlnx-config.sysinitSelect Y for all of the
Towards the end, windows may appear. On the "Configuring flash-kernel" window, select the first option "install the package maintainer's version".[Y/n]questions and press enter to continue when prompted.Note: the second option is selected in the photo. DO NOT CHOOSE THE YELLOW HIGHLIGHTED OPTION FROM THE PHOTO. You want the option above it circled in red.
For any other windows, the default settings are fine so simply hit enter.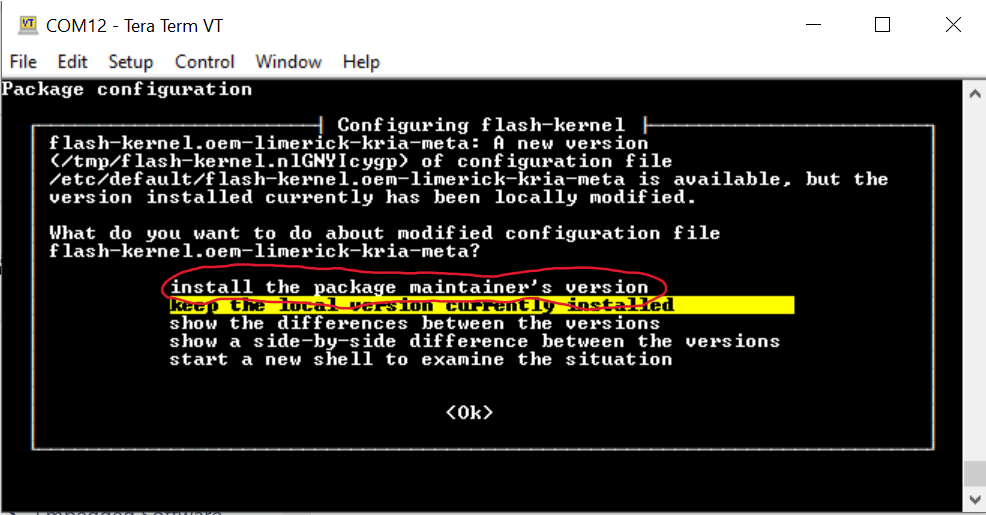
Setting up Wi-Fi Driver
Running the following commands will install the driver for the EW-7811UTC Dual Band WIFI Adapter.
- Run the following commands to clone and install PYNQ:
- Press enter if prompted with a pop up menu
- This final command will prompt you for two [Y/n] inputs. Enter "n" for the first and "Y" for the second.
- This will trigger a reboot and the WiFi adapter should work.
sudo apt install -y dkms git build-essential iwgit clone https://github.com/morrownr/8821au-20210708.git
cd 8821au-20210708sudo ./install-driver.shPYNQ Install
- Run the following commands to clone and install PYNQ:
git clone https://github.com/skalade/Kria-PYNQ -b bootcamp
Kria-PYNQ
sudo bash ./install.sh -b KV260
Getting PYNQ Bootcamp Training Material
- All PYNQ Bootcamp training content is available on github. Run the following commands to clone the repository:
sudo su -
cd /home/root/jupyter_notebook
git clone https://github.com/Xilinx/PYNQ_Bootcamp.git
cd PYNQ_Bootcamp
Accessing the Jupyter Notebooks
- For local access (on the board), on a browser navigate to
kria:9090<ip-address>:9090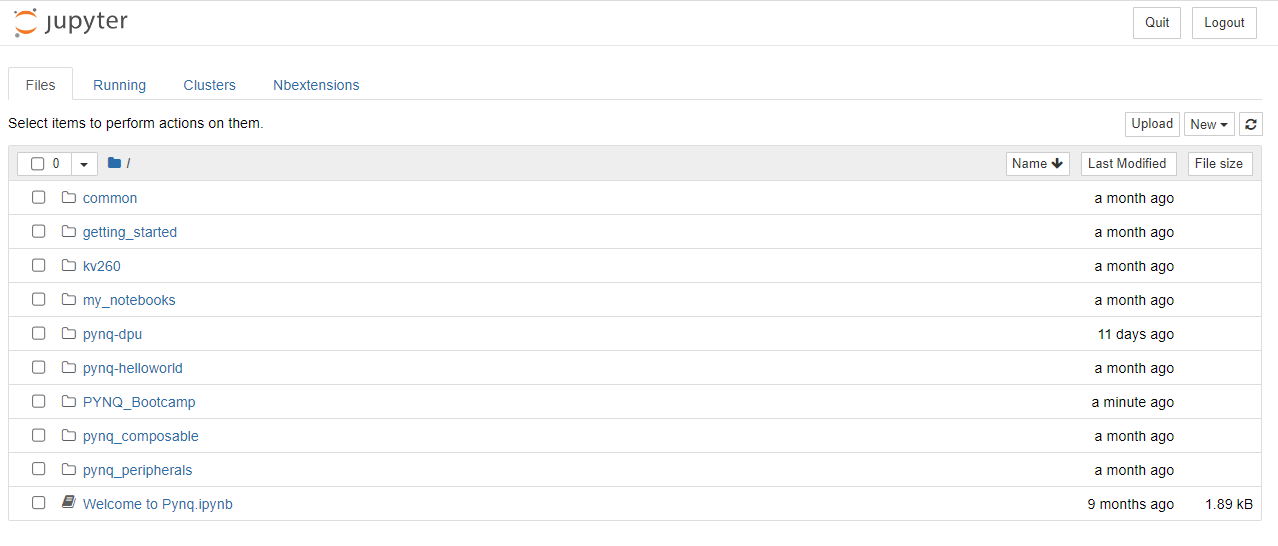
Setup Network Configurations
There are three ways you can setup you host and board communication:
- Ethernet Connection
- WiFi Dongle
- Local LAN using Static IP
Ethernet Connection
This is how the board was accessed during setup:
- Connect the Ethernet cable you got with your kit to the Ethernet port on the board.
- Connect the other side of the Ethernet cable to a port in your router.
- Note: Make sure your laptop is on the same network as the board.
Wi-Fi Dongle (Netplan)
- Connect a USB Wi-Fi dongle to the USB port on your board.
- Wait for the blinking blue LED on the Wi-Fi Dongle to indicate it is active.
- Create a new file at
/etc/netplan/01-wifi-setup.yamlbut set the SSID and password to your actual values. Note: that this file is indentation/whitespace sensitive: - Run the following command to apply your netplan configuration:
- Check to see that you can see the IP address for an interface with a name starting in wl. This may take a while (probably a few seconds, but best to wait a minute or two)
- Check to see if you have routes configured for the subnet of the IP your see (first three octets or so should be the same of the IP you noted in ifconfig):
- Check to see if you can connect to the DNS server, if name resolution is working, and if you can access a webpage:
- After you have done this initial setup, if you need to add a new access point or edit an existing access point, you can add or update access points using the wifi setup notebook (https://github.com/Xilinx/PYNQ_Bootcamp/blob/master/wifi-setup.ipynb) or by editing the netplan file(s) in /etc/netplan directly using any editor with root (sudo) access.
network:
  version: 2
  renderer: NetworkManager
  wifis:
    wlan0:
      match:
        name: wl*
      dhcp4: true
      dhcp6: true
      access-points:
        "MY_SSID":
password: "MY_PASSWORD"sudo netplan applyifconfigroute -nping www.google.comLocal LAN using Static IP
Follow the steps detailed below or refer this guide to setup Static IP for your board: https://www.freecodecamp.org/news/setting-a-static-ip-in-ubuntu-linux-ip-address-tutorial/
Create a new netplan
- Create a new netplan file:
- Add following settings to the file and save it (for vim, press i for insert, then copy/paste the code below, and then press escape, then type
:wq) Note: that this file is indentation/whitespace sensitive:
sudo vim /etc/netplan/01-static-ip.yamlnetwork:
version: 2
renderer: NetworkManager
ethernets:
eth0:
dhcp4: false
dhcp6: false
addresses:
- 192.168.1.2/24
routes:
- to: default
via: 192.168.1.1
metric: 10
nameservers:
addresses: [8.8.8.8,8.8.4.4]Restart the netplan service
- Press enter to accept the changes. To sanity check, you can run:
- You should see that you have an IP address of 192.168.1.2 on the Kria board. If you type:
- You should see a route to/from the gateway 192.168.1.1
sudo netplan tryip aroute -nConfigure Ethernet Adaptor on your windows laptop
- Connect a Ethernet cable between the KRIA-SOM board and your laptop.
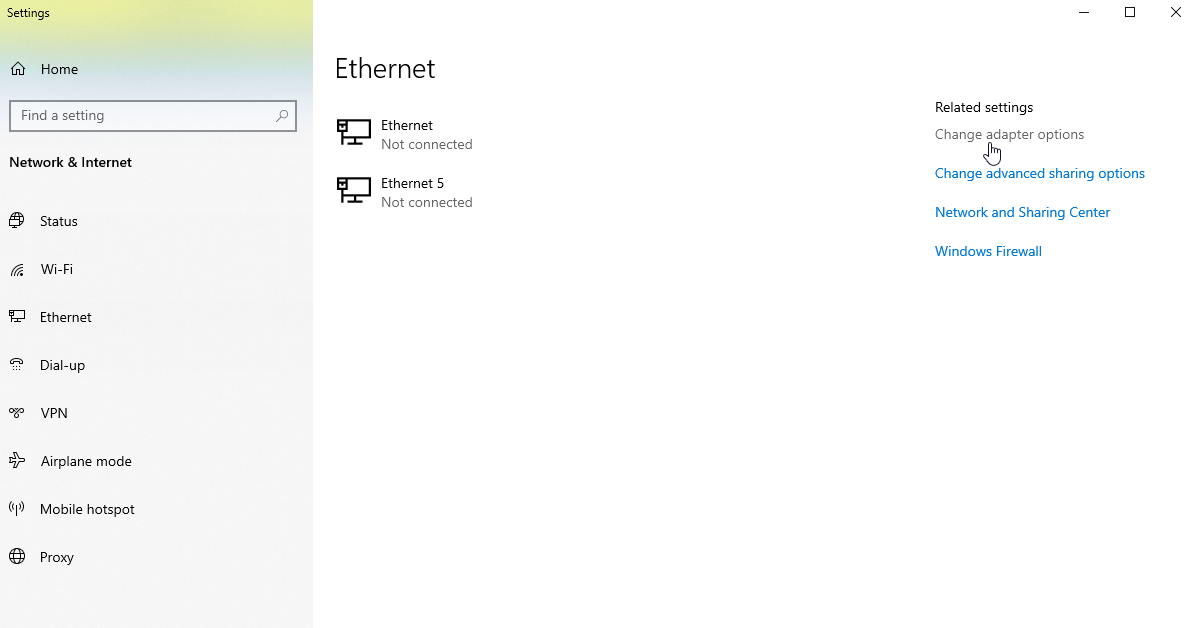
- Open Network and Sharing center on your windows laptop.
- Navigate to "Change adaptor settings" :
- Right click on the Ethernet adaptor associated with the ethernet cable connect to board and select properties.
- Double click on "Internet Protocol Version 4 (TCP/IPv4) and configure it using following settings:
- Click OK and save the settings.

Bridging
To enable bridging from the kria board through your local machine to the internet (tested on Windows 11 Enterprise only). Note: some networks have settings or firewalls that may disallow bridging in this way.
- Plug an ethernet cable from the Kria board into your computer, connect your computer to wifi.
- Follow the instructions from step 3.
- Open the settings for internet by typing Windows+r and then typing
ncpa.cpland hitting Enter. - Open the settings for the wifi, and (on the sharing tab), select enable sharing.
- Double check that your settings for the ethernet remain what they are supposed to be for step 3, ignore any warning boxes that may appear. Be especially careful to remove any DNS server information that may appear.
Check to see if it worked by:
- On your windows machine, make sure you can still ping/ssh into the kria board using 192.168.1.2
- On the kria board, ping 8.8.8.8 (which checks to see if you can access a DNS server). You can also
ping www.google.comorcurl www.google.comto ensure resolution is working.
Troubleshooting - KRIA-SOM UART Setup
- Unplug the power cable from KRIA-SOM
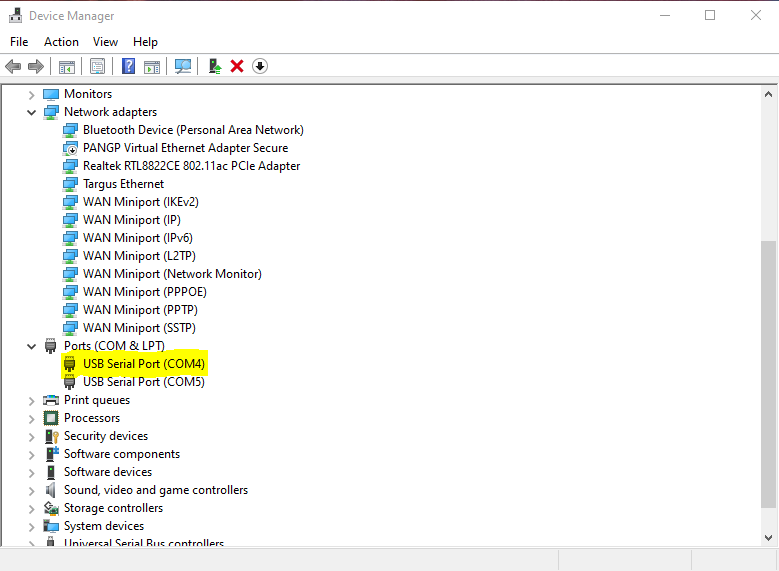
- Plug in Micro USB to KRIA-SOM and the USB end to your computer
- Find the KRIA-SOM under the Ports tab on the Device Manager on Windows (Might not be COM4)
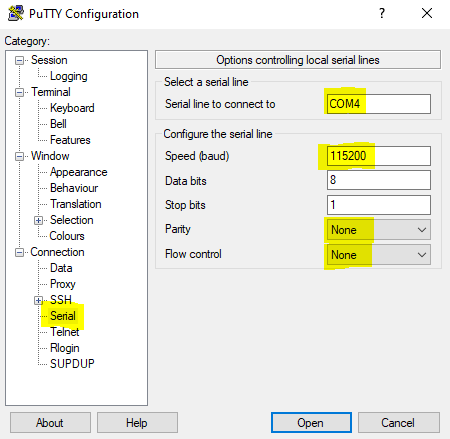
- Run PuTTY. Under sessions, change the highlighted fields. (For serial line field use whatever port was found in step 3. It may not be the first port displayed.) Putty Download
- Change the highlighted sections under the serial tab
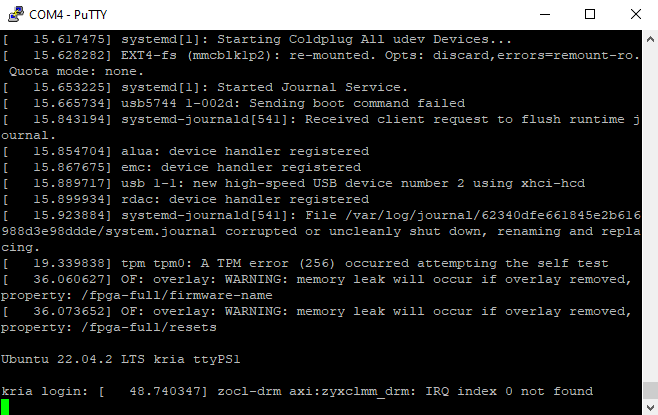
- Plug back in the power cable into the KRIA-SOM
- Select open and log into the KRIA-SOM

More Information for Getting Started
AMD's KRIA Getting Started Page
Frequently Asked Questions
Frequently Asked Questions