Multichannel ML
This tutorial covers steps to create Machine Learning (ML) based example pipelines. There are two types of Machine Learning pipelines:
Single stage ML that involve only one ML operation on the input image
Multi stage ML, also commonly known as Cascaded ML, that involve several ML operation using different ML models on single input image
This tutorial begins with building a one stream, single stage Machine Learning pipeline using VVAS and then scales up to build four channel Machine learning pipelines that processes 4 streams in parallel.
The pipeline will run some ML model on the four H.264 decoded streams and mix the videos and display the four streams on HDMI Monitor.
Once single stage ML pipeline creation is completed, this tutorial covers the steps to build multi stage ML pipelines.
Requirements
Hardware Requirements
Micro USB cable, connected to laptop or desktop computer for the terminal emulator
MicroSD card, 8 GB or larger, class 10 (recommended)
HDMI 2.0 supported Monitor with 3840x2160 as the native resolution
HDMI 2.0 cable
Software Requirements
(Refer Vitis Unified Software Development Platform 2021.2 Documentation for installation instructions)
Vitis™ Unified Software Platform version 2021.2
Petalinux tool version 2021.2
Serial terminal emulator (for example, Tera Term)
Git
Host system with Ubuntu 18.04/20.04 (Recommended)
System Requirements
Board must have access to the internet and be accessible from your development system
Pre-built binaries
Release package provides prebuilt binaries including SD card image that has the implemented design and required software, VAI models and scripts. You may use the pre-built binaries and provided scripts to quickly run the GStreamer pipelines to get a feel of the platform.
Download the release package. Let the path where release package is downloaded be represented as <RELEASE_PATH>.
Note
The pre-buit binaries available for download from the link mentioned above contain software copyrighted by Xilinx and third parties subject to one or more open source software licenses that are contained in the source code files available for download at the link mentioned below. Please see the source code for the copyright notices and licenses applicable to the software in these binary files. By downloading these binary files, you agree to abide by the licenses contained in the corresponding source code
Open Source Licenses and Source code - VVAS 1.1
In case user wants to see the Licenses and source code that was used to build these pre-built binaries, download Source Licenses and Source Code that contain the Open Source Licenses and source code.
Once you have downloaded the pre-built binaries, you may go to section Board bring up to try the released SD card image.
Building Blocks
Let us begin with constructing a single stream video pipeline based on the components selected.
We shall build the pipeline incrementally, starting from the source element and keep appending the pipeline per the use case.
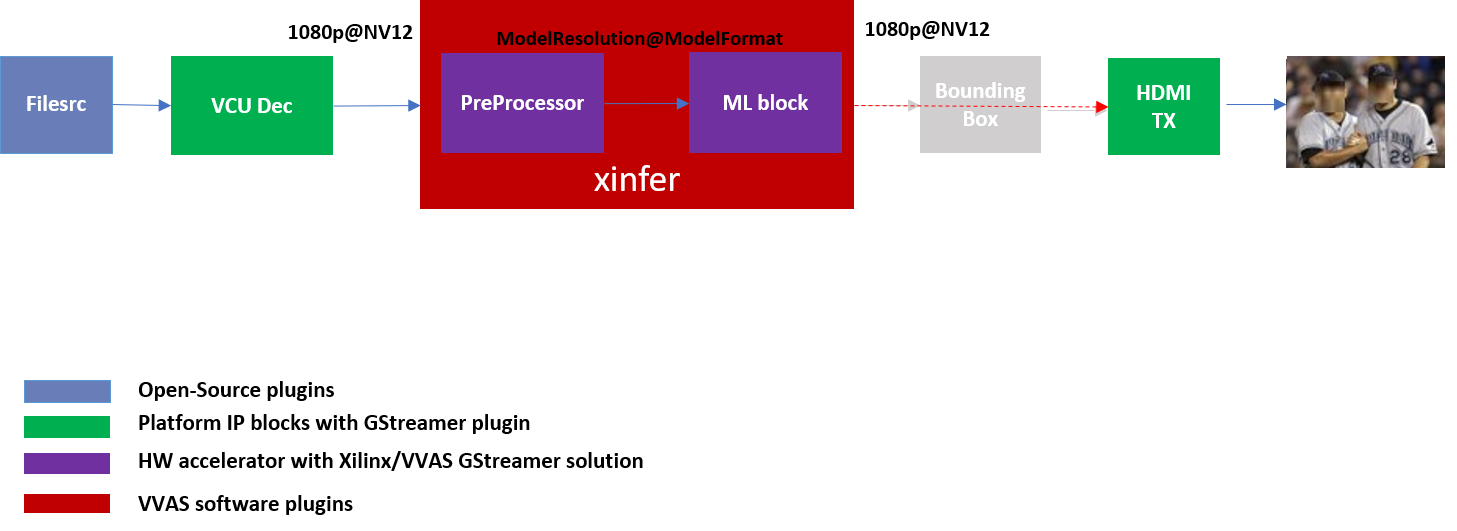
First setup the ZCU104 board with steps outlined in Board bring up. Facedetect model (densebox_320_320) is used in constructing the single stream pipeline, hence choose a mp4 video file with human faces.
VCU Decoder block
A VCU Decoder block is required to decode the H.264/H.265 encoded stream and feed the decoded data to the ML block for inference.
For good performance, the hardware VCU block is expected to be part of the Xilinx platform.
The zcu104_vcuDec_vmixHdmiTx platform provides VCU as a hardware block as part of the design and the omxh264dec plugin for decoding.
Refer to pg252 for more information on the Xilinx VCU block.

VVAS solution for VCU block
Standalone VCU block can be tested with following pipeline:
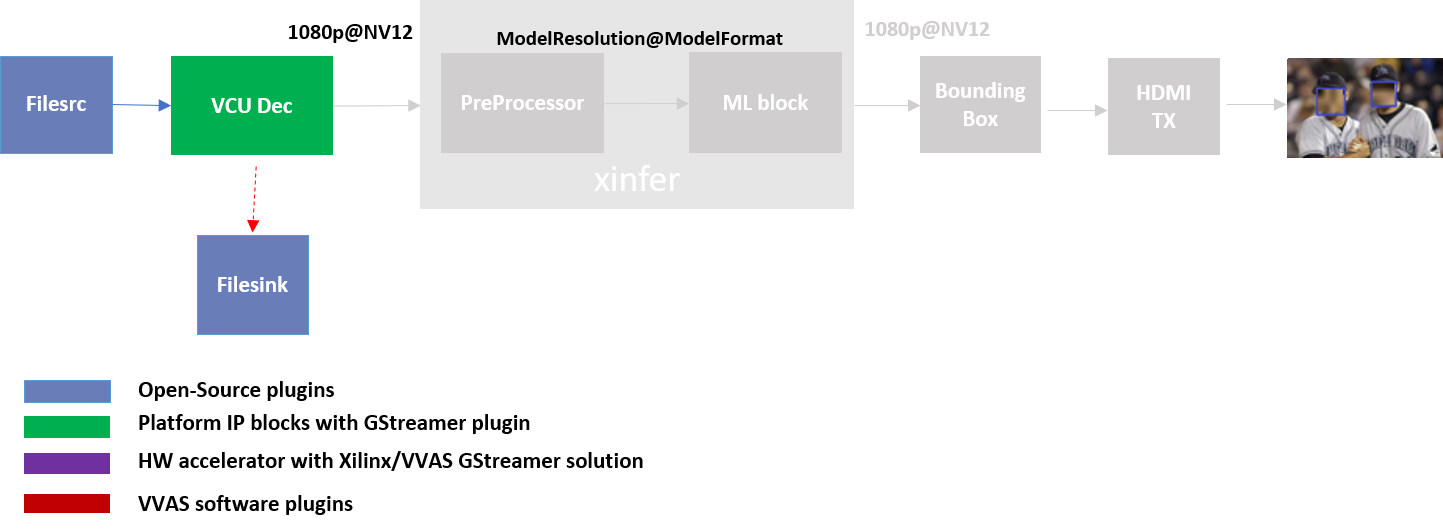
Sample video pipeline for VCU block
GStreamer command:
gst-launch-1.0 filesrc location=/home/root/videos/face_detect.mp4 ! qtdemux ! h264parse ! omxh264dec internal-entropy-buffers=2 ! filesink location=./vcu_out.nv12 -v
HDMI Tx Block
In the previous section, the elementary pipeline is working but the output image from the VCU Decoder block is dump to file via filesink GStreamer opensource plugin. Now we can replace filesink with the HDMI Tx using kmssink GStreamer plugin. This enables viewing video on HDMI monitor. You need to set DRM bus-id, plane-id and rendering position as kmssink properties.
The bus-id for the zcu104_vcuDec_vmixHdmiTx platform is fixed to a0130000.v_mix.
The video mixer in zcu104_vcuDec_vmixHdmiTx platform supports 9 planes of NV12 format, with plane-id starting from 34 to 42.
You need to set the plane-id within this range to output the video stream on one of these planes.
The render-rectangle property sets the position of video stream on screen in the format “<x, y, width, height>”.
Here, x, y represents the starting position of the image on screen,
width represents width of the video image, and height represents height of the video image.
Sample video pipeline for adding HDMI Tx is shown as below
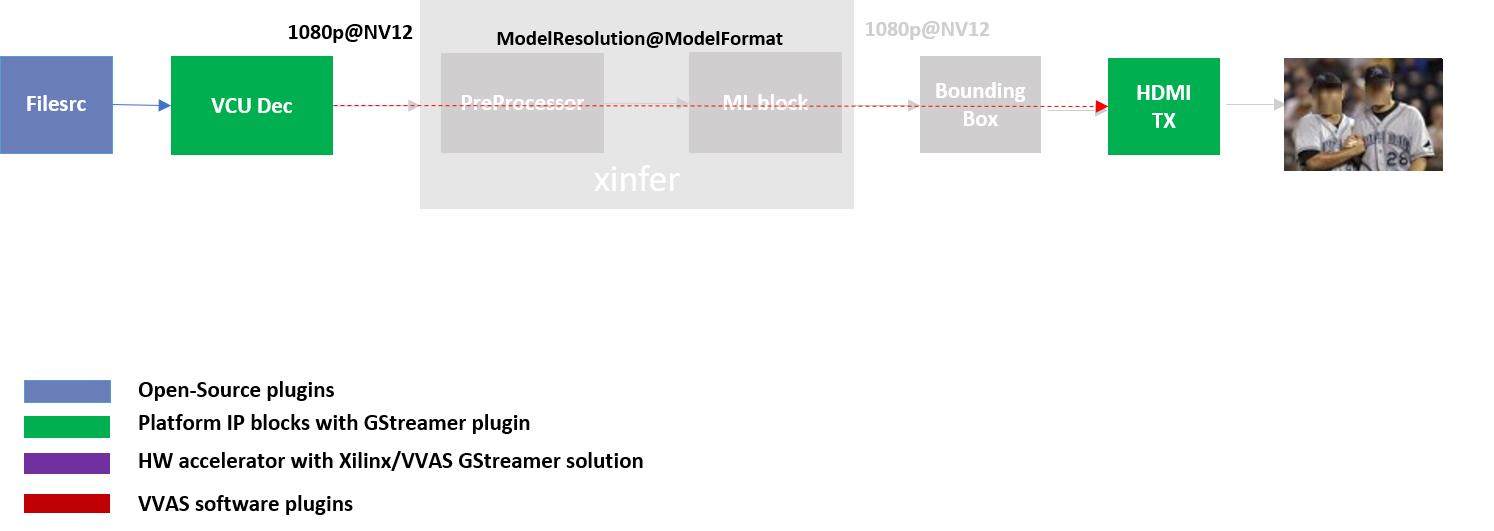
Sample video pipeline adding Decoder and HDMI Tx blocks
GStreamer command:
gst-launch-1.0 -v filesrc location=/home/root/videos/FACEDETECT.mp4 \
      ! qtdemux ! h264parse ! omxh264dec internal-entropy-buffers=2 \
      ! kmssink plane-id=34 bus-id="a0130000.v_mix"
The output can be shift to one corner of the screen by using “render-rectangle” property of kmssink
gst-launch-1.0 -v filesrc location=/home/root/videos/FACEDETECT.mp4 \
      ! qtdemux ! h264parse ! omxh264dec internal-entropy-buffers=2 \
      ! kmssink plane-id=34 bus-id="a0130000.v_mix" render-rectangle="<0,0,1920,1080>"
Note
It is assumed that the video resolution of the input file FACEDETECT.mp4 is 1080P.
Machine Learning (ML) block
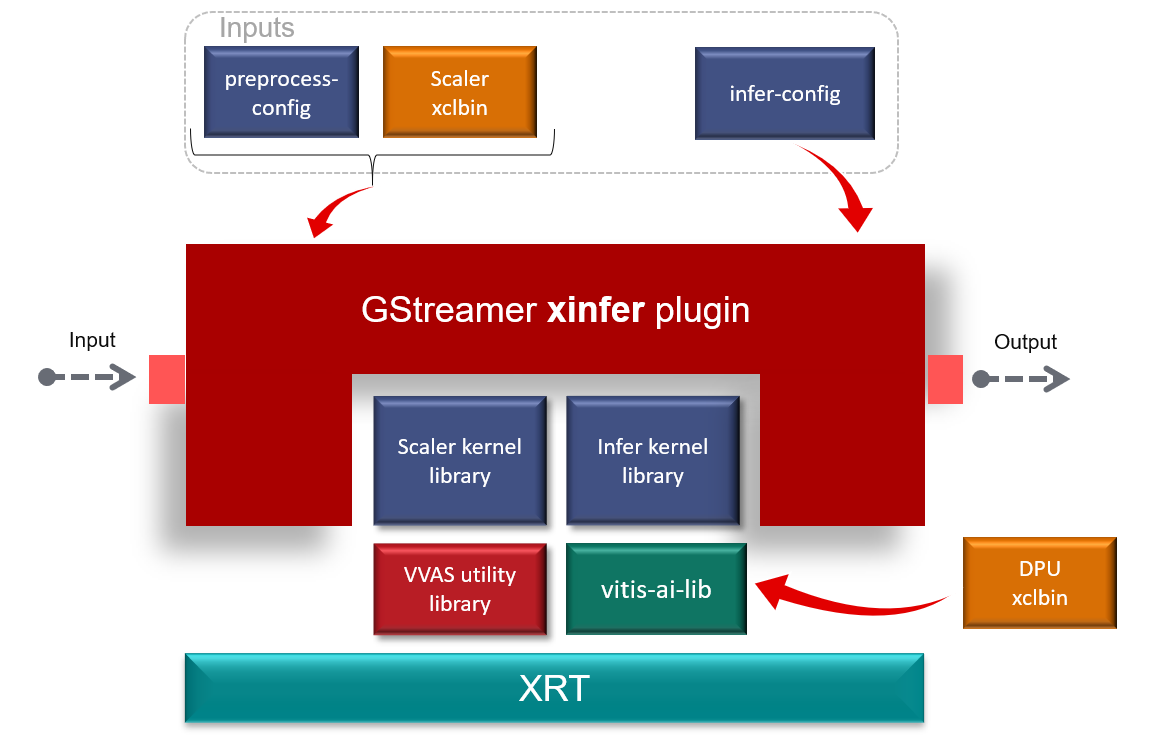
Machine Learning inference is performed by DPU hardware accelerator and vvas_xinfer plug-in. VVAS supports the DPU libraries released with Vitis-AI 2.0. vvas_xinfer is used along with the vvas_xdpuinfer acceleration software library to perform the Machine Learning Inference. The beauty of this VVAS solution is that user need not figure out the resolution required for various DPU supported models. vvas_xinfer plug-in gets this information from the requested model and perform resize, color space conversion operation on the input image as per the requirement of the model using preprocessor block (vvas_xpreprocessor). The output of the vvas_xinfer is the original input image along with the scaled metadata for that resolution.
The information for the ML model to be used must be provided in the JSON file, that is passed to vvas_xfilter’s plug-in property infer-config.
VVAS solution for ML block
ML block can be tested with following pipeline:
Sample Video Pipeline adding ML block
GStreamer command:
gst-launch-1.0 -v filesrc location=/home/root/videos/FACEDETECT.mp4 \
  ! qtdemux ! h264parse ! omxh264dec internal-entropy-buffers=2 ! queue \
  ! vvas_xinfer preprocess-config=kernel_pp_facedectect.json infer-config=kernel_densebox_320_320.json name=infer1 ! queue \
  ! kmssink plane-id=34 bus-id="a0130000.v_mix" render-rectangle="<0,0,1920,1080>"
You can notice that the caps are not mentioned after the decoder as the vvas_xinfer auto negotiates the caps based on the model selected.
Note
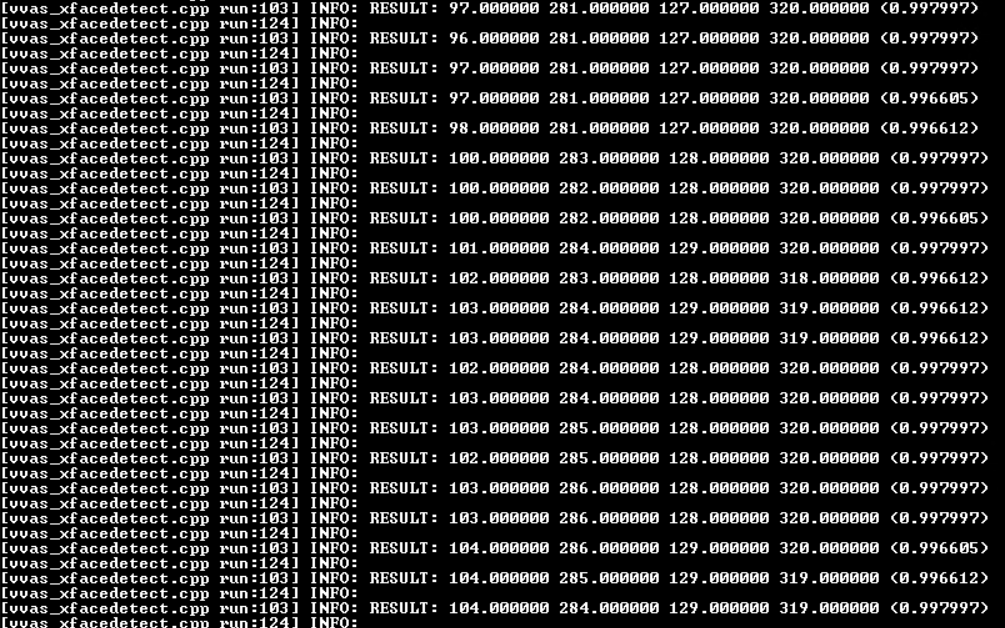
In this pipeline, if the debug_level of vvas_xdpuinfer library is increased to 2, you can see the objects detected in logs.
The debug level can be increased in the kernel_densebox_320_320.json JSON file.
The sample log output is shown below.
Sample JSON files kernel_pp_facedectect.json for preprocesing and kernel_densebox_320_320.json for densebox_320_320 DPU model for detection of a human face are provided for reference.
{
  "xclbin-location":"/media/sd-mmcblk0p1/dpu.xclbin",
  "vvas-library-repo": "/usr/lib",
  "device-index": 0,
  "kernels" :[
    {
      "kernel-name":"v_multi_scaler:v_multi_scaler_1",
      "library-name": "libvvas_xpreprocessor.so",
      "config": {
        "alpha_r" : 128,
        "alpha_g" : 128,
        "alpha_b" : 128,
        "beta_r" : 1,
        "beta_g" : 1,
        "beta_b" : 1,
        "inference-level" : 1,
        "debug_level" : 0
      }
    }
  ]
}
kernel_pp_facedectect.json
{
  "vvas-library-repo": "/usr/lib/",
  "inference-level": 1,
  "attach-ppe-outbuf": false,
  "kernel" : {
     "library-name":"libvvas_xdpuinfer.so",
     "config": {
        "batch-size" : 0,
        "model-name" : "densebox_320_320",
        "model-class" : "FACEDETECT",
        "model-format" : "BGR",
        "model-path" : "/usr/share/vitis_ai_library/models/",
        "run_time_model" : false,
        "need_preprocess" : false,
        "performance_test" : false,
        "debug_level" : 1,
        "max-objects":3
     }
  }
}
kernel_densebox_320_320.json
Different ML models supported by the DPU have different preprocessing requirements that can include resize, mean subtraction, scale normalization etc. Additionally, the DPU expects input image in BGR/RGB format. The VCU decoder at the input of the DPU generates NV12 images. Depending on the model selected, the preprocessor block is expected to support the following operations:
Resize
Color space conversion
Mean Subtraction
Scale Normalization
Although all these operations can be achieved in software, the performance impact is substantial. VVAS support hardware accelerated pre-processing. Configuration parameters for pre-processing block can be specified through a json file by providing location in preprocess-config property of vvas_xinfer GStreamer plugin.
Table 1 lists the pre-processing parameters supported by vvas_xinfer GStreamer plug-in.
These properties are tested in the context of this tutorial only.
Table 1: preprocessing parameters in JSON format to configure mean and scale values
Property Name |
Type |
Range |
Default |
Description |
|---|---|---|---|---|
alpha-b |
float |
0 to 128 |
0 |
Mean subtraction for blue channel |
alpha-g |
float |
0 to 128 |
0 |
Mean subtraction for green channel |
alpha-r |
float |
0 to 128 |
0 |
Mean subtraction for red channel |
beta-b |
float |
0 to 1 |
1 |
Scaling for blue channel |
beta-g |
float |
0 to 1 |
1 |
Scaling for green channel |
beta-r |
float |
0 to 1 |
1 |
Scaling for red channel |
Once the objects are detected, you can move to the next advanced blocks.
Machine Learning with preprocessing in software
VVAS can also be used on the Platform that may not have hardware accelerated pre-processing (multiscaler kernel) due to any reason. In this case the preprocessing needs to be performed in software. The scaling and color space conversation are done by open source gstremaer plugins and the normalization and scaling are done by Vitis AI library.
Below is the pipe pile without vvas preprocessor.
gst-launch-1.0 -v filesrc location=/home/root/videos/FACEDETECT.mp4 \
  ! qtdemux ! h264parse ! omxh264dec internal-entropy-buffers=2 ! queue \
  ! videoscale ! queue \
  ! videoconvert ! queue \
  ! vvas_xinfer infer-config=kernel_densebox_320_320.json name=infer1 ! queue \
  ! videoscale ! queue \
  ! videoconvert ! queue \
  ! video/x-raw, width=1920, height=1080, format=NV12 \
  ! kmssink plane-id=34 bus-id="a0130000.v_mix" render-rectangle="<0,0,1920,1080>"
The following is sample JSON kernel_densebox_320_320.json for running the densebox_320_320 DPU model that detects a human face.
{
  "vvas-library-repo": "/usr/lib/",
  "inference-level": 1,
  "attach-ppe-outbuf": false,
  "kernel" : {
     "library-name":"libvvas_xdpuinfer.so",
     "config": {
        "batch-size" : 0,
        "model-name" : "densebox_320_320",
        "model-class" : "FACEDETECT",
        "model-format" : "BGR",
        "model-path" : "/usr/share/vitis_ai_library/models/",
        "run_time_model" : false,
        "need_preprocess" : true,
        "performance_test" : false,
        "debug_level" : 1,
        "max-objects":3
     }
  }
}

kernel_densebox_320_320.json
You can observe that in above pipeline preprocess-config property of vvas_xinfer plug-in is not set. This means we do not want to use hardware accelerated pre-processing block of vvas_xinfer plug-in and the videoscale and videoconvert GStreamer opensource plug-ins are used to convert the format and colour of input image as required by DPU model and Kmssink. The caps are not mentioned before vvas_xinfer and after the decoder as vvas_xinfer auto negotiates the caps based on the model selected.
Since we want Vitis AI library to perform the required pre-processing in software, we need to set need_preprocess to true in kernel_densebox_320_320.json.
Although all these operations can be achieved in software, the performance impact is substantial. So rest of the document consider that the hardware accelerated pre-processing (using multiscaler kernel) is part of the provided hardware.
Note
Though you may not observe any ML Inference information on monitor with this pipeline, but we should see the input image getting displayed in monitor by this pipeline.
Bounding Box block
To view the result of ML Inference displayed on the monitor, you should draw the results on an image. The vvas_xboundingbox software acceleration library comes in handy in this case. This library along with VVAS infrastructure plug-in vvas_xfilter can provide the bounding box functionality.
Sample video pipeline for adding bounding box block is shown as below
Sample Video Pipeline adding Bounding Box block
GStreamer command:
gst-launch-1.0 -v filesrc location=/home/root/videos/FACEDETECT.mp4 \
  ! qtdemux ! h264parse ! omxh264dec internal-entropy-buffers=2 ! queue \
  ! vvas_xinfer preprocess-config=kernel_pp_facedectect.json infer-config=kernel_densebox_320_320.json name=infer1 ! queue \
  ! vvas_xfilter kernels-config="kernel_boundingbox.json" ! queue \
  ! kmssink plane-id=34 bus-id="a0130000.v_mix" render-rectangle="<0,0,1920,1080>"
The following sample JSON file kernel_boundingbox.json is used to draw a bounding box on detected objects.
{
  "vvas-library-repo": "/usr/lib/",
  "element-mode":"inplace",
  "kernels" :[
    {
      "library-name":"libvvas_xboundingbox.so",
      "config": {
        "model-name" : "densebox_320_320",
        "display_output" : 1,
        "font_size" : 0.5,
        "font" : 3,
        "thickness" : 3,
        "debug_level" : 1,
        "label_color" : { "blue" : 0, "green" : 0, "red" : 0 },
        "label_filter" : [ "class", "probability" ],
        "classes" : [
        ]
      }
    }
  ]
}
With addition of bounding box, your pipeline for single stream is complete.
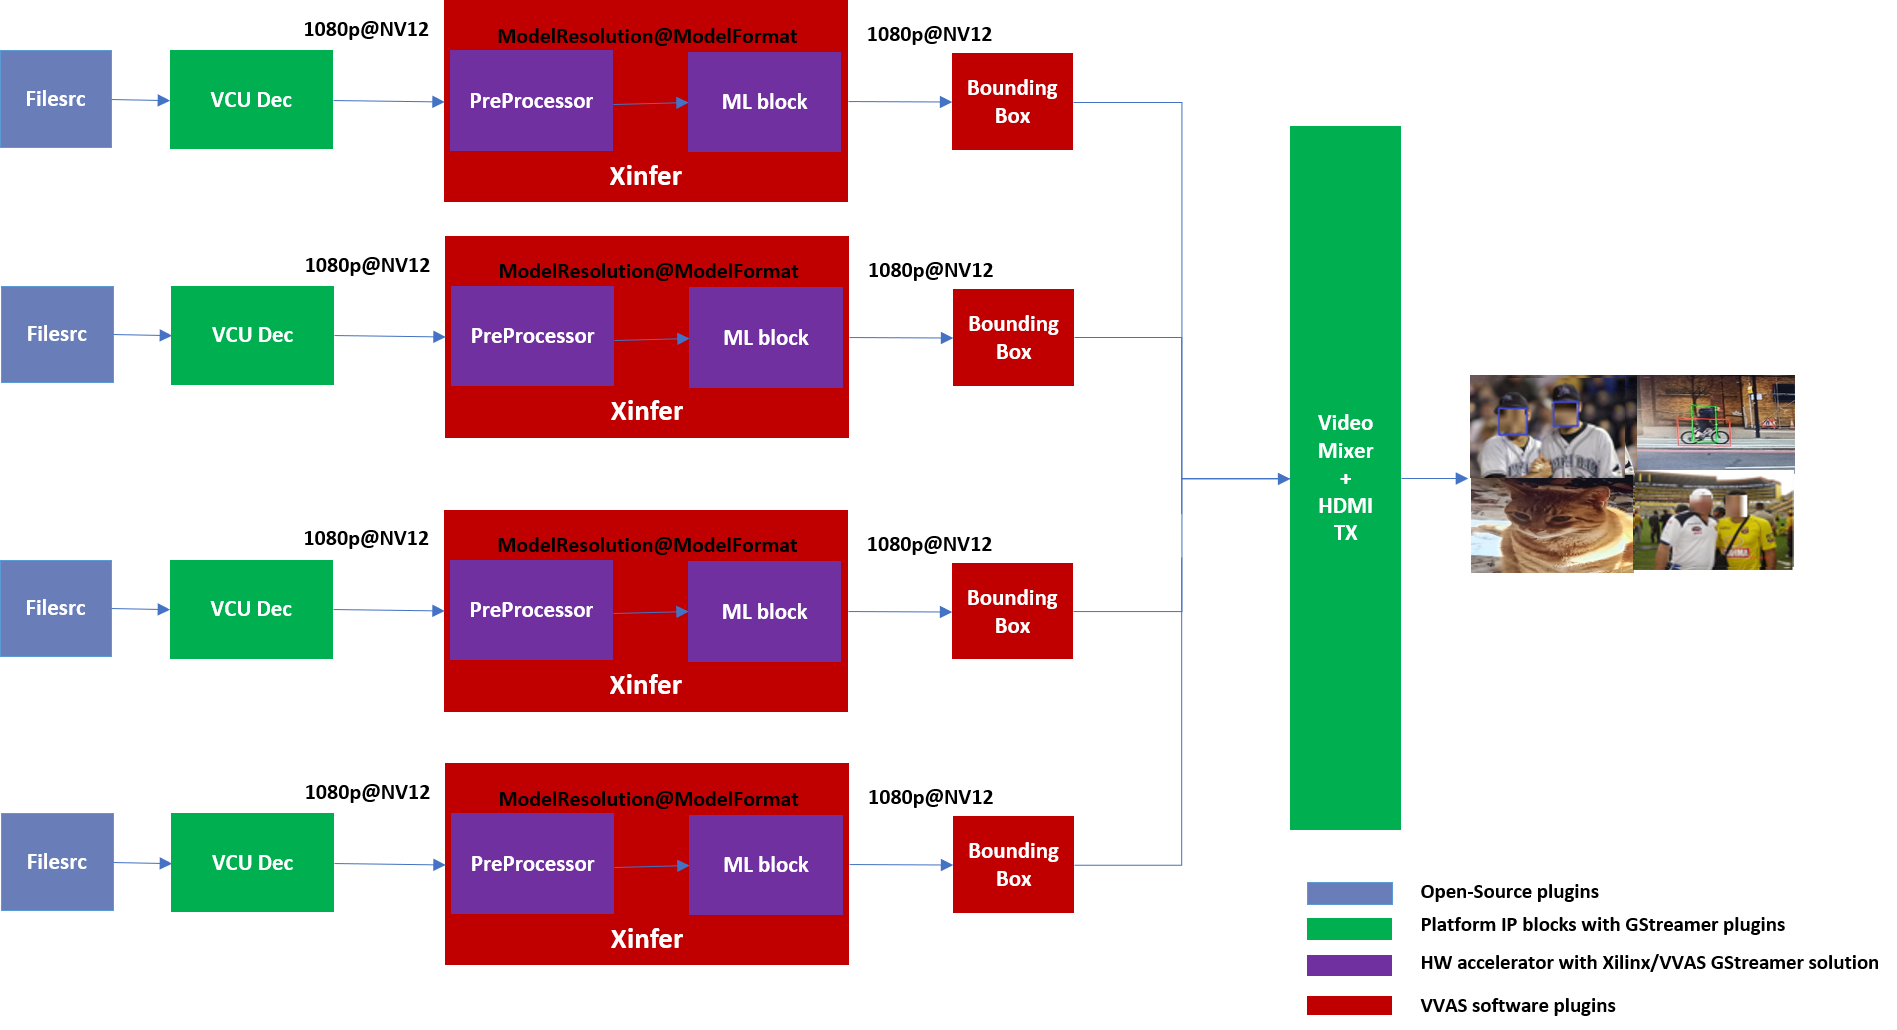
Four Channel ML pipeline
Now, constructing a four-channel pipeline is simply duplicating the above pipeline four times for different models and positioning each output video appropriately on screen on different plane-ids.
Below Vitis AI models are used as example in this tutorial. Refer Vitis AI User Documentation to compile different models using arch.json file from release package.
densebox_320_320 (Face detection)
yolov3_adas_pruned_0_9 (Object detection)
resnet50 (Classification)
refinedet_pruned_0_96 (Pedestrian detector)
A reference pipeline for four channel ML is given below.
gst-launch-1.0 -v \
 filesrc location=/home/root/videos/FACEDETECT.mp4 \
  ! qtdemux ! h264parse ! omxh264dec internal-entropy-buffers=2 ! queue \
  ! vvas_xinfer preprocess-config=kernel_pp_facedectect.json infer-config=kernel_densebox_320_320.json name=infer1 ! queue \
  ! vvas_xfilter kernels-config="kernel_boundingbox.json" ! queue \
  ! kmssink plane-id=34 bus-id="a0130000.v_mix" render-rectangle="<0,0,1920,1080>" \
filesrc location=/home/root/videos/YOLOV3.mp4 \
  ! qtdemux ! h264parse ! omxh264dec internal-entropy-buffers=2 ! queue \
  ! vvas_xinfer preprocess-config=kernel_pp_yolov3.json infer-config=kernel_yolov3_adas_pruned_0_9.json name=infer2 ! queue \
  ! vvas_xfilter kernels-config="kernel_boundingbox.json" ! queue \
  ! kmssink plane-id=35 bus-id="a0130000.v_mix" render-rectangle="<1920,0,1920,1080>"
filesrc location=/home/root/videos/CLASSIFICATION.mp4 \
  ! qtdemux ! h264parse ! omxh264dec internal-entropy-buffers=2 ! queue \
  ! vvas_xinfer preprocess-config=kernel_pp_resnet50.json infer-config=kernel_resnet50.json name=infer3 ! queue \
  ! vvas_xfilter kernels-config="kernel_boundingbox.json" ! queue \
  ! kmssink plane-id=36 bus-id="a0130000.v_mix" render-rectangle="<0,1080,1920,1080>"
filesrc location=/home/root/videos/REFINEDET.mp4 \
  ! qtdemux ! h264parse ! omxh264dec internal-entropy-buffers=2 ! queue \
  ! vvas_xinfer preprocess-config=kernel_pp_refinedet.json infer-config=kernel_refinedet_pruned_0_96.json name=infer4 ! queue \
  ! vvas_xfilter kernels-config="kernel_boundingbox.json" ! queue \
  ! kmssink plane-id=37 bus-id="a0130000.v_mix" render-rectangle="<1920,1080,1920,1080>"
The above command is available in the release package as multichannel_ml.sh.
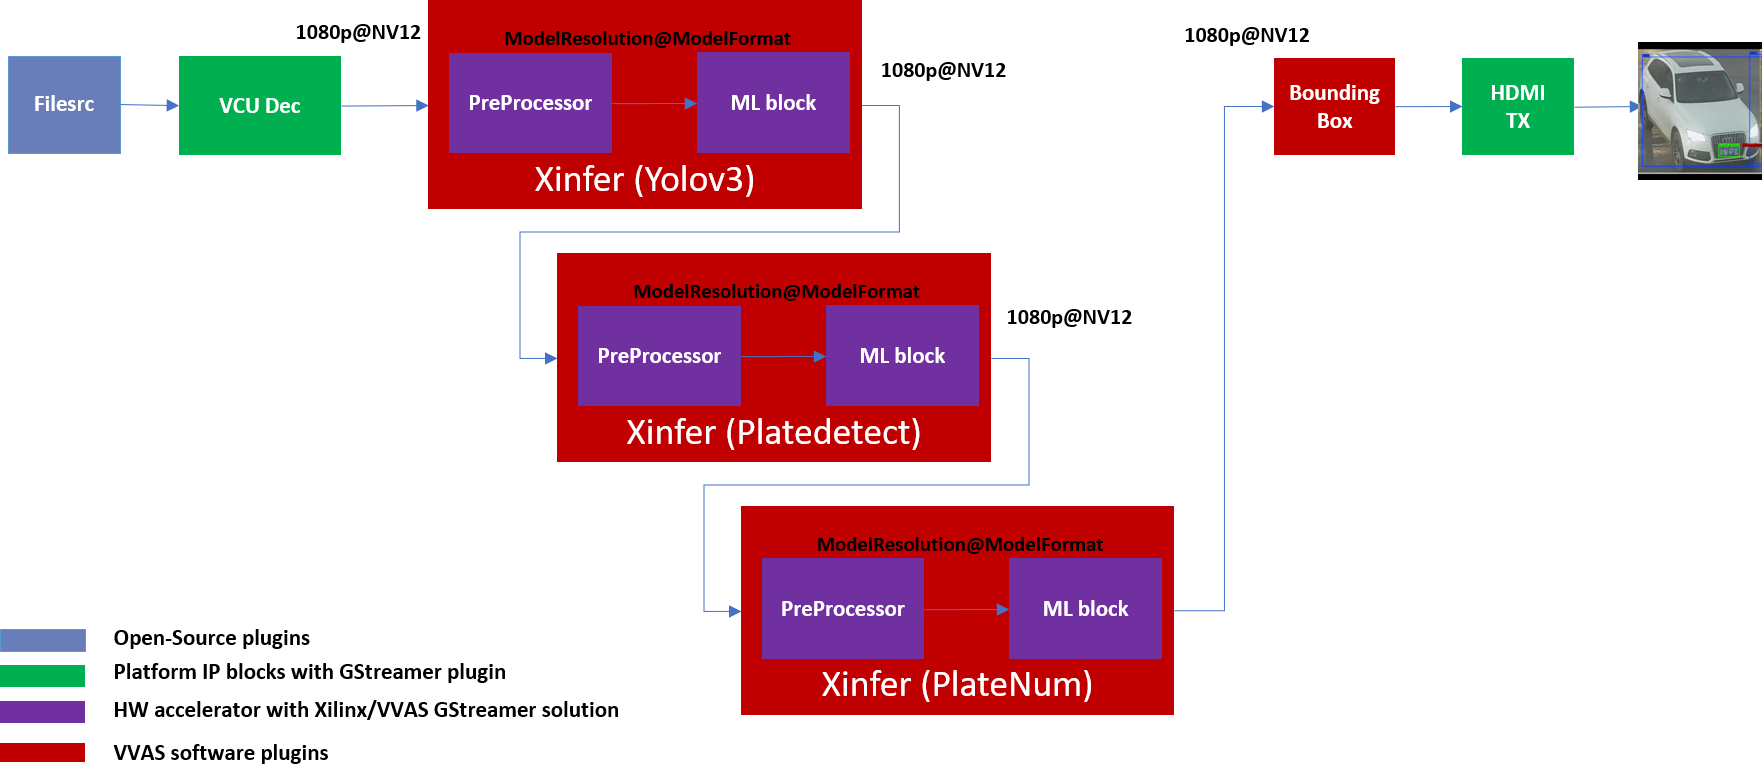
VVAS Cascaded Machine Learning usecase
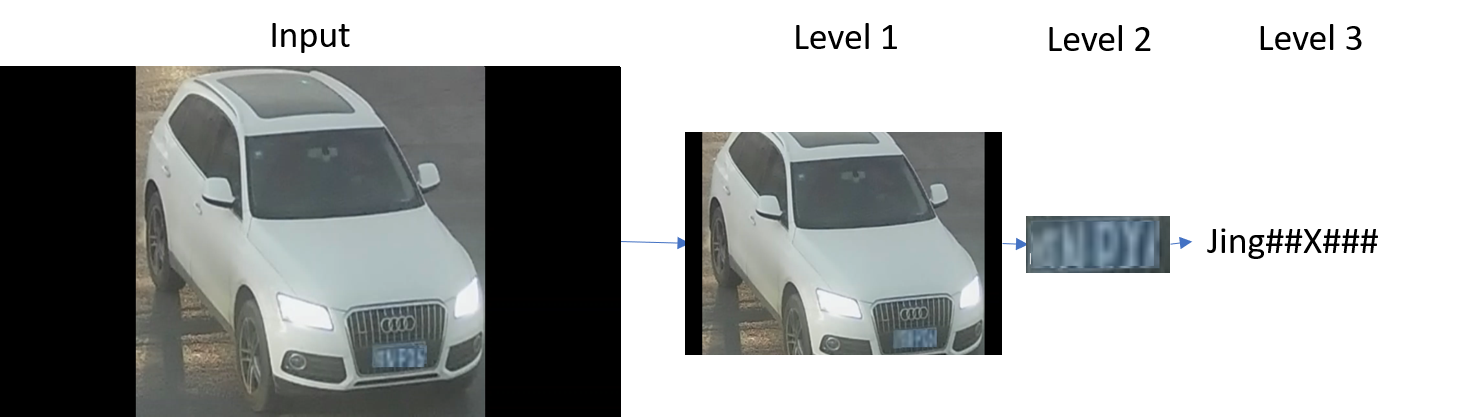
There might be multiple use cases where the user wants to process inference on the required portion of image only and not on full image. One of the examples is to detect the faces of people sitting inside a car. In this case, if multiple cars are present in frame, the system must identify the car by some parameters like car number plate, color or make of the car. This information is needed to process the face of the person inside the car. The scenario mentioned above required multiple levels of ML inference operation in serial or cascade manner where the following inference block works only on the output of the previous inference block.
This tutorial demonstrates how to build such types of use cases using VVAS with minimal configuration and with ease.
In this tutorial, the end goal is to figure out the plate number of Cars in the frame. We will be using the plate num model to detect the number plate. This model expects image that has number in it, no extra border. So, to feed the image of the number plate to the plate num model one should crop the plate from the frame and provide it to plate num model after doing Mean Subtraction and Scale Normalization. So, to achieve this use case 3 levels of ML inference operations are performed. First level ML inference detect the cars in the frame, 2nd level detects the number plate in the provided image of the car and 3rd level finds the number in the plate.
Below diagram express the use case mentioned above.
By the end of this tutorial, you should be able to build and run the following pipeline.
Cascade Building Blocks
Different ML models supported by the DPU have different preprocessing requirements that can include resize, mean subtraction, scale normalization etc. Additionally, the DPU expects input images in BGR/RGB formats. The VCU decoder at the input of the DPU generates NV12 images. Depending on the model selected, the preprocessor block is expected to support the following operations:
Resize
Color space conversion
Mean Subtraction
Scale Normalization
Let us begin with constructing incremental video pipeline based on the components selected.
First Level inference
We start to add the first level of ML inference that will detect the cars. This can be achieved using yolov3_voc model.

Pipeline to demonstrate the car detection from frame and display output to monitor is as mentioned below.
gst-launch-1.0 -v  \
  filesrc location=/home/root/videos/platedetect_sample.mp4   \
   ! qtdemux ! h264parse ! omxh264dec internal-entropy-buffers=2 ! queue  \
   ! vvas_xinfer preprocess-config=kernel_pp_yolov3.json infer-config=kernel_yolov3_voc.json name=infer1 ! queue  \
   ! vvas_xfilter kernels-config="kernel_boundingbox.json" ! queue  \
   ! kmssink plane-id=34 bus-id="a0130000.v_mix"
Below are the sample json files.
{
  "xclbin-location":"/media/sd-mmcblk0p1/dpu.xclbin",
  "vvas-library-repo": "/usr/lib",
  "device-index": 0,
  "kernels" :[
    {
      "kernel-name":"v_multi_scaler:v_multi_scaler_1",
      "library-name": "libvvas_xpreprocessor.so",
      "config": {
        "alpha_r" : 0,
        "alpha_g" : 0,
        "alpha_b" : 0,
        "beta_r" : 0.25,
        "beta_g" : 0.25,
        "beta_b" : 0.25,
        "inference-level" : 1,
        "debug_level" : 0
      }
    }
  ]
}

kernel_pp_yolov3.json
{
  "vvas-library-repo": "/usr/lib/",
  "inference-level": 1,
  "attach-ppe-outbuf": false,
  "kernel" : {
    "library-name":"libvvas_xdpuinfer.so",
    "config": {
      "batch-size" : 0,
      "model-name" : "yolov3_voc",
      "model-class" : "YOLOV3",
      "model-format" : "RGB",
      "model-path" : "/usr/share/vitis_ai_library/models/",
      "run_time_model" : false,
      "need_preprocess" : false,
      "performance_test" : false,
      "debug_level" : 1,
      "max-objects":3
    }
  }
}

kernel_yolov3_voc.json
Here we need to understand the complexity which is taken care of by the VVAS framework in a very easy user interface. The output of VCU Decoder is 1920X1080 NV12 and the requirement for yolov3_voc is 360X360 RGB. This conversion is taken care of by the preprocessor block which is part of vvas_xinfer plugin. Not only the color and format conversion, the preprocessor block also does Mean Subtraction and Scale Normalization. Although all these operations can be achieved in software, the performance impact is substantial.
For simplicity, a common json file is used for bounding box. Please refer vvas_xboundingbox for more detailed parameters of bounding box.
{
  "vvas-library-repo": "/usr/lib/",
  "element-mode":"inplace",
  "kernels" :[
    {
      "library-name":"libvvas_xboundingbox.so",
      "config": {
        "model-name" : "densebox_320_320",
        "display_output" : 1,
        "font_size" : 0.5,
        "font" : 3,
        "thickness" : 3,
        "debug_level" : 2,
        "label_color" : { "blue" : 0, "green" : 0, "red" : 0 },
        "label_filter" : [ "class", "probability" ],
        "classes" : [
        ]
      }
    }
  ]
}

kernel_boundingbox.json
Second Level inference
First level inference detects the car in the frame, now we need to find the number plate in the area where the car is detected. So, lets add second level ML Inference with plate detect model just after the first level ML Inference with yolov3_voc model.
Below is the GStreamer pipe demonstrating the number plate detect after car detect and display output to monitor using the kmssink plugin.
gst-launch-1.0 -v  \
 filesrc location=/home/root/videos/platedetect_sample.mp4   \
  ! qtdemux ! h264parse ! omxh264dec internal-entropy-buffers=2 ! queue  \
  ! vvas_xinfer preprocess-config=kernel_pp_yolov3.json infer-config=kernel_yolov3_voc.json name=infer1 ! queue  \
  ! vvas_xinfer preprocess-config=kernel_pp_platedetect.json infer-config=kernel_platedetect.json name=infer2 ! queue  \
  ! vvas_xfilter kernels-config="kernel_boundingbox.json" ! queue  \
  ! kmssink plane-id=34 bus-id="a0130000.v_mix"
Below are the sample json files for 2nd level.
{
  "xclbin-location":"/media/sd-mmcblk0p1/dpu.xclbin",
  "vvas-library-repo": "/usr/lib",
  "device-index": 0,
  "kernels" :[
    {
      "kernel-name":"v_multi_scaler:v_multi_scaler_1",
      "library-name": "libvvas_xpreprocessor.so",
      "config": {
        "alpha_r" : 128,
        "alpha_g" : 128,
        "alpha_b" : 128,
        "beta_r" : 1,
        "beta_g" : 1,
        "beta_b" : 1,
        "inference-level" : 2,
        "debug_level" : 0
      }
    }
  ]
}

kernel_pp_platedetect.json
{
  "vvas-library-repo": "/usr/lib/",
  "inference-level": 2,
  "attach-ppe-outbuf": false,
  "kernel" : {
    "library-name":"libvvas_xdpuinfer.so",
    "config": {
      "batch-size" : 0,
      "model-name" : "plate_detect",
      "model-class" : "PLATEDETECT",
      "model-format" : "BGR",
      "model-path" : "/usr/share/vitis_ai_library/models/",
      "run_time_model" : false,
      "need_preprocess" : false,
      "performance_test" : false,
      "debug_level" : 1,
      "max-objects":3
    }
  }
}

kernel_platedetect.json
Please note the “inference-level” parameter in both the json is 2 which tells the framework that this model is placed at level 2 in full use case.
As we discussed, there might be multiple cars in frame and we need to find the number plate for each of them so when the image, along with the metadata detected in first level reaches 2nd- level, the pre-processing stage at 2nd level inference first crops the car found in first level and scale down to format/resolution required by plate detect model. All this cropping and scaling is done by preprocessor block without user know about it.
Similarly, when data passes to 3rd level, vvas framework reads the metadata and crop the number plate from full image, scale to required format and pass it to plate number model which find the number inside the image provided to model.
Third Level inference
Below is the full GStreamer pipe demonstrating the number plate detect and display using the kmssink plugin.
gst-launch-1.0 -v  \
 filesrc location=/home/root/videos/platedetect_sample.mp4   \
  ! qtdemux ! h264parse ! omxh264dec internal-entropy-buffers=2 ! queue  \
  ! vvas_xinfer preprocess-config=kernel_pp_yolov3.json infer-config=kernel_yolov3_voc.json name=infer1 ! queue  \
  ! vvas_xinfer preprocess-config=kernel_pp_platedetect.json infer-config=kernel_platedetect.json name=infer2 ! queue  \
  ! vvas_xinfer preprocess-config=kernel_pp_plate_num.json infer-config=kernel_plate_num.json name=infer3 ! queue  \
  ! vvas_xfilter kernels-config="kernel_boundingbox.json" ! queue  \
  ! kmssink plane-id=34 bus-id="a0130000.v_mix"
Below are the sample json files for 3rd level.
{
  "xclbin-location":"/media/sd-mmcblk0p1/dpu.xclbin",
  "vvas-library-repo": "/usr/lib",
  "device-index": 0,
  "kernels" :[
    {
      "kernel-name":"v_multi_scaler:v_multi_scaler_1",
      "library-name": "libvvas_xpreprocessor.so",
      "config": {
        "alpha_r" : 128,
        "alpha_g" : 128,
        "alpha_b" : 128,
        "beta_r" : 1,
        "beta_g" : 1,
        "beta_b" : 1,
        "inference-level" : 3,
        "debug_level" : 0
      }
    }
  ]
}

kernel_pp_plate_num.json
{
  "vvas-library-repo": "/usr/lib/",
  "inference-level": 3,
  "attach-ppe-outbuf": false,
  "kernel" : {
    "library-name":"libvvas_xdpuinfer.so",
    "config": {
      "batch-size" : 0,
      "model-name" : "plate_num",
      "model-class" : "PLATENUM",
      "model-format" : "BGR",
      "model-path" : "/usr/share/vitis_ai_library/models/",
      "run_time_model" : false,
      "need_preprocess" : false,
      "performance_test" : false,
      "debug_level" : 1,
      "max-objects":3
    }
  }
}

kernel_plate_num.json
Please note the “inference-level” parameter in both the json is 3 which tells the framework that this model placed at level 3 in full use case.
Hope you enjoyed the tutorial.
Now, let’s look into implementing the design and executing using Vitis AI and VVAS.
Example Design Creation
This section covers the steps to create a complete example design that comprise Base Platform, Hardware Accelerators (Kernels) and Software required to run Machine Learning Applications explained in thie Tutorial.
This tutorial needs video codec unit (VCU) decoder, Video Mixer and HDMI Tx, hence select a platform having these IPs.
This tutorial uses the VVAS zcu104_vcuDec_vmixHdmiTx platform because it supports VCU decoder, Video mixer and HDMI Tx subsystem.
For more information on Vitis platforms, see Vitis Software Platform.
Note
VVAS platform zcu104_vcuDec_vmixHdmiTx may not be performance optimal. This platform is made available as reference and for tutorial demonstration.
Note
VVAS platform zcu104_vcuDec_vmixHdmiTx adds patch to irps5401 driver for zcu104 board to support multi thread execution of VAI models.
This patch shouldn’t be applied to other boards
and is not part of the official Xilinx released 2021.2 Petalinux.
Build Platform
The first and foremost step is to build this platform from its sources.
The platform provides the following hardware and software components of the pipeline:
VCU hardened IP block
Video Mixer and HDMI Tx soft IP blocks
Opensource framework like GStreamer, OpenCV
Vitis AI 2.0 libraries
Xilinx Runtime (XRT)
omxh264dec GStreamer plugin
kmmsink GStreamer plugin
VVAS GStreamer plugins and libraries
vvas_xinfer GStreamer plugin
vvas_xdpuinfer software accelerator library
vvas_xboundingbox software accelerator library
Steps for building the platform:
1. Download the VVAS git repository. Let the path where VVAS repo is downloaded be represented as <VVAS_REPO>.
git clone https://github.com/Xilinx/VVAS.git
2. Setup the toolchain
source <2021.2.1_Vitis>/settings64.sh
source <2021.2_Petalinux>/settings.sh
source <2021.2_XRT>/setenv.sh
3. Change directory to the platform
cd <VVAS_REPO>/VVAS/vvas-platforms/Embedded/zcu104_vcuDec_vmixHdmiTx
4. Build the platform
make
After the build is finished, the platform is available at
<VVAS_REPO>/VVAS/vvas-platforms/Embedded/zcu104_vcuDec_vmixHdmiTx/platform_repo/xilinx_zcu104_vcuDec_vmixHdmiTx_202120_1/export/xilinx_zcu104_vcuDec_vmixHdmiTx_202120_1/.
Let the path to platform be represented as <PLATFORM_PATH>.
Vitis Example Project
This section covers the steps to create a final sdcard image from the platform created in previous step and hardware accelerators, also called as kernels.
A Vitis build is required to stitch all the discussed hardware accelerators to the platform design. The hardware accelerators required are:
DPU (Xilinx ML IP)
Multiscaler (Xilinx Preprocessing IP)
The Xilinx deep learning processor unit (DPU) is a configurable computation engine dedicated for convolutional neural networks. Refer to DPU-TRD for more information and compiling the DPU accelerator.
The multichannel_ml example design adds two instances of B3136 DPU configuration and a single instance of Multiscaler to the zcu104_vcuDec_vmixHdmiTx platform.
Steps for building Vitis example project:
1. Download Vitis-AI. Let the path where Vitis-AI is downloaded be represented as <VITIS_AI_REPO>.
git clone https://github.com/Xilinx/Vitis-AI.git
cd Vitis-AI/
git checkout tags/v2.0 -b v2.0
2. Change directory to example project
cd <VVAS_REPO>/VVAS/vvas-examples/Embedded/multichannel_ml/
3. Compile the project
make PLATFORM=<PLATFORM_PATH>/xilinx_zcu104_vcuDec_vmixHdmiTx_202120_1.xpfm DPU_TRD_PATH=<VITIS_AI_REPO>/Vitis-AI/dsa/DPU-TRD/ HW_ACCEL_PATH=<VVAS_REPO>/VVAS/vvas-accel-hw/
Note
Depending on the build machine capacity, building this example project can take about 3 or more hours to compile.
Once the build is completed, you can find the sdcard image at
<VVAS_REPO>/VVAS/vvas-examples/Embedded/multichannel_ml/binary_container_1/sd_card.img.
Board bring up
Burn the SD card image
sd_card.img(Either from Release package or generated) using a SD card flashing tool like dd, Win32DiskImager, or Balena Etcher.Boot the board using this SD card.
Once the board is booted, resize the ext4 partition to extend to full SD card size:
resize-part /dev/mmcblk0p2
From the host system, copy the video files on the board:
mkdir -p ~/videos
scp -r <Path to Videos> root@<board ip>:~/videos
Note
Password for root user is root.
Note
Video files are not provided as part of release package.
Copy the model json files and scripts on the board:
scp -r <RELEASE_PATH>/vvas_1.1_multichannel_ml_zcu104/scripts_n_utils/ root@<board ip>:~
Copy the Vitis-AI model files on board:
mkdir -p /usr/share/vitis_ai_library/models
scp -r <RELEASE_PATH>/vvas_1.1_multichannel_ml_zcu104/vai_models/* /usr/share/vitis_ai_library/models/
Execute four channel GStreamer pipeline script:
cd scripts_n_utils/multichannel_ml/
./multichannel_ml.sh
You can now see the 4-channel mixed video on the HDMI monitor.
Execute multi level cascade Gstreamer pipeline scripts:
cd scripts_n_utils/cascade/
./1_level_cascade.sh
./2_level_cascade.sh
./3_level_cascade.sh
Known Issues
In Multi Channel ML design, the design is congested due to having multiple logic blocks including 2 DPU IPs and it is not able to meet timing with few slack violations. They are ignored using vItis compiler switch “skipTimingCheckAndFrequencyScaling”.
In MultichannelML design, on rebooting the board lead to crash dump. The crash dump is during turning off board, but booting of board is succesful without any issue.
When we are executing 3 level cascade pipeline in a loop, by re-starting the pipeline after EOS, we start seeing shift in images. This issue is seen only in 3 stage ML cascading pipeline and only when we do start/stop in a loop. This is random in nature. The issue is not seen when we kept the same 3 stage cascade pipeline running continuously for 12 hrs.