Smart Model Select Application
Smart Model Select is an example application to demonstrate inferencing using 8 Machine Learning (ML) models supported by VVAS. User can select the input source, ML model to be used and the output option, like display on monitor or dump the results to file.
Smart Model Select application design is built on zcu104 development board which, along with VVAS, provides a complete framework for building and customizing video platforms with different pipelines stages. zcu104 development board can support below mentioned pipeline stages:
Capture Pipelines
Video Processing Pipelines
Acceleration Pipelines
Output Pipelines
Smart Model Select design does not support Capture Pipeline.
Features
Smart Model Select application supports below mentioned features
Note
Supported Models are listed below. For more information please contact vvas_discuss@amd.com.
Supports ML Models - refinedet_VOC_tf - efficientdet_d2_tf - ssd_mobilenet_v2_coco_tf - yolov3_voc_tf - face_mask_detection_pt - chen_color_resnet18_pt - vehicle_make_resnet18_pt - vehicle_type_resnet18_pt
Display Port for display
H264/H265 Decode
Input can be from file or rtsp source
Prerequisites
Before attempting the execution of application, please ensure that all the pre-requisites mentioned below are fulfilled.
Hardware Requirements
Micro USB cable, connected to laptop or desktop computer for the terminal emulator
Micro SD card, 8 GB or larger, class 10 (recommended)
Display port 1.2 supported Monitor with 1920x1080 as max resolution
Display port 1.2 cable
Software/Tools Requirements
Serial terminal emulator (for example, Tera Term)
Balena etcher or equivalent flashing tool to flash the SD Card image
System Requirements
Board must have access to the internet and be accessible from your development system
Application Design
Smart Model Select application design has a platform and integrated accelerator functions.
Platform is nothing but collection of hardware as well as software components required to build a solution.
Prebuilt design for Smart Model Select has been provided as part of this VVAS release.
You may download this ready to use design by following the link Download pre-built binaries and
directly jump to Preparing Setup section describing how to prepare the setup and execute the example application.
If for some reason, one wants to build the design from scratch, then refer to the section Build Design that describes the steps to build the platform, accelerator functions and finally integrate these to create complete Design for Smart Model Select application.
Note
VVAS platform zcu104_vcuDec_DP may not be performance optimal. This platform is made available as reference along with Smart Model Select Application.
Pre-built binaries
Ready to use Prebuilt binaries are provided with this VVAS release. You can download these binaries and required supporting files to quickly run the example application.
Note
Pre-built binaries for this example design are available at the link mentioned below. You may also build the complete example design following the steps mentioned in Build Design section. For more information, you may contact vvas_discuss@amd.com.
Create a folder, say PREBUILT_BINARIES, where pre-built binaries are to be downloaded.
Download from vvas_smart_model_select_2022.2_zcu104.zip and unzip the downloaded package vvas_smart_model_select_2022.2_zcu104.zip.
unzip vvas_smart_model_select_2022.2_zcu104.zip
Prebuilt binaries package includes
sd_card.img: Image to be flashed on the SD Card on the zcu104 board.sdk.sh: This is required to generate sysroot. Sysroot is required only if one wants to build the VVAS plugins and libraries. You do not need this if you simply want to execute the pre-built application.models: label.json files for the supported DPU models on this platform.app: Contains application executable and input configuration/json files.arch.json: Represents DPU architecture.
Note
The pre-buit binaries available for download from the link mentioned above contain software copyrighted by Xilinx and third parties subject to one or more open source software licenses that are contained in the source code files available for download at the link mentioned below. Please see the source code for the copyright notices and licenses applicable to the software in these binary files. By downloading these binary files, you agree to abide by the licenses contained in the corresponding source code
Open-Source Licenses and Source code - VVAS 3.0
The source code that was used to build these pre-built binaries and the corresponding licenses can be downloaded from Source Licenses and Source Code
Once you have downloaded the prebuilt binaries, you need to prepare the setup to execute the application, as shown in the next section.
Preparing the setup
It is assumed that all the pre-requisites are fulfilled, and we are ready to setup the board and execute the example application. There are few steps that are required only for the first time when the zcu104 board is not flashed with the sd_card image for smart_model_select application. You may skip these steps if zcu104 board has already been flashed with the required sd_card image.
One time setup
Flash the SD Card with the
sd_card.imgusing any SD card flashing tool like dd, Win32DiskImager, or BalenaEtcher.If using pre-built binaries, then sd_card.img is located as
<PREBUILT_BINARIES>/vvas_smart_model_select_2022.2_zcu104/sd_card.img
If you have built the platform yourself, then sd_card.img would be located at
<VVAS_SOURCES>/VVAS/vvas-examples/Embedded/smart_model_select/binary_container_1/sd_card.img
Insert this SD card in the SD card slot on the zcu104 board and boot the board.
After booting up the board, run below command to extend the root filesystem partition to its 100% size. This is useful in copying input video streams and storing output files from example application.
resize-part /dev/mmcblk0p2
Copy the <PREBUILT_BINARIES>/vvas_smart_model_select_2022.2_zcu104/app folder of the application onto home folder of the board.
scp -r <PREBUILT_BINARIES>/vvas_smart_model_select_2022.2_zcu104/app root@<board ip>:~/
After copying,
chmod~/app/setup.sh and ~/app/smart_model_select to make them executable on the board.chmod 777 ~/app/smart_model_select chmod 777 ~/app/setup.sh
On the host, download and untar the Vitis-AI models:
mkdir <PREBUILT_BINARIES>/models
cd <PREBUILT_BINARIES>/models

wget https://www.xilinx.com/bin/public/openDownload?filename=refinedet_VOC_tf-zcu102_zcu104_kv260-r3.0.0.tar.gz
tar xzf refinedet_VOC_tf-zcu102_zcu104_kv260-r3.0.0.tar.gz
wget https://www.xilinx.com/bin/public/openDownload?filename=efficientdet_d2_tf-zcu102_zcu104_kv260-r3.0.0.tar.gz
tar xzf efficientdet_d2_tf-zcu102_zcu104_kv260-r3.0.0.tar.gz
wget https://www.xilinx.com/bin/public/openDownload?filename=ssd_mobilenet_v2_coco_tf-zcu102_zcu104_kv260-r3.0.0.tar.gz
tar xzf ssd_mobilenet_v2_coco_tf-zcu102_zcu104_kv260-r3.0.0.tar.gz
wget https://www.xilinx.com/bin/public/openDownload?filename=yolov3_voc_tf-zcu102_zcu104_kv260-r3.0.0.tar.gz
tar xzf yolov3_voc_tf-zcu102_zcu104_kv260-r3.0.0.tar.gz
wget https://www.xilinx.com/bin/public/openDownload?filename=face_mask_detection_pt-zcu102_zcu104_kv260-r3.0.0.tar.gz
tar xzf face_mask_detection_pt-zcu102_zcu104_kv260-r3.0.0.tar.gz
wget https://www.xilinx.com/bin/public/openDownload?filename=chen_color_resnet18_pt-zcu102_zcu104_kv260-r3.0.0.tar.gz
tar xzf chen_color_resnet18_pt-zcu102_zcu104_kv260-r3.0.0.tar.gz
wget https://www.xilinx.com/bin/public/openDownload?filename=vehicle_make_resnet18_pt-zcu102_zcu104_kv260-r3.0.0.tar.gz
tar xzf vehicle_make_resnet18_pt-zcu102_zcu104_kv260-r3.0.0.tar.gz
wget https://www.xilinx.com/bin/public/openDownload?filename=vehicle_type_resnet18_pt-zcu102_zcu104_kv260-r3.0.0.tar.gz
tar xzf vehicle_type_resnet18_pt-zcu102_zcu104_kv260-r3.0.0.tar.gz
Modify the ‘top_k’ in ‘prototxt’ files for the below required models:
sed -i 's!top_k : 5!top_k : 1!' <PREBUILT_BINARIES>/models/chen_color_resnet18_pt/chen_color_resnet18_pt.prototxt
sed -i 's!top_k : 5!top_k : 1!' <PREBUILT_BINARIES>/models/vehicle_make_resnet18_pt/vehicle_make_resnet18_pt.prototxt
sed -i 's!top_k : 5!top_k : 1!' <PREBUILT_BINARIES>/models/vehicle_make_resnet18_pt/vehicle_make_resnet18_pt.prototxt
Create /usr/share/vitis_ai_library/models folder on the board and copy the Vitis-AI models into it:
mkdir -p /usr/share/vitis_ai_library/models
scp -r <PREBUILT_BINARIES>/models/* root@<board ip>/usr/share/vitis_ai_library/models/
Copy label.json for each model:
scp <PREBUILT_BINARIES>/vvas_smart_model_select_2022.2_zcu104/models/face_mask_detection_pt/label.json root@<board ip>/usr/share/vitis_ai_library/models/face_mask_detection_pt/
scp <PREBUILT_BINARIES>/vvas_smart_model_select_2022.2_zcu104/models/ssd_mobilenet_v2_coco_tf/label.json root@<board ip>/usr/share/vitis_ai_library/models/ssd_mobilenet_v2_coco_tf/
scp <PREBUILT_BINARIES>/vvas_smart_model_select_2022.2_zcu104/models/yolov3_voc_tf/label.json root@<board ip>/usr/share/vitis_ai_library/models/yolov3_voc_tf/
Running the application
This section will elaborate on the usage of the application and various options with it.
Every time the board is booted, execute the steps mentioned below
Run setup.sh on the board, this will set the alpha channel of the display port and copy label json files related to each model.
cd /home/root/app/
./setup.sh
Export the environment variable “XCLBIN_PATH” with path pointing to xclbin. If it is not exported, /media/sd-mmcblk0p1/dpu.xclbin will be the default xclbin path.
Run the command to execute the application .. code-block:
./smart_model_select
When the application starts executing, you can observe the Fig 1 coming up in the display. This menu displays various models supported by the application and options on either side of the image are for input sources and output sinks supported. All these options carry an index number alongside, which user need to enter in sequence to create the pipeline of choice.
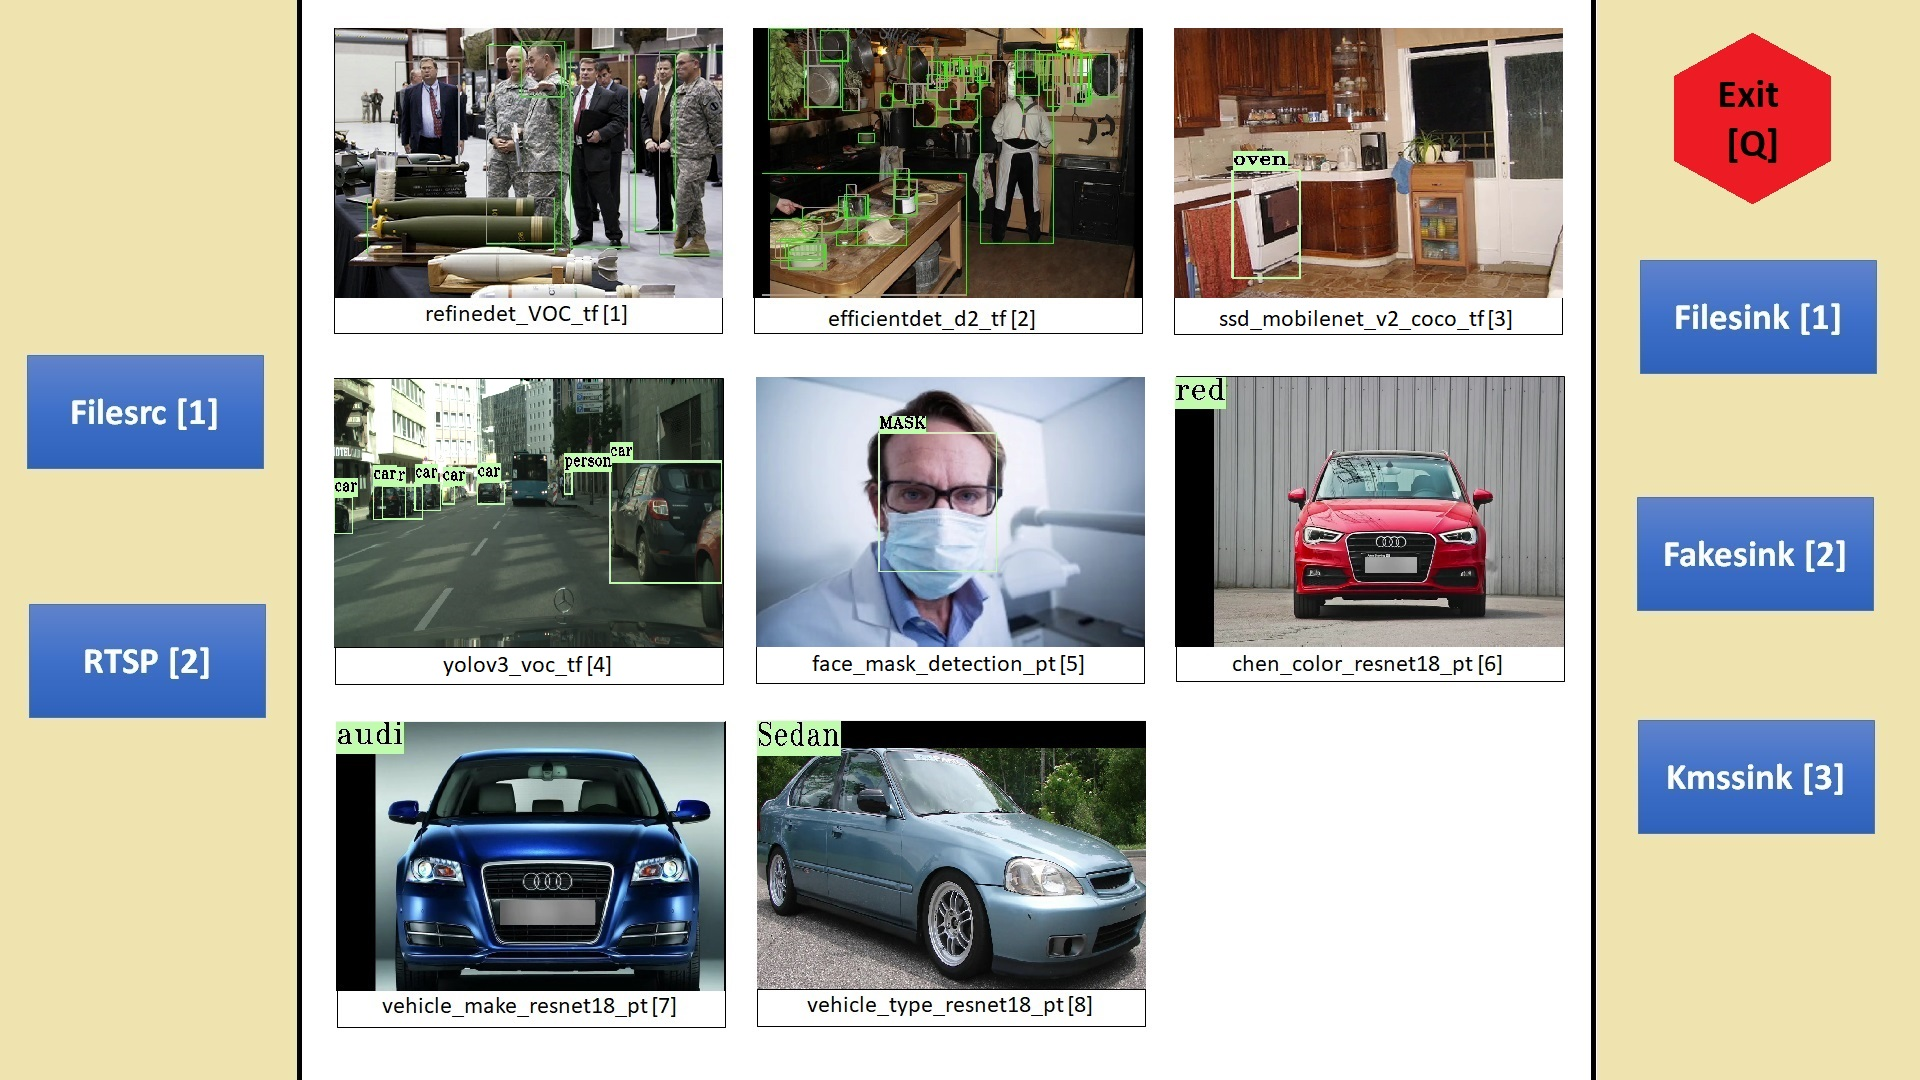
Fig 1: Menu image of the application
When application is started, a command prompt will appear on the console. This prompt will accept the input options for creating the GStreamer pipeline of choice. As described below, user must enter four options in the sequence of input source, ML model to be used, output sink type and a field to enable/disable performance mode. For example, the sequence “1,2,3,0”, means that the source is “filesrc”, ML model to be used is “refinedet_VOC_tf”, sink is “kmssink” and 0 is to disable performance mode.
XXXXXXXXXXXXXXXXXXXXXXXXXXXXXXXXXXXXXXXXXXXXXXXXXXXXXXXXXXXXXXX
Menu displayed on the monitor shows various options available
for input source, ML model, output sink. Each option carries an
index number alongside.
Select elements to be used in the pipeline in the sequence of
"input source, ML model, output sink and performance
mode flag" separated by commas.
e.g. input: 1,1,3,0
Above input will run "filesrc" input, "refinedet_VOC_tf" model
"kmssink" used as output sink and performance mode disabled.
Enter 'q' to exit
XXXXXXXXXXXXXXXXXXXXXXXXXXXXXXXXXXXXXXXXXXXXXXXXXXXXXXXXXXXXX
Note
If performance mode is enabled, then the sink type should always be fakesink. Otherwise, pipeline will not execute.
If performance mode is enabled, there will be 4 ML pipelines executed simultaneously feeding DPU from multiple threads. This results in improved performance compared to when using DPU from single thread.
In the GStreamer pipelines in this application, Sync is disabled. Which means frames are sent to the display at the rate at which these are processed by pipeline. Hence for smaller resolution streams, you may observe that frames are displayed at faster than real time rate.
Followed by the selection of ML model, source and sink elements, next step is the option to provide input filename or RTSP URL as applicable, to be processed.
If the selected input is file source, then by default application will look for the input video files under app/videos folder.
Create the folder /home/root/app/videos and copy the video files here with names given below.
videos/
+-- REFINEDET_VOC_TF.mp4
+-- EFFICIENTDET_D2_TF.mp4
+-- SSD_MOBILENET_V2_COCO_TF.mp4
+-- YOLOV3_VOC_TF.mp4
+-- FACE_MASK_DETECTION_PT.mp4
+-- CHEN_COLOR_RESNET18_PT.mp4
+-- VEHICLE_MAKE_RESNET18_PT.mp4
+-- VEHICLE_TYPE_RESNET18_PT.mp4
If the file is not available in this folder, then application will prompt for the input file. All files must be named after ML model type as given below. User has to enter the input file location in response to the below message prompt.
Enter the input filename to be processed
If the selected input source is “RTSP”, then application will prompt for entering “RTSP” URL.
Enter the RTSP url to be processed
The application supports RTSP input with RTP packets containing H264 payload of resolution 1920x1080. One can download and setup GStreamer RTSP server or VLC can also be used to serve RTSP data. Follow below mentioned steps to compile GStreamer RTSP server. For successful compilation of GStreamer RTSP server, GStreamer framework must be installed as a prerequisite.
1.  wget https://gstreamer.freedesktop.org/src/gst-rtsp-server/gst-rtsp-server-1.18.5.tar.xz
2.  tar -xvf gst-rtsp-server-1.18.5.tar.xz
3.  cd gst-rtsp-server-1.18.5/
4.  ./autogen.sh --disable-gtk-doc
5.  make
Examples in gst-rtsp-server-1.18.5/examples can be used to serve RTSP data. Refer below example
cd gst-rtsp-server-1.18.5/examples
./test-launch  "filesrc location=<Absolute Path of File with H264 1080p in MP4 format> ! qtdemux  ! h264parse ! rtph264pay name=pay0 pt=96"
Streaming starts on the URL rtsp://<RTSP server ip adress>:8554/test. Enter the same URL as input to the application.
Application supports multiple sink options as well. If kmssink is used, output video will be rendered on the display monitor connected. If filesink is chosen, the output will get dumped to a file by name “output.nv12” in the current directory. On the other hand, fakesink acts a black hole for the data with no overhead.
Below Fig 2 is the pictorial depiction of a typical pipeline that is created by the application.
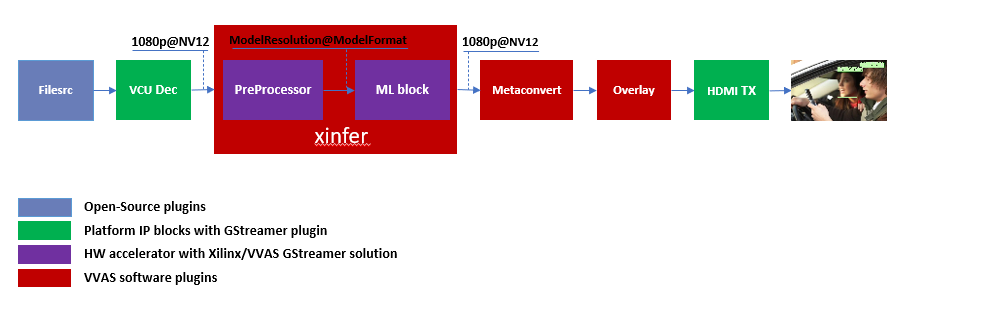
Fig 2: Typical GStreamer pipeline that application creates
Build Design
The Design consists of a base platform and integrated accelerator functions (Kernels).
Base Platform
Smart Model Select application requires video decoding, resizing the decoded frames, Machine Learning and finally display the output. Hence, we need a platform that fulfills these requirements. This VVAS release has zcu104_vcuDec_DP base platform that meets the requirements of decode and display. This platform has hardware accelerated video decoding IP, Video Codec Unit VCU. For display, this platform supports Display Port. The design also includes two DPU 4096 cores for Machine Learning.
In addition to the above-mentioned hardware components, zcu104_vcuDec_DP supports following software components
omxh264dec GStreamer plugin
Opensource framework like GStreamer, OpenCV
Vitis AI 3.0 libraries
Xilinx Run Time (XRT)
Compiling base platform
Complete sources along with workspace to build the platform is provided as part of this release. Follow the steps mentioned below to compile the platform.
Navigate to the folder, such as
VVAS_SOURCES, where you want to clone the VVAS source tree.Clone VVAS repo:
git clone --recurse-submodules https://github.com/Xilinx/VVAS.git
Setup tool chain environment:
source <2022.2_Vitis>/settings64.sh
source <2022.2_Petalinux>/settings.sh
source <2022.2_Vivado>/setenv.sh
Navigate to
zcu104_vcuDec_DPplatform folder:cd <VVAS_SOURCES>/VVAS/vvas-platforms/Embedded/zcu104_vcuDec_DP
Compile the platform:
make
After build is finished, platform will be available <VVAS_SOURCES>/VVAS/vvas-platforms/Embedded/zcu104_vcuDec_DP/platform_repo/xilinx_zcu104_vcuDec_DP_202220_1/export/xilinx_zcu104_vcuDec_DP_202220_1/ location.
Hardware Accelerators (Kernels)
Smart Model Select application’s requirements of Machine Learning and Resize operations are fulfilled by below mentioned accelerators (Kernels):
DPU(Deep Learning Processing Unit) for Machine Learning.Image Processingfor Preprocessing operation
Compiling Hardware Accelerators (Kernels)
The sources for hardware accelerators required for Smart Model Select application can be made available as mentioned below:
Navigate to <VVAS_SOURCES>
DPU Kernel sources can be obtained by following steps as below:
Open the reference_design readme page from Vitis-AI release repo.
Copy the Reference Design link for IP Name corresponding to
DPUCZDX8GfromEdge IPTable:wget -O DPUCZDX8G_VAI_v3.0.tar.gz '<Download Link>'Unarchive
DPUCZDX8G_VAI_v3.0.tar.gztar -xf DPUCZDX8G_VAI_v3.0.tar.gz
Image Processing kernel sources are part of VVAS source tree and are located at:
<VVAS_SOURCES>/VVAS/vvas-accel-hw/image_processing
Kernels may have different configurations for different application requirements. Hence it is recommended to build the Kernels from the application design workspace with the required Kernel configuration for that application.
Each application design workspace provided with this VVAS release has the required Kernel configurations for that application.
In case one wants to change the kernel configuration for some reason, do these changes in the configuration files mentioned below.
Note
Compilation of Kernels is initiated from the build process of the final design for the application. Hence kernel compilation steps are not covered separately here.
DPU Kernel for this example design is configured for B4096 architecture. Configuration file used can be found at <VVAS_SOURCES>/VVAS/vvas-examples/Embedded/multichannel_ml/dpu_conf.vh.
Image Processing IP/Kernel source code can be refered from <VVAS_SOURCES>/VVAS/vvas-accel-hw/image_processing/. For this example design Image Processing kernel is configured for max-width:1920, max-height:1080 and format support of Y_UV8_420, RGB and BGR. Configuration file used can be found at <VVAS_SOURCES>/VVAS/vvas-examples/Embedded/multichannel_ml/image_processing_config.h.
You may modify the kernel configuration as per your requirements in corresponding configuration files.
Creating SD Card image
Once platform is built, next step is to compile and stitch the required hardware accelerators (kernels) into the platform and generate final SD Card image using Vitis Flow.
VVAS sources already has ready to build example Vitis workspace for smart_model_select Application. This workspace uses Vitis Flow that stitches kernels into the platform and generates final SD card image. Follow below mentioned steps to build the final image.
cd <VVAS_SOURCES>/VVAS/vvas-examples/Embedded/smart_model_select
make PLATFORM=<PLATFORM_PATH> DPU_TRD_PATH=<DPU_PATH> HW_ACCEL_PATH=<IMAGE_PROCESSING_PATH>

PLATFORM_PATH=<VVAS_SOURCES>/VVAS/vvas-platforms/Embedded/zcu104_vcuDec_DP/platform_repo/xilinx_zcu104_vcuDec_DP_202220_1/export/xilinx_zcu104_vcuDec_DP_202220_1/xilinx_zcu104_vcuDec_DP_202220_1.xpfm

DPU_PATH=<VVAS_SOURCES>/DPUCZDX8G_VAI_v3.0

IMAGE_PROCESSING_PATH=<VVAS_SOURCES>/VVAS/vvas-accel-hw
Once above build is done, final sdcard image is available at ./binary_container_1/sd_card.img location.
Build VVAS Plug-ins and Libraries
VVAS Plugins and libraries are part of petalinux bsp and are built along with building platform. So, no need to build again. Still if one wants to build these for some reason, follow the steps mentioned below,
Setting Sysroot
Sysroot is required to build the VVAS GStreamer plugins. Sysroot installer location depends on whether you are using pre-built binaries, or you have built the platform from scratch.
If you have downloaded the pre-built binaries in folder, say PREBUILT_BINARIES, then you can find the Sysroot installer at:
<PREBUILT_BINARIES>/vvas_smart_model_select_2022.2_zcu104/sdk.sh
If you have built the platform yourself, then Sysroot installer is available at:
<VVAS_SOURCES>/VVAS/vvas-platforms/Embedded/zcu104_vcuDec_DP/platform_repo/tmp/sw_components/sdk.sh
One need to install the sysroot. Create a folder, say sysroot in VVAS_SOURCES. Command for sysroot generation is:
<path to sdk.sh>/sdk.sh -y -d VVAS_SOURCES/sysroot/
Now sysroot is installed. You are ready to build plugins and applications.
Build Plugins and Libraries
Get the VVAS Sources if not done already. Follow the steps mentioned below.
Navigate to the folder, say
VVAS_SOURCES, where you want to clone the VVAS source tree.Clone VVAS repo:
git clone --recurse-submodules https://github.com/Xilinx/VVAS.git
VVAS Source tree structure is described below:
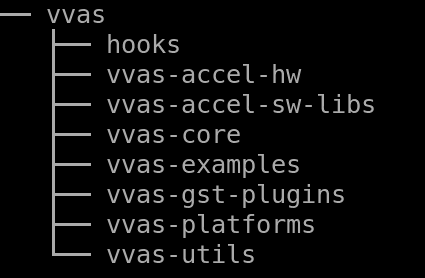
vvas-utils: This folder contains the source code for the VVAS kernel interface to be exposed by the acceleration software libraries, abstraction APIs on top of the Xilinx Runtime (XRT) tool, and common headers (for example, metadata).
vvas-core: This folder contains the source code of core APIs.
vvas-gst-plugins: This folder contains all the VVAS GSteamer plug-ins, including the infrastructure plug-ins and the Custom plug-ins.
vvas-accel-sw-libs: Contains source for the acceleration software libraries that are called from the GStreamer infrastructure plug-ins.
vvas-accel-hw: This folder contains the hardware kernel source code.
vvas-examples: This repository hosts example solutions.
vvas-platforms: This folder contains the reference platforms for different applications.
Navigate to
VVAS_SOURCES/VVASfolderUnset the LD library path environment variable:
unset LD_LIBRARY_PATH
Set the sysroot path:
source VVAS_SOURCES/sysroot/environment-setup-cortexa72-cortexa53-xilinx-linux
You must have write permission to the sysroot.
Build VVAS plugins and libraries:
./build_install_vvas.sh TARGET=Edge
When above step is complete, VVAS plugins are generated as
install/vvas_installer.tar.gz.Copy
install/vvas_installer.tar.gzonto the root folder (/) of the target board and untar it. VVAS Plugins are now installed on the target device.
Build Smart Model Select Application
The example application (smart_model_select) is available in the “vvas-example” section of VVAS repository. Follow below steps to compile the application:
cd <VVAS_SOURCES>/VVAS/vvas-examples/Embedded/smart_model_select/src
unset LD_LIBRARY_PATH
source <sysroot path>/environment-setup-cortexa72-cortexa53-xilinx-linux
make
Known Issues
On zcu104 boards, Cascaded pipelines OR several ML instances running simultaneously are sending board into bad state and needs reboot to recover from it. The default value of IOUT_OC_FAULT_LIMIT on PMIC chip irps5401 is too low and that is causing the temperature fault limit getting crossed. Workaround is to increase this limit. But there is risk of board getting damaged if running for long time.