2021.1 Vitis™ Platform Creation TutorialsSee Vitis™ Development Environment on xilinx.com |
Step 3: Create the Vitis Platform
Prepare Files for Platform Packaging
We would store all the necessary files for Vitis platform creation flow. Here we name it
kv260_custom_pkg. Then we create apfmfolder inside to hold platform creation source components.mkdir kv260_custom_pkg cd kv260_custom_pkg mkdir pfmAfter this step, your directory hierarchy looks like this.
- kv260_custom_platform # Vivado Project Directory
- kv260_custom_plnx     # PetaLinux Project Directory
- kv260_custom_pkg      # Platform Packaging Directory
  - pfm                  # Platform Packaging Sources
Install sysroot:
Go to
<PetaLinux Project>/images/linuxdirectory.Type
./sdk.sh -d <Install Target Dir>to install PetaLinux SDK. use the-doption to provide a full pathname to the output directory kv260_custom_pkg (This is an example ) and confirm.Note: The environment variable LD_LIBRARY_PATH must not be set when running this command
Create
bootdirectory andsd_dirdirectory inside pfm directorycd kv260_custom_pkg/pfm mkdir boot mkdir sd_dirAfter this step, your directory hierarchy looks like this.
- kv260_custom_platform # Vivado Project Directory
- kv260_custom_plnx     # PetaLinux Project Directory
- kv260_custom_pkg      # Platform Packaging Directory
  - sysroots             # Extracted Sysroot Directory
  - pfm                  # Platform Packaging Sources
    - boot               # Platform boot components
    - sd_dir             # Files to be put in FAT32 partition of SD card
When creating the Vitis platform, we will give boot directory for boot components and sd_dir for FAT32 partition contents in SD card.
Prepare for the boot components
Copy the generated Linux software boot components from <your_petalinux_dir>/images/linux directory to the <full_pathname_to_kv260_custom_pkg>/pfm/boot directory to prepare for running the Vitis platform packaging flow:
zynqmp_fsbl.elf: MPSoC first stage boot loader
pmufw.elf: MPSoC PMU Firmware
bl31.elf: MPSoC Arm Trusted Firmware
u-boot-dtb.elf: U-boot with device tree in the elf. Please rename it to u-boot.elf
system.dtb: Device tree for Linux
Note: These files are the sources of creating BOOT.BIN. They are required for the Vitis workflow but since KV260 Starter Kit boot components are fixed in the QSPI Flash, these files will not be used in our flow.
Prepare sd_dir directory.
Contents in this directory will be packaged to FAT32 partition of sd_card.img by v++ package tool. Usually we will store boot.scr and system.dtb in this directory. Since KV260 workflow doesn’t program SD Card, we can skip adding contents to this directory. Please just leave it empty.
Create a Vitis Platform
First we create a Vitis platform project with the XSA file generated by Vivado from Step 1.
Launch Vitis IDE
Go to the kv260_custom_pkg folder you created:
cd <full_pathname_to_kv260_custom_pkg>Launch Vitis by typing
vitis &in the console.Select kv260_custom_pkg folder as workspace directory.
Create a new platform project
Select menu File > New > Platform Project to create a platform project.
Enter the project name. For this example, type
kv260_custom. Click Next.In the Platform page,
Click Browse button, select the XSA file generated by the Vivado. In this case, it is
kv260_custom_platform.xsa.Set the operating system to linux.
Set the processor to psu_cortexa53.
Architecture: 64-bit
Uncheck option Generate boot components because we will use PetaLinux generated boot components.
Click Finish.
Setup software settings in Platform Settings view.
Click the linux on psu_cortexa53 domain, browse to the locations and select the directory or file needed to complete the dialog box for the following:
Bif file: Click the drop-down icon and select Generate BIF.
Note: The file names in
<>are placeholders. Vitis will replace the placeholders with the relative path to platform during platform packaging. V++ packager, which runs when building the final application would expand it further to the full path during image packaging. Filename placeholders point to the files in boot components directory. The filenames in boot directory need to match with placeholders in BIF file.<bitstream>is a reserved keyword. V++ packager will replace it with the final system bit file.Boot Components Directory: Browse to kv260_custom_pkg/pfm/boot and click OK.
FAT32 Partition Directory: Browse to kv260_custom_pkg/pfm/sd_dir and click OK.
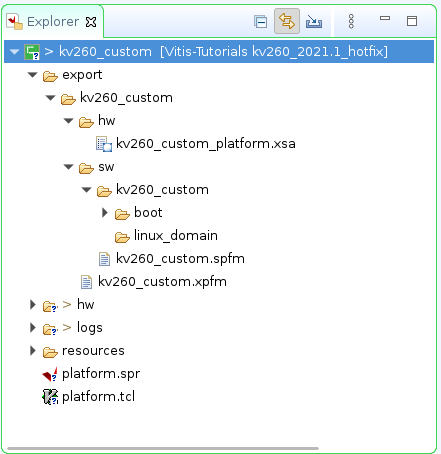
Click kv260_custom project in the Vitis Explorer view, click the Build button to generate the platform.

Note: The generated platform is placed in the export directory. BSP and source files are also provided for re-building the FSBL and PMU if desired and are associated with the platform. The platform is ready to be used for application development.
If you would create an Vitis application in the same workspace as this platform, you can find this platform available in the platform selection page in platform creation wizard. If you’d like to reuse this platform in another workspace, add its path to PLATFORM_REPO_PATHS environment variable before launching Vitis GUI, or use “Add” button in platform selection page of Vitis GUI to add its path.
Next Step
Next let us try to build applications on this platform and test them.
Copyright© 2021 Xilinx