PIK Encoder
PIK Encoder example resides in L2/demos/pikEnc directory. The tutorial provides a step-by-step guide that covers commands for building and running kernel.
Internal Designs
- Overall Designs
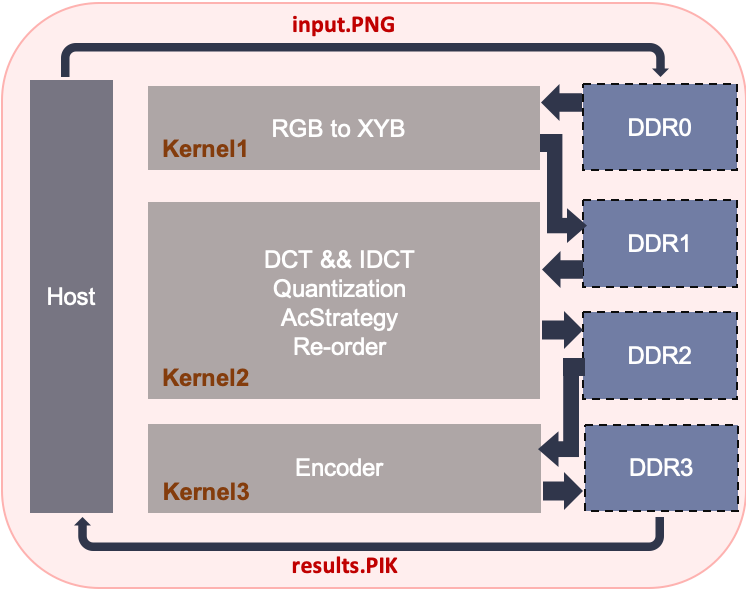
PIK Encoder is a multi-kernel design because PIK is a very complex algorithm compared with other image codec. So the algorithm is divided into three kernel and connected by on-board DDR. The overall design are shown in the picture below.

- Kernel1
Kernel1 is responsable for transferring RGB data to XYB. Correlation Map and flooating-point Quant-field stream are also initialized in kernel1.
- Kernel2
Kernel2 firstly do DCT transformation using XYB data and then makes AC strategy decision. The AC stream is composed by several types of DCT streams (DCT4x4, DCT8x8, DCT16x61 and DCT32x32) by the information of AC strategy. The DC stream is generated from AC stream by partial selection. Quantizer takes float stream of AC and DC and quantize them into int16_t. Order data is generated by counting non-zero in quantized AC, then sorting the counting results. Quant-field stream is also quantized into int16_t in kernel2.
- Kernel3
Kernal3 is the encode part. It takes the data (quantized AC, quantized DC, order, AC strategy, block and quant-field) into the encoder and generates serilized token. The final ouput contains AC token, DC token and file headers in which are AC strategy, order,block and quant-field information.
Executable Usage
- Work Directory(Step 1)
The steps for library download and environment setup can be found in Vitis Codec Library. For getting the design,
cd L2/demos/pikEnc
- Build kernel(Step 2)
Run the following make command to build your XCLBIN and host binary targeting a specific device. Please be noticed that this process will take a long time, maybe couple of hours.
make run TARGET=hw DEVICE=xilinx_u200_xdma_201830_2
- Run kernel(Step 3)
To get the benchmark results, please run the following command.
./build_dir.hw.xilinx_u200_xdma_201830_2/host.exe --xclbin build_dir.hw.xilinx_u200_xdma_201830_2/pikEnc.xclbin PNGFilePath PIKFilePath --fast
PIK Encoder Input Arguments:
Usage: host.exe -[-xclbin]
       --xclbin:         the kernel name
       --fast:           the encoding mode
       PNGFilePath:      the path to the input *.PNG
       PIKFilePath:  the path to the output *.pik
Note: Default arguments are set in Makefile, you can use other Pictures listed in the table.
- Example output(Step 4)
Found Platform
Platform Name: Xilinx
INFO: Found Device=xilinx_u200_xdma_201830_2
INFO: Importing build_dir.hw.xilinx_u200_xdma_201830_2/pikEnc.xclbin
Loading: 'build_dir.hw.xilinx_u200_xdma_201830_2/pikEnc.xclbin'
INFO: Kernel has been created
INFO: Finish kernel setup
...

INFO: Finish kernel execution
INFO: Finish E2E execution
INFO: Data transfer from host to device: 100 us
INFO: Data transfer from device to host: 20 us
INFO: Average kernel execution per run: 600 ms
Profiling
The hardware resource utilizations are listed in the following table. Different tool versions may result slightly different resource.
| IP | BRAM | URAM | DSP | FF | LUT |
| Kernel1 | 25 | 93 | 568 | 125920 | 97441 |
| Kernel2 | 411 | 252 | 1614 | 309222 | 262543 |
| Kernel3 | 178 | 128 | 216 | 114845 | 90011 |