JPEG Huffman Decoder
Jpeg Huffman Decoder example resides in L1/tests/jpegDec directory. The tutorial provides a step-by-step guide that covers commands for building and running IP.
Executable Usage
- Work Directory(Step 1)
The steps for library download and environment setup can be found in l1_vitis_codec. For getting the design,
cd L1/tests/jpegDec
- Run and Build IP(Step 2)
Run the following make command to build your IP targeting a specific device. Please be noticed that this process will take a long time, maybe couple of hours.
make run DEVICE=xilinx_u50_gen3x16_xdma_201920_3 VIVADO_IMPL=1

Usage: host.exe -[-xclbin -JPEGFile]
       -JPEGFile:  the path point to input *.jpg
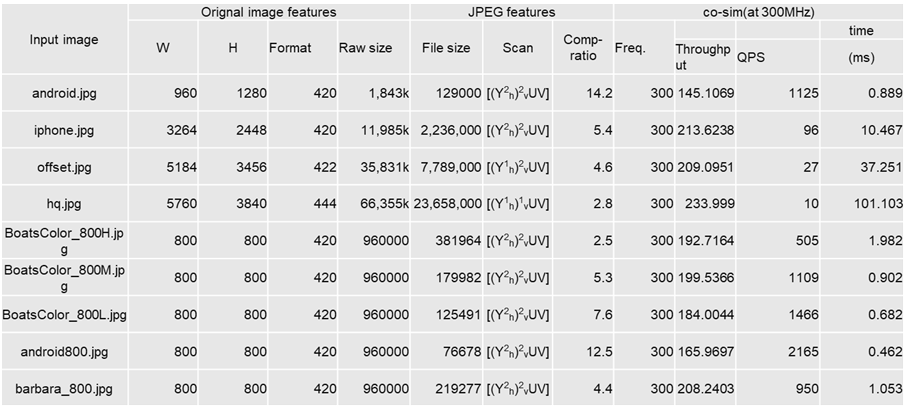
Note: Default arguments are set in Makefile, you can use other Pictures & Performance listed in the table.
- Example output(Step 2)
...
Time resolution is 1 ps
...
RTL Simulation : 0 / 1 [n/a] @ "106000"
RTL Simulation : 1 / 1 [n/a] @ "345801000"
...
INFO: [COSIM 212-316] Starting C post checking ...
INFO: [COSIM 212-1000] *** C/RTL co-simulation finished: PASS ***
...
Implementation tool: Xilinx Vivado v.2021.2
Project:             test.prj
Solution:            solution1
...
#=== Post-Implementation Resource usage ===
SLICE:            0
LUT:           7939
FF:            8043
DSP:             12
BRAM:             5
URAM:             0
LATCH:            0
SRL:            717
CLB:           1748

#=== Final timing ===
CP required:                     2.500
CP achieved post-synthesis:      4.564
CP achieved post-implementation: 3.703
Profiling
The hardware resource utilizations are listed in the following table. Different tool versions may result slightly different resource.
| IP | BRAM | URAM | DSP | FF | LUT | Frequency(MHz) |
| kernel_parser_decoder | 5 | 0 | 12 | 7939 | 8043 | 270 |
Table 2 : Jpeg Huffman Decoder IP profiling

Note
1. MAX_DEC_PIX is for benchmark. If testcase image is larger than 20M, the value of MAX_DEC_PIX should be enlarged following the size of image.
2. MAXCMP_BC is for benchmark. If testcase image is larger than 20M, the value of MAXCMP_BC should be enlarged following the size of image.