Kria™ KV260 Vision AI Starter Kit AIBox-ReID Tutorial |
Setting up the Board and Application Deployment |
Setting up the Board and Application Deployment
Introduction
This document shows how to set up the board and run the aibox-reid application.
Setting up the Board
Note: If you have already flashed the SD Card with the KV260 Vision AI Starter Kit Image (kv260-sdcard.img.wic), then skip the first step below.
Flash the SD Card
Download the SD Card Image and save it on your computer.
Connect the microSD to your computer.
Download the Balena Etcher tool (recommended; available for Window, Linux, and macOS) required to flash the SD card.
Follow the instructions in the tool and select the downloaded image to flash onto your microSD card.
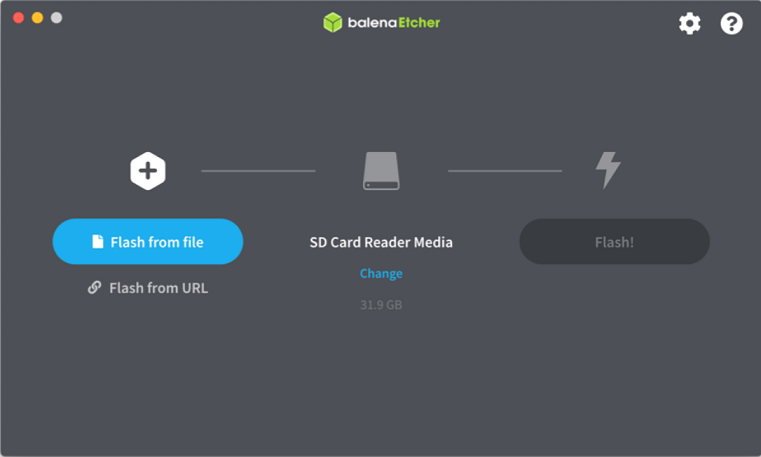
Eject the SD card from your computer.
If you are looking for other OS specific tools to write the image to the SD card, refer to KV260 Getting Started Page
Set up the hardware.
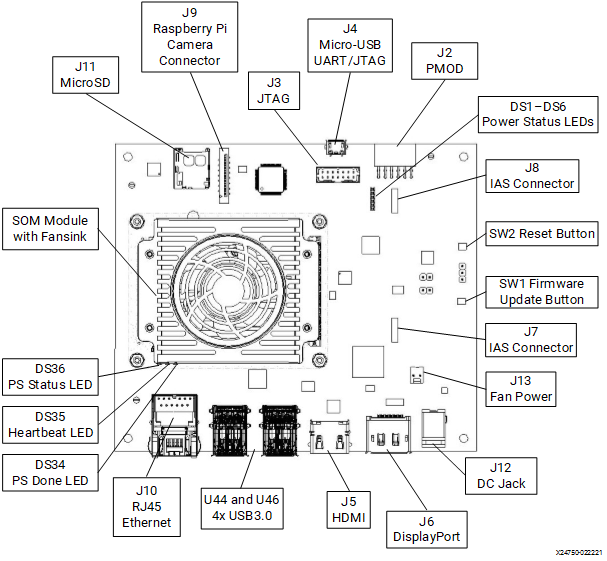
microSD:
Insert the SD card into slot at J11.
Monitor:
To display up to 4 channels of 1080p video, this application requires 4K monitor.
Before booting the board, please connect the monitor to the board via either DP or HDMI port.
UART/JTAG interface:
For interacting and seeing boot-time information, connect a USB debugger to the J4.
Network connection:
Connect the Ethernet cable to your local network with DHCP enabled to install packages and run Jupyter Notebooks
Power on the board, and boot the Linux image.
The Linux image will boot into the following login prompt:
xilinx-k26-starterkit-2020_2 login:Use the
petalinuxuser for login. You will be prompted to set a new password on the first login.xilinx-k26-starterkit-2020_2 login: petalinux You are required to change your password immediately (administrator enforced) New password: Retype new password:
The
petalinuxuser does not have root privileges. Most commands used in subsequent tutorials have to be run usingsudoand you may be prompted to enter your password.Note: The root user is disabled by default due to security reasons. If you want to login as root user, follow the below steps, else, ignore this step and continue. Use the petalinux user’s password on the first password prompt, then set a new password for the root user. You can now login as root user using the newly set root user password.
xilinx-k26-starterkit-2020_2:~$ sudo su -l root

We trust you have received the usual lecture from the local System
Administrator. It usually boils down to these three things:

    #1) Respect the privacy of others.
    #2) Think before you type.
    #3) With great power comes great responsibility.

Password:
root@xilinx-k26-starterkit-2020_2:~# passwd
New password:
Retype new password:
passwd: password updated successfully
Get the latest application package.
Check the package feed for new updates.
sudo dnf update
Confirm with “Y” when prompted to install new or updated packages.
Sometimes it is needed to clean the local dnf cache first. To do so, run:
sudo dnf clean all
Get the list of available packages in the feed.
sudo xmutil getpkgs
Install the package with dnf install:
sudo dnf install packagegroup-kv260-aibox-reid.noarch
System will ask “Is this ok [y/N]:” to download the packages, please type “y” to proceed.
Note: For setups without access to the internet, it is possible to download and use the package locally. Please refer to the Install from a local package feed for instructions.
Dynamically load the application package.
The firmware consist of bitstream, device tree overlay (dtbo) and xclbin file. The firmware is loaded dynamically on user request once Linux is fully booted. The xmutil utility can be used for that purpose.
Shows the list and status of available acceleration platforms and AI Applications:
sudo xmutil listapps
Switch to a different platform for different AI Application:
When xmutil listapps reveals that no accelerator is currently active, just activate kv260-aibox-reid:
sudo xmutil loadapp kv260-aibox-reid
When xmutil listapps reveals that there’s already another accelerator being activated apart from kv260-aibox-reid, unload it first, then switch to kv260-aibox-reid.
sudo xmutil      unloadapp
sudo xmutil      loadapp kv260-aibox-reid
How to run the application:
Two types of input sources
The AIBOX application is targeted to run with RTSP streams as input source, but for convienience, we also support video files as input.
We assume the RTSP or video file to be 1080P H264/H265 30FPS. AIBOX application can adjust for other FPS with -r flag, but resolution must be 1080p.
-
IP Camera
IP cameras normally have a configuration page to configure the RTSP stream related parameters. Please refer to the manual of your camera, and configure it to 1080P H264/H265 30FPS, and get the RTSP URL to be used as input parameter for the AIBox application. The URL is in the form of “rtsp://user:passwd@ip-address:port/name”
VLC player
Alternatively, you can use VLC in windows to setup RTSP Streaming server. You must first turn off any firewalls (McAfee, etc) and VPN, and make sure your windows machine is on the same subnet as SOM board. In the folder with vlc.exe (typically C:\Program Files\VideoLAN\VLC), do a shift-rightclick and select “Open PowerShell window here”. In PowerShell window, enter
> .\vlc.exe -vvv path_to_a_mp4_file --sout '#rtp{dst=windows_ip_address,port=1234,sdp=rtsp://windows_ip_address/test.sdp}' --loop
File source
To demonstrate the application in the case where no IP camera is available, a video source may be played from a file on the SD card instead.
You can download video files from the following links, which is of MP4 format.
https://pixabay.com/videos/liverpool-people-couple-pier-head-46090/
https://pixabay.com/videos/liverpool-pier-head-england-uk-46098/
https://pixabay.com/videos/spring-walk-park-trees-flowers-15252/
https://pixabay.com/videos/walking-people-city-bucharest-6099/
Then you need to transcode it to H264 file which is the supported input format.
ffmpeg -i input-video.mp4 -c:v libx264 -pix_fmt nv12 -vf scale=1920:1080 -r 30 output.nv12.h264
Finally, upload or copy these transcoded H264 files to the board, place it to somewhere under /home/petalinux, which is the home directory of the user you login as.
Interacting with the application
There are two ways to interact with application, via Jupyuter notebook or Command line
Jupyter notebook
The system will auto start a Jupyter server at
/home/petalinux/notebooks, with userpetalinux.User need to run following command to install the package shipped notebooks which reside in
/opt/xilinx/share/notebooks/aibox-reidto the folder/home/petalinux/notebooks/aibox-reid.$ aibox-reid-install.pyThis script also provides more options to install the notebook of current application to specified location.
    usage: aibox-reid-install [-h] [-d DIR] [-f]

    Script to copy aibox-reid Jupyter notebook to user directory

    optional arguments:
      -h, --help         show this help message and exit
      -d DIR, --dir DIR  Install the Jupyter notebook to the specified directory.
      -f, --force        Force to install the Jupyter notebook even if the destination directory exists.
Please get the list of running Jupyter servers with command:
$ jupyter-server listOutput example:
Currently running servers:
http://ip:port/?token=xxxxxxxxxxxxxxxxxx:: /home/petalinux/notebooksStop the currently running server with command:
$ jupyter-server stop 8888To launch Jupyter notebook on the target, run below command.
    python3 /usr/bin/jupyter-lab --no-browser --notebook-dir=/home/petalinux/notebooks --ip=ip-address &

    // fill in ip-address from ifconfig
Output example:
[I 2021-08-02 15:54:31.141 LabApp] JupyterLab extension loaded from /usr/lib/python3.8/site-packages/jupyterlab
[I 2021-08-02 15:54:31.141 LabApp] JupyterLab application directory is /usr/share/jupyter/lab
[I 2021-08-02 15:54:31.164 ServerApp] jupyterlab | extension was successfully loaded.
[I 2021-08-02 15:54:31.166 ServerApp] Serving notebooks from local directory: /home/petalinux/notebooks
[I 2021-08-02 15:54:31.166 ServerApp] Jupyter Server 1.2.1 is running at:
[I 2021-08-02 15:54:31.166 ServerApp] http://192.168.3.123:8888/lab?token=9f7a9cd1477e8f8226d62bc026c85df23868a1d9860eb5d5
[I 2021-08-02 15:54:31.166 ServerApp]  or http://127.0.0.1:8888/lab?token=9f7a9cd1477e8f8226d62bc026c85df23868a1d9860eb5d5
[I 2021-08-02 15:54:31.167 ServerApp] Use Control-C to stop this server and shut down all kernels (twice to skip confirmation).
[C 2021-08-02 15:54:31.186 ServerApp]

    To access the server, open this file in a browser:
        file:///home/petalinux/.local/share/jupyter/runtime/jpserver-1119-open.html
    Or copy and paste one of these URLs:
        http://192.168.3.123:8888/lab?token=9f7a9cd1477e8f8226d62bc026c85df23868a1d9860eb5d5
     or http://127.0.0.1:8888/lab?token=9f7a9cd1477e8f8226d62bc026c85df23868a1d9860eb5d5
User can access the server by opening the server URL from previous steps with the Chrome browser.
In the notebook, we will construct the GStreamer pipeline string, you can get it by adding simple python code to print it out, and played with gst-launch-1.0 command in the console, and there are some user options variables that can be changed and run with. For other parts of the pipeline, you can also change and play to see the effect easily.
Note Known limitation
Command Line
Note The application needs to be run with sudo .
Examples:
Run one channel RTSP stream
sudo aibox-reid -s rtsp://username:passwd@ip_address:port/name -t rtsp -p 0
or
sudo aibox-reid -s rtsp://username:passwd@ip_address:port -t rtsp -p 0
or (for windows VLC server setup):
sudo aibox-reid -s rtsp://windows_ip_address:1234/test.sdp -t rtsp -p 0
Run one channel video file
sudo aibox-reid -s /tmp/movies/shop.nv12.30fps.1080p.h264 -t file -p 1
Run multiple channels
sudo aibox-reid -s rtsp://username:passwd@ip_address:port/name -t rtsp -p 2 -s /tmp/movies/shop.nv12.30fps.1080p.h264 -t file -p 1
Note: Only one instance of aibox-reid application can run at a time because it requires exclusive access to a DPU engine and there is only one instance of DPU that exists in the aibox-reid platform.
Command Options:
The examples show the capability of the aibox-reid for specific configurations. User can get more and detailed application options as following by invoking
aibox-reid --help
   Usage:

   aibox-reid [OPTION?] - AI Application of pedestrian + reid + tracking for multi RTSP streams, on SoM board of Xilinx

   Help Options:

   -h, --help      Show help options

        --help-all                                       Show all help options
        --help-gst                                       Show GStreamer Options

   Application Options:

        -s, --src=[rtsp://server:port/id |file path]     URI of rtsp src, or location of h264|h265 video file. Must set. Can set up to 4 times
        -t, --srctype=[f|file, r|rtsp]                   Type of the input source: file (f)|rtsp (r). Optional. Can set up to 4 times.
        -e, --srcenc=[h264|h265]                         Encoding type of the input source. Optional and defaults to h264. Can set up to 4 times.
        -p, --pos=[0|1|2|3]                              Location of the display in the 4 grids of 4k monitor. Optional.
                                                         0: top left, 1: top right, 2: bottom left, 3: bottom right. Optional. Can set up to 4 times.
        -r, --framerate                                  Framerate of the input. Optional. Can set up to 4 times.
        -R, --report                                     Report fps
Files structure
The application is installed as:
Binary File Directory: /opt/xilinx/bin
| filename | description |
|---|---|
| aibox-reid | main app |
Configuration file directory: /opt/xilinx/share/ivas/aibox-reid
| filename | description |
|---|---|
| ped_pp.json | Config of preprocess for refinedet. |
| refinedet.json | Config of refinedet. |
| crop.json | Config of cropping for reid. |
| reid.json | Config of reid. |
| draw_reid.json | Config of final results drawing. |
Jupyter Notebook Directory: /opt/xilinx/share/notebooks/aibox-reid
| filename | description |
|---|---|
| aibox-reid.ipynb | Jupyter notebook file for aibox-reid. |
Next Steps
Go back to the KV260 SOM AIBox-ReID design start page
License
Licensed under the Apache License, Version 2.0 (the “License”); you may not use this file except in compliance with the License.
You may obtain a copy of the License at http://www.apache.org/licenses/LICENSE-2.0
Unless required by applicable law or agreed to in writing, software distributed under the License is distributed on an “AS IS” BASIS, WITHOUT WARRANTIES OR CONDITIONS OF ANY KIND, either express or implied. See the License for the specific language governing permissions and limitations under the License.
Copyright© 2021 Xilinx