Kria™ KV260 Vision AI Starter Kit Defect Detection Tutorial |
Setting up the Board and Application Deployment |
Setting up the Board and Application Deployment
Introduction
This document shows how to set up the board and run the defect-detect application.
Introduction to the Test Environment
Setting Up the Live Source
When setting up the SOM Board for the live camera source, adhere to the following guidelines:
Keep the board firmly held in a static position.
The board should be opposite directly the monitor (180 deg).
Keep the board at an appropriate distance from the monitor. In the test environment, the appropriate distance was 31 cm.
In the test environment, the brightness was set to 45, and the contrast to 17. Set the brightness and contrast of the monitor appropriately based on the model of your monitor.
Ensure that the room is closed. Only natural light should pass through the glass windows at daytime. At night, use artificial lighting but ensure that the lights are not opposite the monitor.
To avoid over exposure of light, do NOT place the monitor opposite an open door or window.
Ensure that the mango is completely captured by the live source.
The camera should be focused ONLY on the mango image that is displayed.
In the test environment, the light intensity was ~08 LUX.
Note: If the preview image is not satisfactory, accordingly adjust the parameters mentioned above.
Setting Up the Test Environment
Note: Ensure that you have the Gstreamer packages installed on your Linux PC. If you are using Ubuntu as your Linux distribution, ensure that the Ubuntu version is atleast 16.04.
You need to download all the sample mango images from the Cofilab site to the Linux PC.
Note: If the file fails to download, copy the link and open in a new browser tab to download the file.
As the downloaded images are in JPG format, you need to convert them to GRAY 8 (Y8) format using the following steps.
Unzip the rar file that you downloaded.
In the Linux PC, go to
DB_mango.Copy and save the following script as convert_jpeg_y8.sh:
for file in ./*; do
f=$(echo "${file##*/}");
  filename=$(echo $f| cut  -d'.' -f 1); #file has extension, it return only filename
    echo $filename
      gst-launch-1.0 filesrc location=$file ! jpegdec  ! videoconvert  ! videoscale ! video/x-raw, width=1280, height=800, format=GRAY8 ! filesink location=$filename.y8
done
cat Mango_*.y8 > input_video.y8
Make the script executable:
chmod +x convert_jpeg_y8.shRun the script
convert_jpeg_y8.shas follows:./convert_jpeg_y8.sh >& file.txt
When complete, the script produces
input_video.y8as input to the Defect Detect application.Copy
input_video.y8from the Linux PC to the SOM boardrootfs path=/home/petalinux.NOTE: You can delete all files except
input_video.y8.You can also perform the preceding conversion on the SOM board, but will need to do a
sudo dnf install gstreamer1.0-plugins-good-jpeg.aarch64first, and use sudo with all the commands.NOTE: For setups without access to the internet, it is possible to download and use the packages locally. Refer to the Install from a local package feed for instructions.
The Defect Detection application’s design processes these images and sends the results and the processed images on to the monitor.
See Known Issues with the Defect Detect application.
Setting up the SOM Board
Note: Skip Step 1, if you have already flashed the SD Card with the KV260 Vision AI Starter Kit Image (kv260-sdcard.img.wic)
Flash the SD Card
Download the SD Card Image and save it on your computer.
Connect the microSD to your computer.
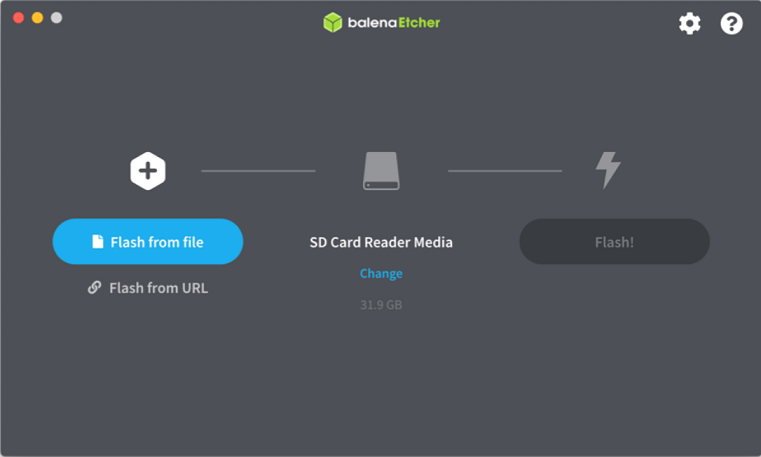
Download the Balena Etcher tool (recommended; available for Window, Linux, and macOS) required to flash the SD card.
Follow the instructions in the tool and select the downloaded image to flash onto your microSD card.
Eject the SD card from your computer.
If you are looking for other OS specific tools to write the image to the SD card, refer to KV260 Getting Started Page
Hardware Setup:
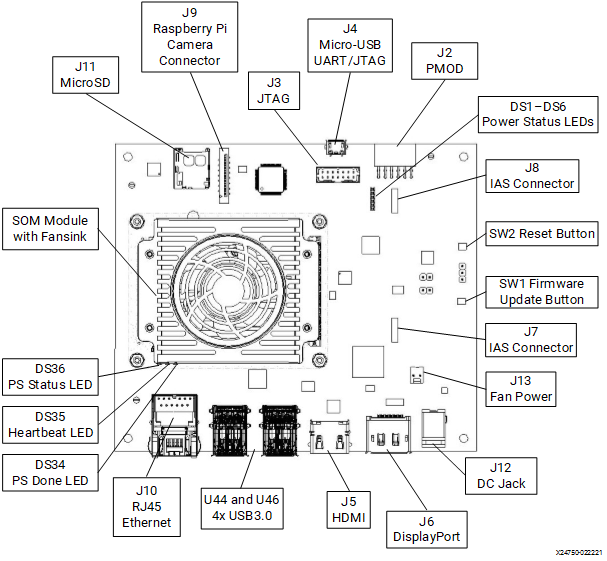
microSD: Insert the SD card into slot at J11.
Monitor: Before booting, connect the 4k monitor to the board using either DP or HDMI port.
UART/JTAG Interface: For interacting and viewing boot-time information, ensure that the board is powered off, and then connect the micro-USB cable to J4.
Network Connection: Connect the Ethernet cable from J10 on SOM board to your local network that is DHCP enabled and ensure that you have Internet access as otherwise the package feed will not be accessible.
Camera Connection: Ensure that the board is powered off, and then connect AR0144 to IAS connector J7.
Boot the Linux Image:
NOTE: Only perform this step if you are booting the Starter kit for the first time. Otherwise, log in with the PetaLinux username and the password that was previously set.
The Linux image will boot into the following login prompt:
xilinx-k26-starterkit-202X_Y login:
Use the
petalinuxuser for login. You will be prompted to set a new password on the first login.xilinx-k26-starterkit-202X_Y login: petalinux You are required to change your password immediately (administrator enforced) New password: Retype new password:
The
petalinuxuser does not have root privileges. Most commands used in subsequent tutorials must be run usingsudoand you may be prompted to enter your password.Note: For security, by default, the root user is disabled. If you want to login as root user, perform the following steps. Use the
petalinuxuser’s password on the first password prompt, then set a new password for the root user. You can now login as root user using the newly set root user password.xilinx-k26-starterkit-202X_Y:~$ sudo su -l root We trust you have received the usual lecture from the local System Administrator. It usually boils down to these three things: #1) Respect the privacy of others. #2) Think before you type. #3) With great power comes great responsibility. Password: root@xilinx-k26-starterkit-202X_Y:~# passwd New password: Retype new password: passwd: password updated successfully
Installing the Defect Detect package
Install the latest application packages.
Check the package feed for new updates.
sudo dnf update
Confirm with “Y” when prompted to install new or updated packages.
Sometimes it is needed to clean the local dnf cache first. To do so, run:
sudo dnf clean all
Get the list of available packages in the feed:
sudo xmutil getpkgs
Install each package:
sudo dnf install packagegroup-kv260-defect-detect.noarch
NOTE: For setups without access to the internet, it is possible to download and use the packages locally. Refer to the Install from a local package feed for instructions.
Firmware Loading
The Defect Detection application firmware consist of bitstream, device tree overlay (dtbo) and the xclbin file. The Defect Detection firmware is loaded dynamically on user request once Linux is fully booted. Use the xmutil utility to list and load the firmware.
To list the available accelerator applications, run:
sudo xmutil listapps
You should see similar output to this:
Accelerator                   Type           #Slots   Active_Slot
kv260-smartcam                XRT_FLAT          1      -1
kv260-dp                      XRT_FLAT          1       0
kv260-aibox-reid              XRT_FLAT          1      -1
kv260-defect-detect           XRT_FLAT          1      -1
Note: The Active_Slot column shows the accelerator application that is currently loaded in the system. The value -1 indicates that the firmware is not loaded, while the value of 0 indicates that the firmware is loaded. By default, only the
kv260-dpfirmware is loaded.
To load the Defect Detection application firmware consisting of PL bitstream, device tree overlay, and the xclbin file, run the following command:
sudo xmutil loadapp kv260-defect-detect
Running the Defect Detect Application
There are two ways to invoke the Defect Detection application: Jupyter Notebook or command line.
Jupyter Notebook
Jupyter notebook works as an example to show the capability of the defect-detect application for specific configurations.
Jupter Notebook Defect Detect application supports the following modes:
0 ==> File Input and File Sink
1 ==> Live Normal Mode. Live Source and Display Out Normal Mode
2 ==> Live Demo Mode. Live Source and Display Out
3 ==> File In Display Out
4 ==> Live In and File Out
5 ==> File In Display Out Demo Mode
The default mode is Live source and display out (mode 1). Use the playback variable to change the mode.
Note:
Like other applications, by default, the defect-detection Jupyter notebook application is launched under the
petalinuxuser. For defect-detection, the defect-detection Jupyter notebook application must be run withrootprivilege.
To start the defect-detection Jupyter notebook application with
rootprivilege, perform the following steps:
Get the list of running Jupyter servers, with the following command:
jupyter-server list
Stop the default Jupyter notebook using the following command:
jupyter-server stop 8888
By default, the Defect Detection Jupyter Notebook is in
/home/petalinux/notebook. To change the path, run the Python script to install the Defect Detection Jupyter Notebook at the specified path.
Run the Python installer script.
Example: defect-detect-install.py -d /home/petalinux/
Note: /home/petalinux is the only accessible path for the petalinux user. You could have any specified path under this folder as the path for the Python script.
Launch the Jupyter notebook with
rootprivilege using the following command:
sudo jupyter lab --allow-root --notebook-dir=/home/petalinux/defect-detect --ip=<ip address> &**
Jupyter Notebook requires an IP address. If an IP address is not assigned by default, then perform the following steps 1-2.
If using a direct connection (no DHCP), see public documentation on how to configure your PC with a static IP on the same subnet.
For the SOM target, set the desired IP address within the same subnet using
ifconfig, like the following example:ifconfig eth0 <user defined IP> netmask <user defined netmask>
Output example:
[I 2021-07-28 07:54:34.076 ServerApp] jupyterlab | extension was successfully linked.
[I 2021-07-28 07:54:34.236 LabApp] JupyterLab extension loaded from /usr/lib/python3.8/site-packages/jupyterlab
[I 2021-07-28 07:54:34.236 LabApp] JupyterLab application directory is /usr/share/jupyter/lab
[I 2021-07-28 07:54:34.261 ServerApp] jupyterlab | extension was successfully loaded.
[I 2021-07-28 07:54:34.263 ServerApp] Serving notebooks from local directory: /home/petalinux/notebooks/defect-detect
[I 2021-07-28 07:54:34.263 ServerApp] Jupyter Server 1.2.1 is running at:
[I 2021-07-28 07:54:34.263 ServerApp] http://xxx.yyy.yyy.yyy:8888/lab?token=7db9bce8f3d64e072de222d17419eb3dc8aa66f98853bb26
[I 2021-07-28 07:54:34.264 ServerApp]  or http://xxx.yyy.yyy.yyy:8888/lab?token=7db9bce8f3d64e072de222d17419eb3dc8aa66f98853bb26
[I 2021-07-28 07:54:34.264 ServerApp] Use Control-C to stop this server and shut down all kernels (twice to skip confirmation).
[W 2021-07-28 07:54:34.288 ServerApp] No web browser found: could not locate runnable browser.
To access the Defect Detection Jupyter Notebook, use the path returned by the jupyter-server list command.
A Jupyter notebook user can run cell by cell or run the defect detection full pipeline in Jupyter Notebook. To do this, go to defect-detect.ipynb, then from the menu bar, select Kernel, and then select Restart Kernel & Run All Cells. The notebook by default expects file source location to be /home/petalinux/input_video.y8 - you can make changes in the notebook if needed.
When using a file sink, data is dumped in the rootfs (/home/petalinux). You will need to offload the output files to your PC and play using a YUV player. In the YUV player select the color as Y and the custom size as 1280x800.
Command Examples
Note: The application needs to be run with sudo.
Examples:
Note: Only one instance of the application can run at a time.
* For File-In and File-Out playback, run the following command.

    `sudo defect-detect -i input_video.y8 -x raw.y8 -y pre_pros.y8 -z final.y8`

     **Note** : The 3-stage outputs will be dumped into the files. It is mandatory to specify all the three output file names.

* For File-In and Display-Out playback, run the following command.

    `sudo defect-detect -i input_video.y8`

     **Note**: The 3-stage outputs will be displayed on DP/HDMI. Change the input file path as appropriate.

* For Live-In and File-Out playback, run the following command.

    `sudo defect-detect -x raw.y8 -y pre_pros.y8 -z final.y8`

     **Note**: The 3-stage outputs will be dumped into the files. It is mandatory to specify all the three output file names.

* For Live-In and Display-Out playback, run the following command.

    `sudo defect-detect`

     **Note**:The 3-stage outputs will be displayed on DP/HDMI.

* For Live-In and Display-Out playback in demo mode, run the following command.

    `sudo defect-detect -d 1`

  The 3-stage outputs will be displayed on DP/HDMI with 4 fps rate. This mode is enabled to run the pipeline with a slower rate for the user to analyze the different outputs.
Note: The File In Display Out Demo Mode is not supported in the command line application. You can run this mode using Jupyter Notebook (See the section named Jupyter Notebook in this document) or by using the gst-launch command.
Command Line
Use the command line to set the resolution, configuration file path and more, using the defect-detect application.
More combinations could be made based on the options provided by the defect-detect application.
Defect Detection Application Usage
sudo defect-detect --help
Usage:
defect-detect [OPTION?] - Application for defect detction on SoM board of Xilinx.
Help Options:
  -?, --help                        Show help options

  --help-all                        Show all help options

  --help-gst                        Show GStreamer Options
Application Options:
-i, --infile=file path                                  location of input file
-x, --rawout=file path                                  location of capture raw output file
-y, --preprocessout=file path                           location of pre-processed output file
-z, --finalout=file path                                location of final output file
-w, --width=1280                                        resolution width of the input
-h, --height=800                                        resolution height of the input
-r, --framerate=60                                      framerate of the input source
-d, --demomode=0                                        For Demo mode value must be 1
-c, --cfgpath=/opt/xilinx/share/ivas/defect-detect/     JSON config file path
The application is targeted to run an input source that supports GRAY8 (Y8) format with a resolution of 1280x800.
Once you are done with the Defect Detection application, to switch to another accelerator application, you can unload the currently loaded accelerator application firmware by running:
sudo xmutil unloadapp kv260-defect-detect
Sensor Calibration for the Live Source
While running the Defect Detection application through the command line or the Jupyter Notebook, by default the ar0144-sensor-calib.sh is called to perform the sensor calibration.
If the preview image is not properly displayed, use the ar0144-sensor-calib.sh script (present in /opt/xilinx/bin/)to change various sensor calibration parameter values such as:
Brightness
Contrast
Saturation
Exposure Metering
GAIN
Exposure
GAMMA
Make sure that the Defect Detection application is running in the background when calibrating the sensor.
Save the values in the script and run the script to apply the new values. For example:
sudo ar0144-sensor-calib.sh /dev/mediaX (where X is the corresponding media node for the AR0144 sensor)
File Structure of the Application
To view details, click here.
The application is comprised of the following files:
Binary File: =>
/opt/xilinx/bin
| filename | description |
|---|---|
| defect-detect | main app |
Script File: =>
/opt/xilinx/bin
| filename | description |
|---|---|
| defect-detect-install.py | Script to copy Jupyter notebook to user directory |
| ar0144-sensor-calib.sh | Script to calibrate sensor for user test environment |
Configuration Files: =>
/opt/xilinx/share/ivas/defect-detect/
| filename | description |
|---|---|
otsu-accelarator.json |
Configuration of OTSU accelerator |
cca-accelerator.json |
Configuration of CCA accelerator |
preprocess-accelarator.json |
Configuration of pre-process accelerator |
text2overlay.json |
Configuration of text2overlay software accelerator |
Jupyter notebook file: =>
/opt/xilinx/share/notebooks/defect-detect
| filename | description |
|---|---|
defect-detect.ipynb |
Jupyter notebook file to run the Defect Defection pipeline |
Next Steps
Go back to the KV260 SOM Defect detect design start page

License
Licensed under the Apache License, Version 2.0 (the “License”); you may not use this file except in compliance with the License.
You may obtain a copy of the License at http://www.apache.org/licenses/LICENSE-2.0
Unless required by applicable law or agreed to in writing, software distributed under the License is distributed on an “AS IS” BASIS, WITHOUT WARRANTIES OR CONDITIONS OF ANY KIND, either express or implied. See the License for the specific language governing permissions and limitations under the License.
Copyright© 2021 Xilinx