Using Caffe Framework and Inception v1
In this lab, you will use the pretrained Inception-v1 model with Caffe framework from the AI-Model-Zoo. It is assumed that you have an AWS F1 instance setup for the Vitis-AI version 1.4.1 otherwise refer to AWS_README to set one up.
Open a terminal window.
Download the source files
We will use the pretrained Inception-v1 network with the Caffe framework from the AI-Model-Zoo.
Download the model source files.
cd /home/ubuntu/Vitis-AI_1_4_1/models/AI-Model-Zoo/
python3 downloader.py
At the input: prompt, type cf inceptionv1 and hit Enter. The available selections will be displayed.
Note 1 is for the board independent source files, 2 to 7 are for the various boards specific options.
Type 1 and hit Enter to download the zip file (cf_inceptionv1_imagenet_224_224_3.16G_1.4.zip).
Create a working directory called cf_inceptionv1 under the workspace directory. Move the downloaded zip file in the cf_inceptionv1 directory. Unzip the downloaded file to get cf_inceptionv1_imagenet_224_224_3.16G_1.4 directory and associated files. Change to the unzipped directory.
mkdir /home/ubuntu/Vitis-AI_1_4_1/cf_inceptionv1
mv cf_inceptionv1_imagenet_224_224_3.16G_1.4.zip /home/ubuntu/Vitis-AI_1_4_1/cf_inceptionv1/.
cd /home/ubuntu/Vitis-AI_1_4_1/cf_inceptionv1
unzip cf_inceptionv1_imagenet_224_224_3.16G_1.4.zip
cd cf_inceptionv1_imagenet_224_224_3.16G_1.4
The cf_inceptionv1_imagenet_224_224_3.16G_1.4 directory will be created with its source files.
Note the directory structure and the files under them.
cf_inceptionv1_imagenet_224_224_3.16G_1.4
├── code
│   ├── gen_data
│   │   ├── gen_data.py
│   │   ├── gen_quantize_data_list.py
│   │   ├── get_dataset.sh
│   │   └── imagenet_class_index.json
│   ├── test
│   │   ├── quantize.sh
│   │   ├── quantized_test.sh
│   │   └── test.sh
│   └── train
│       ├── solver.prototxt
│       └── train.sh
├── data
│   └── demo_list.txt
├── float
│   ├── quantize.prototxt
│   ├── test.prototxt
│   ├── trainval.caffemodel
│   └── trainval.prototxt
├── quantized
│   ├── deploy.caffemodel
│   ├── deploy.prototxt
│   ├── quantize_test.prototxt
│   ├── quantize_train_test.caffemodel
│   └── quantize_train_test.prototxt
└── readme.md
Edit the following two files to set the directory path, change the quantizer name, and set other parameters.
gedit code/test/quantize.sh
In line 17, replace caffe_xilinx_dir=../../../caffe-xilinx/ with caffe_xilinx_dir=../../../../../../models/AI-Model-Zoo/caffe-xilinx/
In line 22, replace $caffe_xilinx_dir/build/tools/vai_q with vai_q_caffe and --calib_iter 64 with --calib_iter 16. Changing calib_iter value from 64 to 16 speeds up quantization process.
The changes should look like:

Save the changes and close the file.
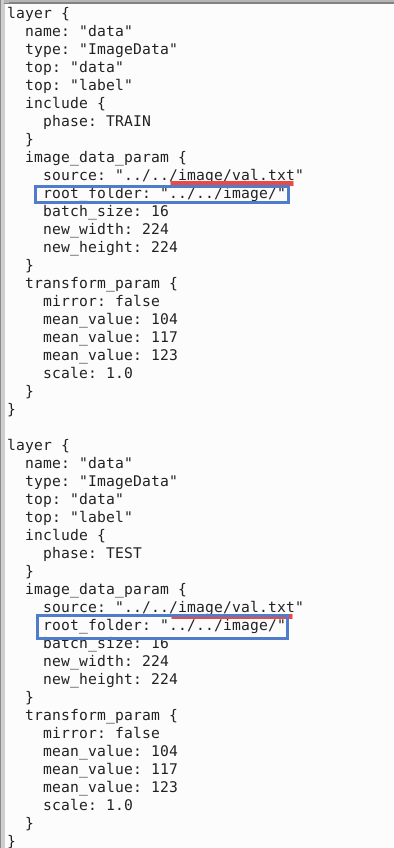
gedit float/quantize.prototxt
Change line 10 from ../../data/quantize/quant.txt to ../../image/val.txt
Insert after line 10 (source:…) root_folder: "../../image/"
Change line 34 from ../../data/quantize/quant.txt to ../../image/val.txt
Insert after line 34 (source:…) root_folder: "../../image/"
Save the changes and close the file.

Launch Docker Container
Open another terminal window and Launch Docker Container.
cd /home/ubuntu/Vitis-AI_1_4_1
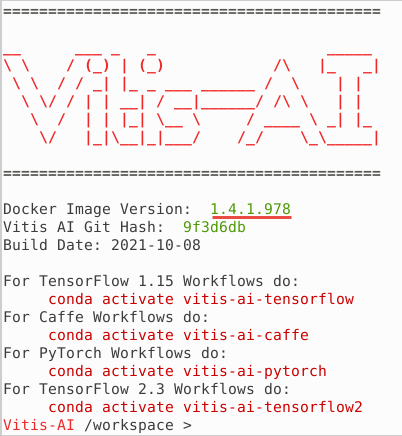
./docker_run.sh xilinx/vitis-ai-cpu:1.4.1.978
The docker shell will start showing the following:

Activate Conda Environment.
conda activate vitis-ai-caffe
Note the root folder changes to (vitis-ai-caffe) Vitis-AI /workspace>.
DPU IP selection.
source /workspace/setup/alveo/setup.sh DPUCADF8H
Download a minimal validation set for Imagenet2012 using Collective Knowledge (CK). Create a local image directory. Copy the val.txt and image files into the image directory using the following commands:
cd /workspace/cf_inceptionv1/cf_inceptionv1_imagenet_224_224_3.16G_1.4
mkdir image
python -m ck pull repo:ck-env
python -m ck install package:imagenet-2012-val-min
python -m ck install package:imagenet-2012-aux --tags=from.berkeley
head -n 500 ~/CK-TOOLS/dataset-imagenet-ilsvrc2012-aux-from.berkeley/val.txt > ./image/val.txt
cp ~/CK-TOOLS/dataset-imagenet-ilsvrc2012-val-min/*.JPEG image/
Quantize the Model
To deploy a Caffe model on the FPGA, it needs to be quantized and compiled.
Quantize the model
Make sure that you are at the /workspace/cf_inceptionv1/cf_inceptionv1_imagenet_224_224_3.16G_1.4/code/test directory. Run the following command to run the quantizer.
cd /workspace/cf_inceptionv1/cf_inceptionv1_imagenet_224_224_3.16G_1.4/code/test
source quantize.sh
The following command will be executed:
vai_q_caffe quantize --model $MODEL_PATH --weights $WEIGHT_PATH --keep_fixed_neuron --calib_iter 16
| Quantizer Arguments | Description |
|---|---|
| –model | Caffe floating-point network model in *.protext file |
| –weights | Weights in *.caffemodel file |
| –keep_fixed_neuron | Fixes the neurons |
| –calib_iter | Number of iterations in calibration phase |
Since we changed the number of calibration iterations to 16, it will take about five minutes to complete the process. With 64, it would take about 15 minutes. When the process is completed, quantize_results directory would have been created under the current code/test directory. There will be four files generated under the quantize_results.
Output Quantized Train&Test Model:   "./quantize_results/quantize_train_test.prototxt"
Output Quantized Train&Test Weights: "./quantize_results/quantize_train_test.caffemodel"
Output Deploy Weights: "./quantize_results/deploy.caffemodel"
Output Deploy Model:   "./quantize_results/deploy.prototxt"
The deploy.caffemodel and deploy.prototxt are the files which will be used as input parameters to the compiler.
Compile the Model
In this step, the network graph, xmodel file, inceptionv1.xmodel along with md5sum.txt and meta.json will be generated in the vai_c_output_AWS directory under the current directory. Note this may take approximately 2 minutes.
Execute the following command which invokes vai_c_caffe compiler with several input parameters.
vai_c_caffe -p quantize_results/deploy.prototxt -c quantize_results/deploy.caffemodel -a /opt/vitis_ai/compiler/arch/DPUCADF8H/U200/arch.json -o vai_c_output_AWS -n inceptionv1 --options '{"input_shape":"4,3,224,224"}'
| Compiler Arguments | Description |
|---|---|
| -p MODEL | *.prototxt file |
| -c caffemodel | *.caffemodel file |
| -a ARCH | Architecture JSON file |
| -o OUTPUT_DIR | Output directory location to store the generated output |
| -n NET_NAME | Prefix-name for the outputs |
| -options OPTIONS | Extra options |
Run example classification code
The inceptionv1.xmodel is the compiled model for the DPUCADF8H DPU. Copy the necessary source files directory (src), a shell script to build the project (build.sh), and words.txt which describes various objects labels from the example directory provided as part of the repository. Finally, build the project.
cp -r /workspace/examples/DPUCADF8H/tf_inception_v1/* .
./build.sh
The build.sh script will compile the source files and generate the inception_example executable.
Run the compiled application using the images you downloaded into the image directory.
Run
./inception_example ./vai_c_output_AWS/inceptionv1.xmodel ../../image/
The output should look like:
WARNING: Logging before InitGoogleLogging() is written to STDERR
I0214 10:16:32.653612   361 main.cc:293] create running for subgraph: subgraph_conv1/7x7_s2
  ...
  ...
Image : ILSVRC2012_val_00000498.JPEG
top[0] prob = 0.085024  name = waffle iron
top[1] prob = 0.066217  name = sports car, sport car
top[2] prob = 0.051570  name = swing
top[3] prob = 0.031279  name = mask
top[4] prob = 0.031279  name = ladle

Image : ILSVRC2012_val_00000237.JPEG
top[0] prob = 0.085024  name = waffle iron
top[1] prob = 0.066217  name = sports car, sport car
top[2] prob = 0.051570  name = swing
top[3] prob = 0.031279  name = mask
top[4] prob = 0.031279  name = ladle

Image : ILSVRC2012_val_00000073.JPEG
top[0] prob = 0.085024  name = waffle iron
top[1] prob = 0.066217  name = sports car, sport car
top[2] prob = 0.051570  name = swing
top[3] prob = 0.031279  name = mask
top[4] prob = 0.031279  name = ladle
The top five priorities are identified for each image.
You may want to close the docker image by typing exit in the image console.
Note If the previous attempt to run the application fails with a core dump, then run
xbutil examineand verify that the board is detected. If the board is not detected then source the setup.sh (source /workspace/setup/alveo/setup.sh DPUCADF8H) and run the same command to see that the board is detected. Once the board is detected, you can run the application.
Copyright© 2022 Xilinx