Streaming Lab
Introduction
In this lab you will create an streaming kernel which implements a Finite Impulse Response (FIR) filter of 73 taps. However, Alveo/AWS F1 shells do not support direct streaming connection between the host and kernels. In order to support the streaming kernel, you will include datamover kernels which will translate from memory mapped to stream and vice versa.
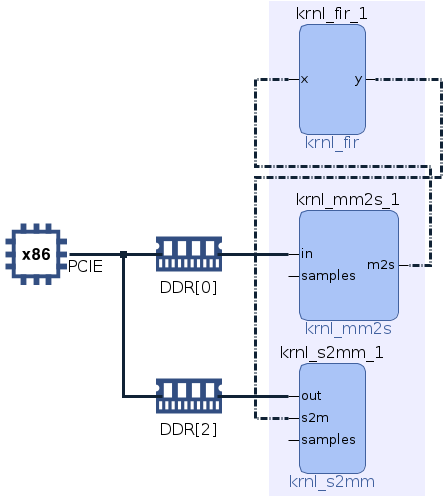
The following image depicts the three kernels that will be use and how they are connected together.

This labs guides you through the steps to:
- Add the host and kernel code to Vitis
- Define the kernels that will be implemented on hardware
- Specify the streaming connection with a configuration file
- Run the application
This lab has been verified in the following platforms (platform containing the string 2018 are not supported)
- xilinx_aws-vu9p-f1_shell-v04261818_201920_2
- xilinx_u50_gen3x16_xdma_201920_3
- xilinx_u55c_gen3x16_xdma_2_202110_1
- xilinx_u200_gen3x16_xdma_1_202110_1
- xilinx_u250_gen3x16_xdma_3.1_202020_1
- xilinx_u280_xdma_201920_2
FIR
A FIR filter is one of the two primary digital filters. A FIR has a finite response to an impulse.
The following figure shows the conventional discrete tapped delay line filter representation. As you can see the output, y(n), is the weighted sum of the n previous samples. The weight vector, a(n), is also called coefficients and vary deepening on the filter type, sampling frequency and other parameters.

However, in this lab we will use the transposed direct version, which is an improved version of the filter that yields to better performance and does not diverge significantly from the standard version. There are much more efficient implementations, but these will not be cover here.

Steps
Create Vitis project
-
Create a new Vitis Application Project
-
In the Platform window select AWS F1 platform
-
In the Application Project Details type streaming_lab
-
Finally, select Empty Application
Add source code and hardware functions
-
In the Explore view, right-click on
streaming_lab_system > streaming_lab > srcand selectImport Sources... -
Browse to
~/xup_compute_acceleration/sources/streaming_laband addhost.cpp, xcl2.cpp and xcl2.hppfiles -
In the Explore view, right-click on
streaming_lab_system > streaming_lab_kernels > srcand selectImport Sources... -
Browse to
~/xup_compute_acceleration/sources/streaming_laband addkrnl_fir.cpp, krnl_mm2s.cpp, and krnl_s2mm.hppfiles -
Double-click on
streaming_lab_system > streaming_lab_kernels > streaming_lab_kernels.prj -
In the
Hardware Functionsview, click the Add Hardware Function ( ) button icon
 -
Select
krnl_fir,krnl_mm2sandkrnl_s2mmand click OK -
Check that the kernels are included within the Hardware Functions panel

-
In the Explore view, right-click on
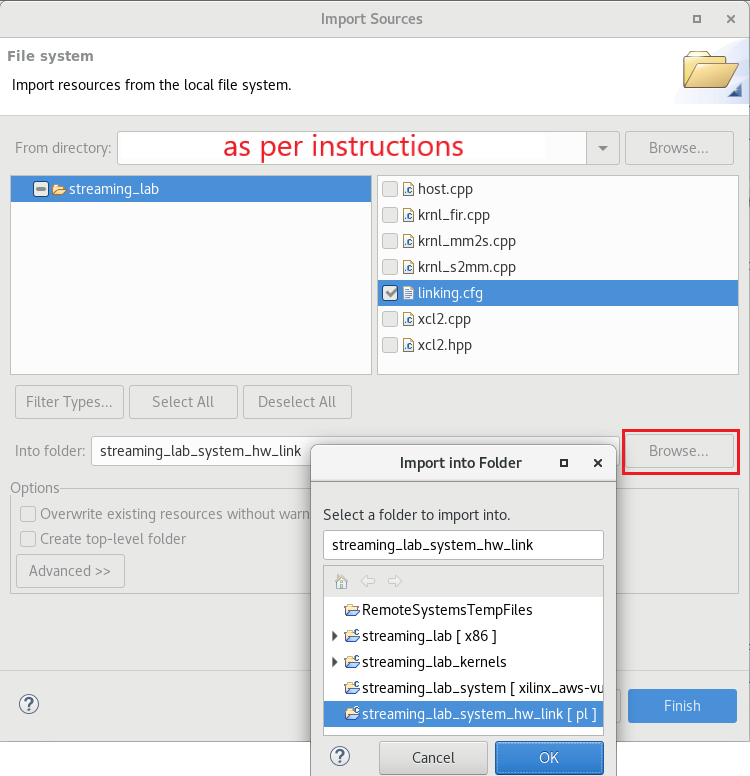
streaming_lab_system_hw_linkand selectImport Sources... -
Browse to
~/xup_compute_acceleration/sources/streaming_laband addlinking.cfgfile -
In the field Into folder:, click
Browse...and selectstreaming_lab_system_hw_link [pl], then click OK and Finish
-
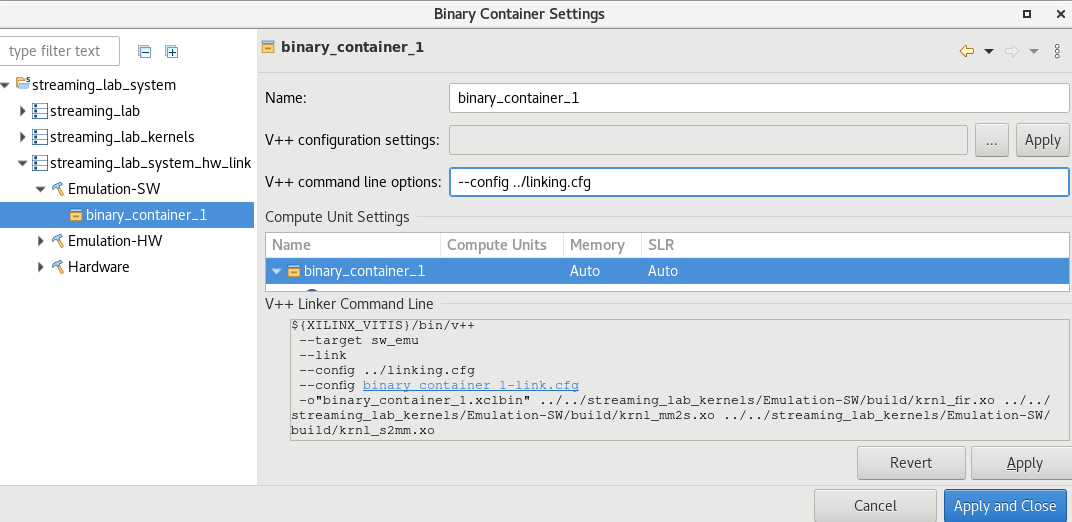
In the Assistant view, right-click on
streaming_lab_system > streaming_lab_system_hw_link > Emulation-SW > binary_container_1and selectSettings... -
In the V++ command line options: field type
--config ../linking.cfgand click Apply and Close
The linker option will take effect for all configurations.
-
Open and analyze the source code of the kernels and host application
krnl_mm2s.cpp: reads data from global memory and generates a streamkrnl_s2mm.cpp: reads data from an stream and stores the data in global memorykrnl_fir.cpp: implements a digital bandpass FIR filter using the transposed form. There are 73 coefficients that are statichost.cpp: creates the test vector, instantiates and run the FIR filter
-
Open and analyze
linking.cfgfile.This file provides information to the tool on how to connect the streaming connections as well as the memory interfaces
Run software emulation
-
In the Assistant view, select streaming_lab_system and build the application by clicking the build (
 ) button
 -
In the Explorer view, right-click on streaming_lab_system and select
Run As > Run Configurations... -
In the Program Arguments make sure that Automatically add binary container(s) to arguments is selected.
-
Click Apply and then Run
-
The console output will report
Found Platform
Platform Name: Xilinx
INFO: Reading <path>/binary_container_1.xclbin
Loading: '<path>/binary_container_1.xclbin'
Trying to program device[0]: xilinx_aws-vu9p-f1_shell-v04261818_201920_2
Device[0]: program successful!
Running FIR filter with 128 samples, each sample is a 32-bit signed element
Launching Hardware Kernels...
Getting Hardware Results...
Computing Software results...
TEST PASSED
Change program arguments
-
In the Explorer view, right-click on streaming_lab_system and select
Run As > Run Configurations... -
In the Program Arguments click
Edit... -
Double-click
streaming_lab -
In the
Argumentsbox include include:${project_loc:streaming_lab_system}/Emulation-SW/binary_container_1.xclbin 16 debug
-
Click OK to set the arguments, click OK again, then click Apply, and finally click Run
Notice that this time the results are shown with sample number, sw and hw computed results
Run hardware emulation
-
Select or open the
Hardware Kernel Project Settingsview and change Active build configuration to: Emulation-HW -
In the Assistant view, select streaming_lab_system and build the application by clicking the build
 button
 -
Once compiled, Run the Emulation-HW, only specify the binary container as argument
-
The console output will report
Found Platform
Platform Name: Xilinx
INFO: Reading <path>/binary_container_1.xclbin
Loading: '<path>/binary_container_1.xclbin'
Trying to program device[0]: xilinx_aws-vu9p-f1_shell-v04261818_201920_2
INFO: [HW-EM 01] Hardware emulation runs simulation underneath. Using a large data set will result .............
Device[0]: program successful!
Running FIR filter with 2048 samples, each sample is a 32-bit signed element
Launching Kernel...
Getting Results...
TEST PASSED
INFO::[ Vitis-EM 22 ] [Time elapsed: 0 minute(s) 39 seconds, Emulation time: 0.145998 ms]
Data transfer between kernel(s) and global memory(s)
krnl_mm2s_1:m_axi_gmem-DDR[0]          RD = 8.000 KB               WR = 0.000 KB
krnl_s2mm_1:m_axi_gmem-DDR[2]          RD = 0.000 KB               WR = 8.000 KB

Data transfer on stream interfaces
krnl_fir_1:y-->krnl_s2mm_1:s2m               8.000 KB
krnl_mm2s_1:m2s-->krnl_fir_1:x               8.000 KB
Notice that not only the data memory mapped data transfer is reported, but also, the streaming data transfer. Once again, you can rerun the application with different arguments.
-
In the Assistant view expand streaming_lab_system > streaming_lab [Host] > Emulation-HW -> SystemDebugger_streaming_lab_system_streaming_lab and double click
Run Summary (xclbin) -
In the Vitis Analyzer, click
System Diagramand notice the memory mapped and streaming connection (dotted lines)
-
Open
Timeline Traceand explore the host and kernel timeline. If you do not see host activity then go to Run Configurations and change runtime configuration to enable Host Code tracing
Note that when the FIR filter starts producing data it never starves. This is because the design uses two different memory banks. You can explore how the memory bank assignation impacts the performance by editing the
linking.cfgfile, re building and rerunning the application.
Analysis
Note that for a linear phase response FIR filter, the coefficients are symmetric around the center value. Vitis HLS realizes and halves the number of multiplications. What is more, Vitis HLS analyzes the coefficients and does not implement a multiplications for those coefficients that are a power of 2, or can be conformed as the sum of power of two, e.g, 384 (256 + 128). Vitis HLS analyzes the cost of implementing the multiplication as an addition of power of 2 or implementing using a multiplier. Consequently, out of the 36 symmetric multiplications one has a coefficient 0, and the other four are implemented as sum. That leaves the designing with only 32 multiplications. Since each multiplication is 32-bit x 16-bit and the DSP48e2, harden multipliers, can handle multiplication of 27-bit x 18-bit each multiplication needs two DSP48e2. Vitis HLS is able to perform these types of optimizations because the coefficients are static, for dynamic coefficients Vitis cannot make any assumption and will implement 73 multiplications.
Here is the list of the coefficients that are optimized.
| Index | Coefficient | Composition |
|---|---|---|
| 4 | 384 | 256 , 128 |
| 8 | -15 | -16 , 1 |
| 14 | 20 | 16 , 4 |
| 27 | -6 | -8 , 2 |
Run hardware
Since the Hardware build and AFI availability for AWS takes a considerable amount of time, a precompiled and preregistered AWS version is provided for you. Use the precompiled solution directory to verify the functionality
-
Change Active build configuration: to Hardware
-
In the Assistant view, right-click on
streaming_lab_system > streaming_lab [Host]and select BuildNote, this will only build the host code.
-
Copy the precompiled bitstream solution
cp ~/xup_compute_acceleration/solutions/streaming_lab/* ~/workspace/streaming_lab/Hardware/ -
Run the application and analyze the output using the following commands:
cd ~/workspace/streaming_lab/Hardware/ ./streaming_lab binary_container_1.awsxclbin -
The FPGA bitstream will be downloaded and the host application will be executed showing an output similar to:
Found Platform
Platform Name: Xilinx
INFO: Reading binary_container_1.awsxclbin
Loading: 'binary_container_1.awsxclbin'
Trying to program device[0]: xilinx_aws-vu9p-f1_shell-v04261818_201920_2
Device[0]: program successful!
Running FIR filter with 4194304 samples, each sample is a 32-bit signed element
Launching Hardware Kernels...
Getting Hardware Results...
Computing Software results...
TEST PASSED
Conclusion
In this lab, you used Vitis to implement an FIR filter using streaming kernels. A configuration file specifies how the streaming interfaces are connected between the kernels. You also analyzed the system diagram and the timeline trace.
Copyright© 2021 Xilinx