2020.1 Vitis™ Application Acceleration Development Flow TutorialsSee 2019.2 Vitis Application Acceleration Development Flow Tutorials |
3. Optimizing Memory Transfers
In the last lab, you established a baseline performance of the application using a single frame. In this lab, you remove redundant memory accesses, and optimize the data movement between the kernel and global memory.
For Hardware Emulation runs, the kernel is processing images with a size of 512x10. Each pixel is composed of 4 bytes representing RGBA values. For a 512x10 image, that means that you are processing 20 KB per frame. The processed report also indicates that application reads (167.781+167.781=335.562) KBs of data in your kernel. This is significantly more than the 20 KB input frame. This is because you are reading all the filter coefficients every time you process a pixel, as well as 9 pixels to make a computation. In steady state, 8 of the 9 pixels for processing have already been read.
This might not be a problem on modern CPUs because most processors have a hardware controlled cache that store the data automatically on a very fast local cache. However, on an FPGA, this needs to be done explicitly by creating and copying the data into a local array in the hardware kernel.
You can apply the same technique to read a part of the image to the local array and perform the convolution on that local data instead of on the global memory. You will read in as many lines as the width of the filter. You then perform the convolution on these lines and write the result of the line back to global memory. Afterwards, you are going to read only the next line into the next slot of the local memory to perform the next operation. The following diagram shows this process.
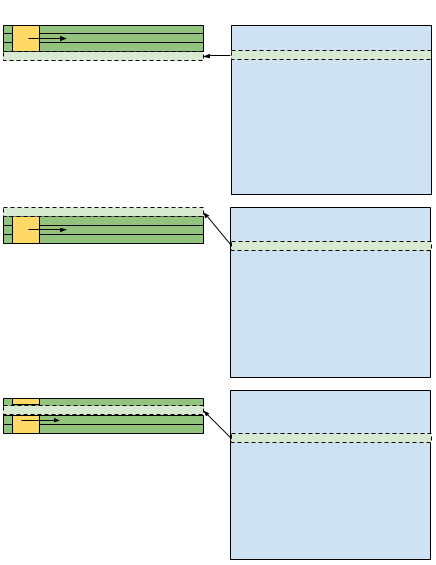
In the first operation, you read three lines into the local memory, and perform the operation on those lines. You store the result back to the global memory and read the next line in the fourth line of the local memory array. After you reach the end of the buffer, you circle back to the top of the local memory array and write there.
Kernel Code Modifications
TIP: The completed kernel source file is provided under the
reference-files/localbuffolder. You can use it as a reference if needed.
From the src/localbuf folder, open the convolve_fpga.cpp file, and make the following modifications:
Add the
cstringheader at the top of the file to add the declaration of thememcpyfunction.#include <cstring>After the last pragma in the function body, add the following.
 float coef[MAX_FILTER * MAX_FILTER];
 memcpy(coef, coefficient, coefficient_size * coefficient_size * sizeof(float));
These lines create a
coefarray that will store the filter coefficients, then copy the data from thecoefficientarray passed into the function. Thecoefarray is going to be synthesized on the FPGA using block RAM resources. Access to block RAM has significantly lower latency than the on-board DDR memory.Now that you have created the cached array called
coef, you need to modify the rest of the code to use that array. Change the following lines in the inner loops (line 48-50):sum_r += inFrame[(ii * img_width) + jj].r * coefficient[(m * coefficient_size) + n]; sum_g += inFrame[(ii * img_width) + jj].g * coefficient[(m * coefficient_size) + n]; sum_b += inFrame[(ii * img_width) + jj].b * coefficient[(m * coefficient_size) + n];
to:
 sum_r += inFrame[(ii * img_width) + jj].r * coef[(m * coefficient_size) + n];
 sum_g += inFrame[(ii * img_width) + jj].g * coef[(m * coefficient_size) + n];
 sum_b += inFrame[(ii * img_width) + jj].b * coef[(m * coefficient_size) + n];
The
MAX_FILTERspecifies the largest filter you expect your kernel to process. TheMAX_WIDTHis the maximum width of the image that this kernel can process. These are set in theconstants.hheader and can be updated to handle larger sizes. In this example, theMAX_FILTERis 19, and theMAX_WIDTHis 1920. Create a local array for the input pixels and output pixels and only storeMAX_FILTERlines because you need at least that many lines to perform the convolution at each iteration. Put the following lines before theforloop (after line 34).RGBPixel window_mem[MAX_FILTER][MAX_WIDTH]; RGBPixel out_line[MAX_WIDTH]; #pragma HLS data_pack variable=window_mem #pragma HLS data_pack variable=out_line
The
window_memvariable stores the input pixels. Theout_linevariable stores the output pixels.Next, fill the first half of the arrays with zero to take the border into account. Put the following lines after the lines you just added in the previous step.
 static const RGBPixel zero = {0, 0, 0, 0};
 int center = coefficient_size / 2;
 for(int line = 0; line < center; line++) {
     for(int pixel = 0; pixel < MAX_WIDTH; pixel++) {
         window_mem[line][pixel] = zero;
     }
 }
Here
centeris the location of the center pixel in the filter. It is the same as the radius of the kernel.Fill the second half of the array with the first few lines of the image. You are going to let the next
forloop bring in the final line. Put the following lines of code after the lines from Step 5.for(int line = center; line < coefficient_size-1; line++) { memcpy(window_mem[line], inFrame + ((line-1) * img_width), img_width * sizeof(RGBPixel)); }
In the
forloop that iterates over the height of the image, first read the next line of the image into the local array. You also need to take into account the additional padding at the end of the image, so you need to add a check to see if you have reached the bottom of the image and insert zeros into the array. Modify the outer loop as follows (line 38).for(int line = 0; line < img_height; ++line) { int next_line = (line + coefficient_size - 1) % MAX_FILTER; if(line + 1 < img_height) { memcpy(window_mem[next_line], inFrame + ((line+center) * img_width), img_width * sizeof(RGBPixel)); } else { for(int pixel = 0; pixel < MAX_WIDTH; pixel++) { window_mem[next_line][pixel] = zero; } } ...
The
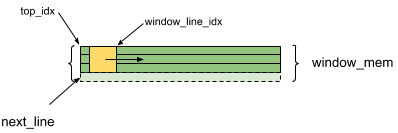
next_linevariable tracks where in the window you will be storing the next line of the input image.You also need to track which lines of the
window_memyou will read in your convolution. The calculation here uses thewindow_line_idxvariable to map the input image line to thewindow_memline in the local array. Thetop_idxvariable will be used to point to the first line of thewindow_memarray. Put the following lines of code after the lines you just added in Step 7.int window_line_idx = next_line - center - 1; if(window_line_idx < 0) window_line_idx += MAX_FILTER; int top_idx = window_line_idx;
Next, modify the convolution operation to use the new
window_memarray, instead of theinFrameparameter. Replace the calculation of the inner loop (line 47~), from:int ii = line + m - center; int jj = pixel + n - center; if(ii >= 0 && ii < img_height && jj >= 0 && jj < img_width) { sum_r += inFrame[(ii * img_width) + jj].r * coef[(m * coefficient_size) + n]; sum_g += inFrame[(ii * img_width) + jj].g * coef[(m * coefficient_size) + n]; sum_b += inFrame[(ii * img_width) + jj].b * coef[(m * coefficient_size) + n]; }
to:
 int jj = pixel + n - center;
 if(jj >= 0 && jj < img_width)
 {
     sum_r += window_mem[window_line_idx][jj].r * coef[m * coefficient_size + n];
     sum_g += window_mem[window_line_idx][jj].g * coef[m * coefficient_size + n];
     sum_b += window_mem[window_line_idx][jj].b * coef[m * coefficient_size + n];
 }
Notice you are using the
window_line_idxvariable to index into thewindow_memvariable instead ofii.The
window_line_idxvariable needs to be incremented each time you update themvariable. You also need to make sure that after you read the edge of the local array, you circle back to the first line. The following code that does this.window_line_idx=(window_line_idx + 1) == MAX_FILTER ? 0 : window_line_idx + 1;
This is equivalent to
window_line_idx = (window_line_idx + 1) % MAX_FILTER;, but you are avoiding a modulus operation which is computationally expensive.This will need to be placed at the end of the loop that updates the
mvariable.After calculating the convolution for a given pixel, reset the
window_line_idxvariable totop_idx, and write your results to theout_linearray. You can replace write tooutFramewith write toout_line. Replace (line 58~60).outFrame[line * img_width + pixel].r = fabsf(sum_r); outFrame[line * img_width + pixel].g = fabsf(sum_g); outFrame[line * img_width + pixel].b = fabsf(sum_b);
with
window_line_idx = top_idx;
out_line[pixel].r =  fabsf(sum_r);
out_line[pixel].g =  fabsf(sum_g);
out_line[pixel].b =  fabsf(sum_b);
The
out_linewill be written tooutFrameafter the image line has been processed.memcpy(outFrame+(line * img_width), out_line, img_width * sizeof(RGBPixel));
This will be placed after the for loop that iterates over
image_width.
Now you have completed all the modifications, and you can run hardware emulation with the optimized code.
Run Hardware Emulation
Go to the Makefile directory, and use the following command to run hardware emulation.
make run TARGET=hw_emu STEP=localbuf SOLUTION=1 NUM_FRAMES=1
The following output is displayed.
Processed 0.02 MB in 461.702s (0.00 MBps)

INFO: [Vitis-EM 22] [Wall clock time: 20:41, Emulation time: 1.61452 ms] Data transfer between kernel(s) and global memory(s)
convolve_fpga_1:m_axi_gmem1-DDR[0]          RD = 20.000 KB              WR = 20.000 KB
convolve_fpga_1:m_axi_gmem2-DDR[0]          RD = 0.035 KB               WR = 0.000 KB
View Profile Summary for Hardware Emulation
Use the following command to view the Profile Summary report.
make view_run_summary TARGET=hw_emu STEP=localbuf
The kernel execution time is now 1.574 ms rather than the baseline performance of 3.903 ms (see the following table). This is because you removed all global memory accesses for the calculation and stored image data and coefficients in the local memory.
Capture the performance data from Profile Summary report, and add it to the following table.
Here is the updated table. There is a 2.48x boost on kernel execution time perspective.
| Step | Image Size | Time (HW-EM)(ms) | Reads (KB) | Writes (KB) | Avg. Read (KB) | Avg. Write (KB) | BW (MBps) |
|---|---|---|---|---|---|---|---|
| baseline | 512x10 | 3.903 | 344 | 20.0 | 0.004 | 0.004 | 5.2 |
| localbuf | 512x10 | 1.574 (2.48x) | 21 (0.12x) | 20.0 | 0.064 | 0.064 | 13 |
Next Step
You will now look at optimizing floating point calculations for an FPGA by optimizing using fixed point datatypes.
Return to Getting Started Pathway — Return to Start of Tutorial
Copyright© 2020 Xilinx