Versal Custom Platform Creation Tutorial |
Step 3: Create the Vitis Platform
Vitis Platform can be created with Vitis GUI or XSCT command line. This tutorial will focus on GUI flow.
Prepare for Platform Packaging
We would store all the necessary files in one directory for Vitis platform creation flow.
| Component | Conventional Path or Filename | Description |
|---|---|---|
| BIF file | boot/linux.bif | Boot image generation description file |
| Boot components in BOOT.BIN | boot/bl31.elfboot/u-boot.elfboot/system.dtb | All components referred in linux.bif should be in this folder |
| Boot components in FAT32 partition | image/boot.scr | U-boot configuration file |
| Linux Software Components | sw_comp/Imagesw_comp/rootfs.ext4sw_comp/sysroots | Linux components for application creation and Linux booting |
When building a Vitis application, software components like Linux kernel image, root filesystem and sysroot are also needed. So we’ll prepare them altogether.
We would store all the necessary files for Vitis platform creation flow. Here we call it step3_pfm directory. Example files can be found in ref_files/step3_pfm directory of this repository.
Add a BIF file (linux.bif) to the step3_pfm/boot directory with the contents shown below. The file names should match the contents of the boot directory.
/* linux */
the_ROM_image:
{
{ load=0x1000, file=<system.dtb> }
{ load=0x8000000, file=<u-boot.elf> }
{ core=a72-0, exception_level=el-3, trustzone, file=<bl31.elf> }
}
Make sure all files being referred by linux.bif are stored in the same directory. They are generated by PetaLinux and originally located in <your_petalinux_dir>/images/linux directory. You can copy them into step3_pfm/boot for easy understanding. Here we keep them in <your_petalinux_dir>/images/linux directory because in case we need to update PetaLinux settings and rebuilt PetaLinux, we just need to clean platform and rebuilt them in Vitis to generate a new platform. We won’t need to copy them manually every time. These files are the source of creating final BOOT.BIN during application packaging. When creating the platform, these files will be copied to the platform output directory. In this example, these files are referred by the BIF file.
bl31.elf
u-boot.elf
system.dtb
Prepare step3_pfm/image directory. Contents in this directory will be packaged to FAT32 partition of SD card image by v++ package tool.
Copy boot.scr from <your_petalinux_dir>/images/linux directory to the step3_pfm/image directory. It’s a script for u-boot initialization. U-boot will read it from fat32 partition during boot process.
Prepare software components for application creation. Platform packaging can add them or exclude them. Due to the software component size, they are usually kept outside of platforms so that these components can be reused among multiple platforms with the same architecture.
# Create sw_comp directory
cd step3_pfm
mkdir sw_comp
cd sw_comp
# Copy Linux kernel image
cp <your_petalinux_dir>/images/linux/Image .
# Copy EXT4 Root Filesystem
cp <your_petalinux_dir>/images/linux/rootfs.ext4 .
# Install sysroot to this directory
<your_petalinux_dir>/images/linux/sdk.sh -d ./ -y
Finally, your prepared directory structure looks like this.
tree -L 3 --charset ascii
.
|-- boot
|   |-- bl31.elf
|   |-- linux.bif
|   |-- system.dtb
|   `-- u-boot.elf
|-- image
|   `-- boot.scr
|-- sw_comp
|   |-- environment-setup-aarch64-xilinx-linux
|   |-- Image
|   |-- rootfs.ext4
|   |-- site-config-aarch64-xilinx-linux
|   |-- sysroots
|   |   |-- aarch64-xilinx-linux
|   |   `-- x86_64-petalinux-linux
|   `-- version-aarch64-xilinx-linux
Note: If you run the fast track script, the boot directory only has linux.bif file because the platform creation script xsct_create_pfm.tcl uses <petalinux_project>/images/linux directory as boot directory for components of the BIF file. To make the GUI flow easier, we copy these components to boot directory for preparation.
Platform Packaging
First we create a Vitis platform project with the XSA file generated by Vivado
Launch Vitis.
# You are still in step3_pfm directory
# Setup Vitis environment
source <Vitis_Install_Directory>/settings64.sh
# Launch Vitis, using ./platform_repo directory as workspace
vitis -workspace ./platform_repo &
Create a platform project
In the Vitis IDE, select File > New > Platform Project to create a platform project.
Enter the project name. For this example, type
vck190_custom, click Next.In the Platform page, click Browse button, select the XSA file generated by the Vivado. In this case, it is located in
<Your Vivado Project Directory>/vck190_custom.xsa. Click Next.Set the operating system to linux.
Set the processor to psv_cortexa72.
Click Finish.
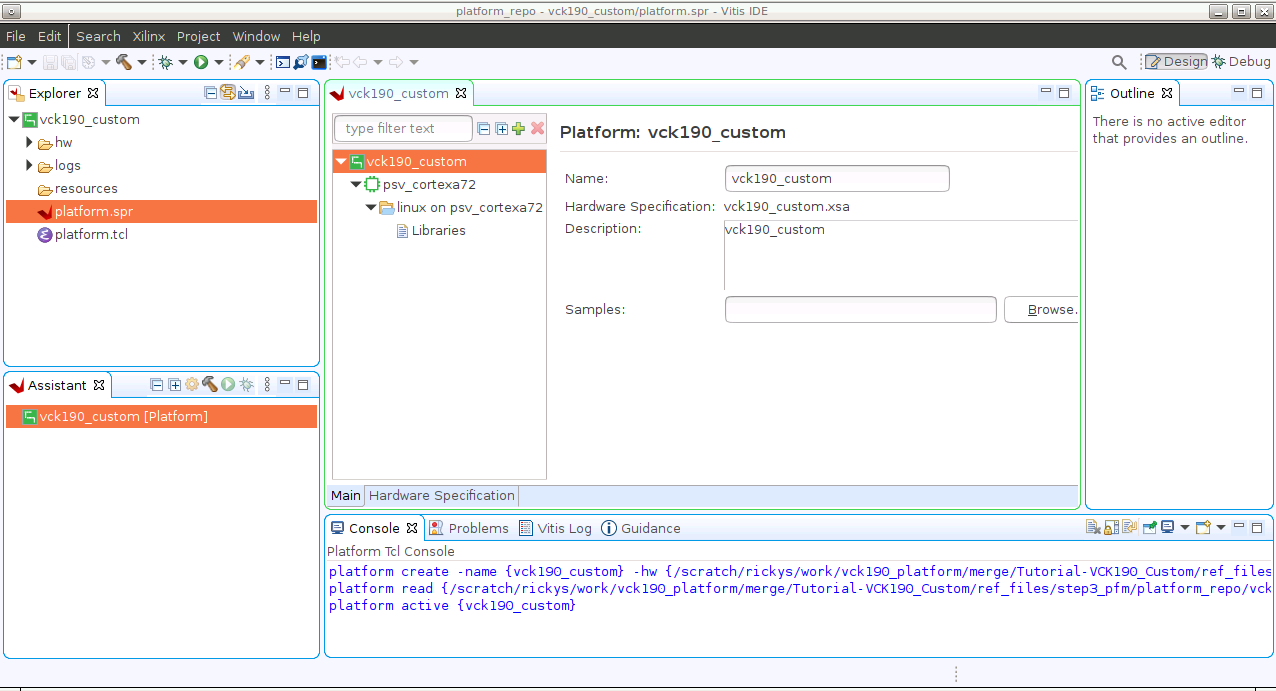
Setup Linux domain settings in Platform Settings view.
Click the linux on psv_cortexa72 domain
Update the Display Name to
xrtby clicking the edit button on the right of this line and input the name. We’d like to indicate this is a Linux domain has XRT installed and is capable of running acceleration applications.Set Bif file: Browse to step3_pfm/boot/linux.bif file and click OK.
Boot Components Directory: Browse to step3_pfm/boot/ and click OK. Bootgen will look for boot components referred by BIF in this directory to generate BOOT.BIN
Linux Image Directory: Browse to step3_pfm/image and click OK. Files in this directory will be copied to FAT32 partition of SD card.
Note: Linux Image Directory option name was defined when initramfs is used to boot Linux. In that case, the Linux kernel image, or image.ub with kernel image, rootfs and device tree are all placed in the FAT32 partition of the SD Card. Now with EXT4 rootfs, only boot.scr needs to be placed in the FAT32 partition. The display name of this option in Vitis IDE may change in the future.
Note: Linux Rootfs and Sysroot Directory are optional for Linux domain. They can be provided in either platform or application. We will add them in application creation phase because it would be easy to reuse these components among multiple platforms.
(Optional) Setup Linux domain emulation settings
Check the settings of QEMU Arguments and PMC QEMU Arguments are set to the files in Vitis installation directory. These default settings can be used. If you need to update the arguments, you can copy them to local, update and setup the new path in the Linux domain configuration.
Change QEMU Data to step3_pfm/boot directory.
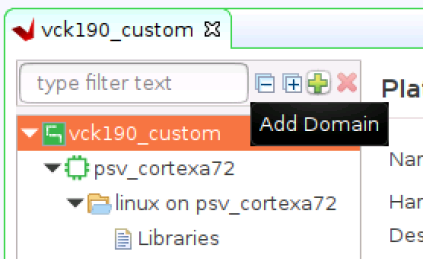
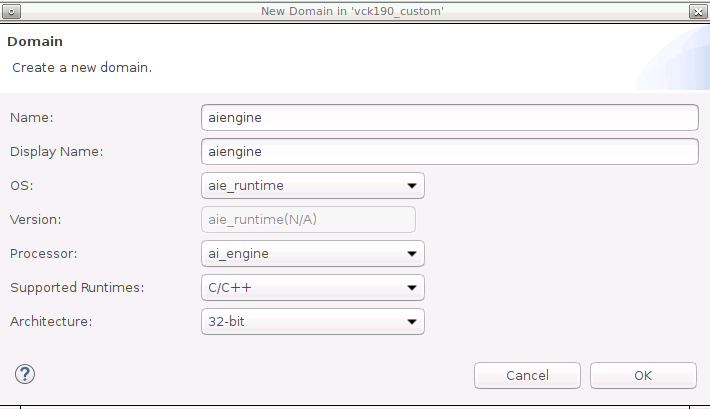
Add AI Engine domain
Click Add domain icon
Set Name to aiengine
Change OS to aie_runtime.
Keep other settings to default and click OK.
Note: Vitis IDE and XSCT will add QEMU arguments for AI Engine domain automatically.
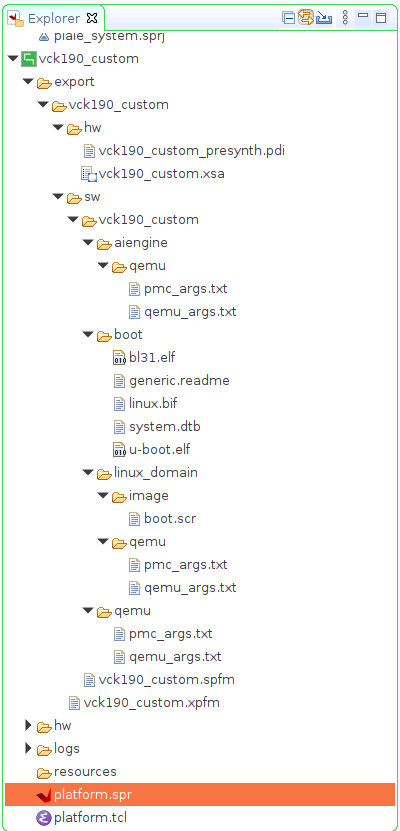
Click vck190_custom project in the Vitis Explorer view, click the Build button to generate the platform.
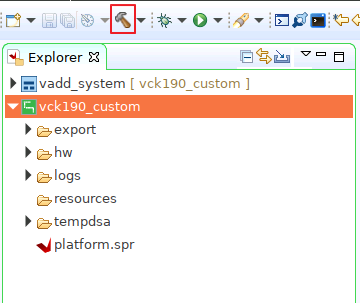
Note: The generated platform is placed in the export directory. BSP and source files are also provided for re-building the FSBL and PMU if desired and are associated with the platform. The platform is ready to be used for application development.
Fast Track
Scripts are provided to package the Vitis platform.
To use these scripts, please run the following steps.
Run build
# cd to the step directory, e.g.
cd step3_pfm
make
To clean the generated files, please run
make clean
Next let’s move to step 4 to try to build some applications on this platform and test them.
Copyright© 2020 Xilinx