Kria™ KV260 Vision AI Starter Kit NLP SmartVision Tutorial |
Setting Up the Board and Application Deployment |
Setting Up the Board and Application Deployment
Introduction
This document shows how to set up the board, and run the nlp-smartvision application.
This guide and its prebuilt are targeted for Ubuntu® 22.04 and AMD 2022.1 toolchain. The previous version of this application (on AMD 2021.1 toolchain) targeted to PetaLinux is still available online.
Booting Up Linux
Before continuing with NLP application specific instructions, if not yet done so, boot Linux with instructions from the Kria Starter Kit Linux boot page.
Setting Up the Board
Application Specific Hardware Setup
Besides the hardware configurations required in Kria Starter Kit Linux boot for booting Linux, AIBox application requires a 4k monitor to display up to four channels of 1080p video.

Monitor:
The monitor for this application must support 1024x768 resolution. Before booting, connect the monitor to the board via the DP/HDMI port.
Camera sensors:
This application supports the following three camera modules.
AR1335 sensor module in J7
Note: KV260 V2 supports auto-focus with the AR1335 sensor, so the displayed image will automatically adjust for clarity. KV260 V1 hardware does not support auto-focus, and the image may appear blurry at certain distances.
Raspberry pi sensor module in J9
USB webcam in any of the available USB ports
Install the required sensor modules in their respective locations.
USB Microphone:
Connect the microphone to any of the USB ports. If you USB webcam has a build-in microphone, it will also acts as the USB microphone.
Downloading and Loading the Application Firmware
Download the firmware.
Search the package feed for packages compatible with the KV260.
ubuntu@kria:~$ sudo apt search xlnx-firmware-kv260
Sorting... Done
Full Text Search... Done
xlnx-firmware-kv260-aibox-reid/jammy 0.1-0xlnx1 arm64
 FPGA firmware for Xilinx boards - kv260 aibox-reid application

xlnx-firmware-kv260-benchmark-b4096/jammy 0.1-0xlnx1 arm64
 FPGA firmware for Xilinx boards - kv260 benchmark-b4096 application

xlnx-firmware-kv260-defect-detect/jammy 0.1-0xlnx1 arm64
 FPGA firmware for Xilinx boards - kv260 defect-detect application

xlnx-firmware-kv260-nlp-smartvision/jammy,now 0.1-0xlnx1 arm64 [installed]
 FPGA firmware for Xilinx boards - kv260 nlp-smartvision application

xlnx-firmware-kv260-smartcam/jammy 0.1-0xlnx1 arm64
 FPGA firmware for Xilinx boards - kv260 smartcam application
Install the firmware binaries.
sudo apt install xlnx-firmware-kv260-nlp-smartvision
Dynamically load the application package.
The firmware consists of a bitstream, device tree overlay (dtbo) file. The firmware is loaded dynamically on user request once Linux is fully booted. The xmutil utility can be used for that purpose.
After installing the firmware, execute xmutil listapps to verify that it is captured under the listapps function and to have dfx-mgrd re-scan and register all accelerators in the firmeware directory tree.
sudo xmutil listapps
Switch to a different platform for a different application.
When there is already another accelerator/firmware being activated apart from xlnx-app-kv260-pmod-rs485-test, unload it first, then switch to xlnx-app-kv260-nlp-smartvision.
sudo xmutil unloadapp
sudo xmutil loadapp kv260-nlp-smartvision
Docker Based Application Preparation
Pull the 2022.1 Docker image for nlp-smartvision using the following command.
docker pull xilinx/nlp-smartvision:2022.1
Once the above step is done, you can check for the available images as follows.
ubuntu@kria:~$ docker images -a
REPOSITORY                                                                  TAG        IMAGE ID       CREATED                  SIZE
xilinx/nlp-smartvision                                                      2022.1     3c16ce65624a   Less than a second ago   1.41GB
The storage volume on the SD card can be limited with multiple Dockers. If there are space issues, use the following command to remove the existing container:
docker rmi --force <other containers>
This application features display output either on Ubuntu GUI or the entire monitor as mentioned in the follwoing table:
| S.No | Scenario   |      Display Sink      |  Note | Required Steps |
|:----:|:--------|:-------------:|:------|:-----|
| 1 | User runs the Docker on a terminal opened on Ubuntu GUI |  ximagesink | Opens new window on Ubuntu GUI to display output | Disable access control for local docker with ```xhost +local:docker``` |
| 2 | User runs the Docker on serial port or SSH session |    kmssink   |   Uses entire monitor to display the output | Disable Ubuntu GUI with ```sudo xmutil desktop_disable``` |
> **NOTE:** Once you are done with running the application, enable the access control with ```xhost -local:docker```.
Launch the Docker using the following command. You should launch the NLP Docker container as user “ubuntu” and not as other user or “sudo”:
docker run \
--env="DISPLAY" \
-h "xlnx-docker" \
--env="XDG_SESSION_TYPE" \
--net=host \
--privileged \
-v /tmp:/tmp \
-v /dev:/dev \
-v /sys:/sys \
-v /etc/vart.conf:/etc/vart.conf \
-v /lib/firmware/xilinx:/lib/firmware/xilinx \
-v /run:/run \
-it xilinx/nlp-smartvision:2022.1 bash
It will launch the nlp-smartvision image in a new container.
root@xlnx-docker/#
Run the Application
There are two ways to interact with application: via Jupyter Notebook or command line.
Jupyter nNtebook
Launch the Jupyter Notebook with the
rootprivilege using the following command:
   jupyter lab --allow-root --notebook-dir=/opt/xilinx/kv260-nlp-smartvision/share/notebooks/ --ip=<ip address> &

    // fill in ip-address from ifconfig, eth0
Output example:
[I 2021-08-02 15:54:31.141 LabApp] JupyterLab extension loaded from /usr/lib/python3.8/site-packages/jupyterlab
[I 2021-08-02 15:54:31.141 LabApp] JupyterLab application directory is /usr/share/jupyter/lab
[I 2021-08-02 15:54:31.164 ServerApp] jupyterlab | extension was successfully loaded.
[I 2021-08-02 15:54:31.166 ServerApp] Serving notebooks from local directory: /opt/xilinx/kv260-nlp-smartvision/share/notebooks/
[I 2021-08-02 15:54:31.166 ServerApp] Jupyter Server 1.2.1 is running at:
[I 2021-08-02 15:54:31.166 ServerApp] http://192.168.3.123:8888/lab?token=9f7a9cd1477e8f8226d62bc026c85df23868a1d9860eb5d5
[I 2021-08-02 15:54:31.166 ServerApp]  or http://127.0.0.1:8888/lab?token=9f7a9cd1477e8f8226d62bc026c85df23868a1d9860eb5d5
[I 2021-08-02 15:54:31.167 ServerApp] Use Control-C to stop this server and shut down all kernels (twice to skip confirmation).
[C 2021-08-02 15:54:31.186 ServerApp]

    To access the server, open this file in a browser:
        file:///root/.local/share/jupyter/runtime/jpserver-1119-open.html
    Or copy and paste one of these URLs:
        http://192.168.3.123:8888/lab?token=9f7a9cd1477e8f8226d62bc026c85df23868a1d9860eb5d5
     or http://127.0.0.1:8888/lab?token=9f7a9cd1477e8f8226d62bc026c85df23868a1d9860eb5d5
You can access the server by opening the server URL from the previous steps with a Chrome browser.
In the notebook, the usage of app and the commands needed to run live usecase are explained.
Command Line
This allows you to run the “nlp-smartvision” application on CLI. These are to be executed using the universal asynchronous receiver-transmitter (UART)/debug interface.
Run the following command to launch the application for live audio input via a USB microphone. You need to be silent for the first few seconds (2.5s apx.) for the application to dynamically decide the noise threshold value as per your input device and environment. Once you see the following message “Noise Threshold is set. You can start speaking the keywords now..” you are ready to start pronouncing any of the ten keywords (Yes, No, Off, On, Up, Down, Left, Right, Stop, Go).
Application Usage
Usage: nlp-smartvision [OPTION] [arg1] [arg2]

-h (or) --help                                    help
-m (or) --mipi <isp/rpi>                          test the application with live video from mipi cameras rpi(default)/isp
-u (or) --usb                                     test the application with live video from USB camera
-f (or) --file-audio  <testing_list>.txt          test the keyword spotting with audio files listed in the .txt file
-t (or) --test <sample_image> <model>             test the DPU with sample images. Input is Model and sample jpeg. Supported models are densebox_640_360, yolov2_voc_pruned_0_77 & plate_detect
-v (or) --verbose
Run the App with Default MIPI Sensor (RPI)
nlp-smartvision -m
(or)
nlp-smartvision --mipi
The detected keyword will be displayed on the terminal, and the corresponding action on the input video stream will be displayed on the monitor, which is connected to the board through a DP/HDMI cable.
To print FPS along with the above application, use the -v or --verbose flag shown in the following command. The FPS is measured as average over 90 consecutive frames. Also the latency of the keywords spotting and action is printed while the keyword is detected.
nlp-smartvision -m -v
You should be able to see the video the camera is capturing on the monitor connected to the board.
The application starts with facedetect. When there is a face captured by the camera, there should be a blue bounding box drawn around the face, and the box should follow the movement of the face.
Speak the desired keyword into the microphone; the application will perform the following assigned tasks.
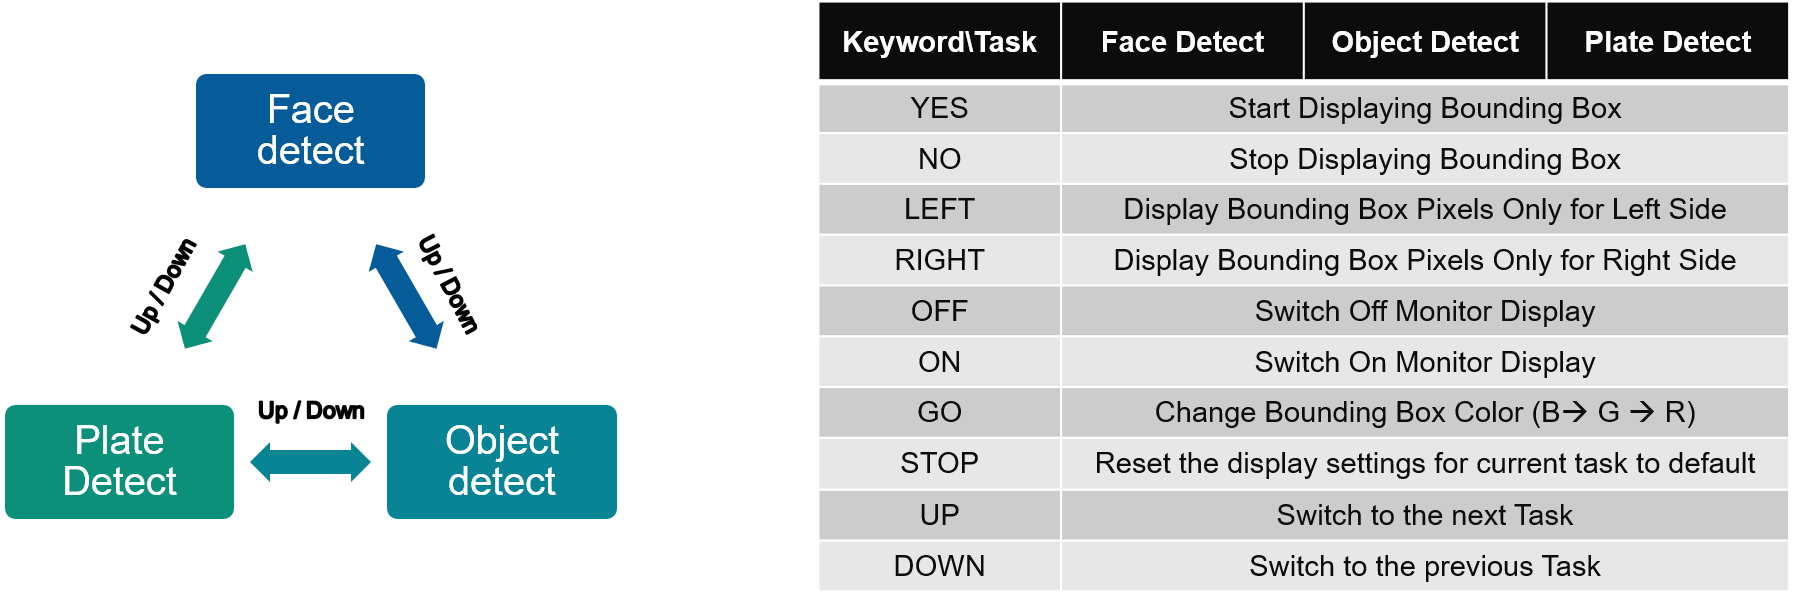
NOTE:
The Google Command dataset has audio clips of one second durations. Thus, the expectation by KWS task is that one keyword is spoken within a duration of one second.
Stop command resets display setting, but does not change monitor on/off mode.
File Based Testing and Accuracy Measurement of KWS Only
NLP SmartVision provides a mode which is dedicated for testing the accuracy of keyword spotting (no vision task is running during this mode) on pre-recorded audio files. You need to provide audio files along with a text file that consists of paths to the audio files which are to be tested. The application expects the audio files to be grouped under folders with keyword as the folder name. Thus, the text file will consist of lines with keyword/*.wav paths corresponding to each audio file (example: yes/audio1.wav). For more details, refer Testing Accuracy on the Google Command Dataset and Testing Custom Input Audio Files.
The following command tests the audio files listed in the testing_list.txt file.
## Change your dircetory to the dircetory where you have the testing_list.txt file having proper paths to the audio files.
nlp-smartvision -f testing_list.txt
(or)
nlp-smartvision --file-audio testing_list.txt
Testing Accuracy on the Google Command Dataset
You can download the open source Google speech command dataset for testing the application in file input mode. This dataset consists of pre-recorded audio files for 30 keywords, and the audio files that are separated for testing are listed in the testing_list.txt file. Use the following commands to download and extract this dataset. These commands also create the datafiles that are required for testing the application with 10 keywords for which the model has been trained.
TIP: You can copy the following commands and create a single script. Then directly executes that script to do all the required steps one after the other.
mkdir Google_dataset
cd Google_dataset
wget http://download.tensorflow.org/data/speech_commands_v0.01.tar.gz
tar -xf speech_commands_v0.01.tar.gz
mkdir keywords
mv -t ./keywords/ on off up down left right yes no stop go
sed -n -e '/down\//p; /go\//p; /left\//p; /no\//p; /off\//p; /on\//p; /right\//p; /stop\//p; /yes\//p; /up\//p ' testing_list.txt > ./keywords/testing_list.txt
find . -maxdepth 1 ! -name keywords -print0|xargs -0 rm -r --
These commands will create a directory with the name Google_dataset/keywords inside the current working directory.
NOTE: The commands might take few minutes (depending on the internet speed) to download and process the dataset.
Output after running the command for file based testing will also report the accuracy. Sample output on the Google Command Dataset is as follows.
Ground truth : yes            Predicted : yes
Ground truth : yes            Predicted : yes
Ground truth : yes            Predicted : yes
=========================================
Number of keywords tested = 2552
Number of keywords detected correctly = 2383
Accuracy = 93.3777%
Testing Custom Input Audio Files
The application expects audio file names to be stored as keyword/audio_filename.wav format into the audio files list file. For example, a prerecorded audio file of keyword ‘yes’ needs to be listed as yes/file_001.wav. The application uses the main directory name (‘yes’ in this example) as ground truth to compare against the detected keyword. New line character must be placed after every audio file name to differentiate multiple audio files (even after the last file name). Moreover, the audio file needs to be copied to the SD card into the directory from which the application will be invoked. For example, /keywords/yes/file_001.wav.
The test audio files should have the following specifications.
Sampling rate: 16 kHz
Sample width: 16 bits per sample
Sample encoding: Little endian
Number of channels: 1 (mono)
Supported format: S16_LE (PCM signed 16-bit Little-endian)
Audio Length: 1 second
Image Based Testing of DPU Only
NLP SmartVision provides a mode which is dedicated for testing the Vision models on DPU (no KWS task is running during this mode) on image files. You need to provide image files along with the AI model that is under test.
The following command tests the image files:
nlp-smartvision -t <image.jpg/image.png> <model>
The command returns the metadata along with a jpg file containing a bounding box on the input image.
Files Structure of the Application
The application is installed as:
Binary File: =>
/opt/xilinx/kv260-nlp-smartvision/bin
| Filename | Description |
|---|---|
| nlp-smartvision | Main application |
Script File: =>
/opt/xilinx/kv260-nlp-smartvision/bin/
| Filename | Description |
|---|---|
| init-isp-smartvision.sh | Configures ISP media nodes to run 1024.768@RGB |
| init-imx-smartvision.sh | Configures RPI media nodes to run 1024.768@RGB |
| nlp-smartvision.app | Application executable |
Jupyter Notebook file: =>
/opt/xilinx/kv260-nlp-smartvision/share/notebooks/nlp-smartvision
| Filename | Description |
|---|---|
| nlp-smartvision.ipynb | Jupyter Notebook file for nlp-smartvision demo. |
Next Steps
Copyright © 2021-2024 Advanced Micro Devices, Inc