Attention
This product has reached its End Of Life. All new designs should migrate to MA35D.
Managing Video Acceleration Compute Resources
Note
This page describes how to manage video acceleration resources and run multiple jobs on given machine through the Xilinx Resource Manager (XRM). For information about managing multiple tasks across a cluster of machines using orchestration services (i.e Kubernetes or EKS), refer to the following page: Deploying with Kubernetes.
Introduction
Each Xilinx device on an Alveo U30 card can process an aggregate load of 4K pixels at 60 frames per second. The Xilinx Video SDK supports running multiple jobs simultaenously on a given device if the overall throughput does not exceed the limit of 4kp60. When the user has access to more than one device on a given machine, the Xilinx Video SDK also supports running one or more jobs across multiple devices. In this situation, it becomes important to manage the pool of video acceleration resources in order to get the most out of the total compute bandwidth available in the system.
The notion of compute units (CUs) and CU pool is central to resource managent. A typical video transcode pipeline needs a conjunction of multiple CUs like decoder, scaler, lookahead, and encoder, together forming a CU pool. Based on the input resolution and type of transcode, the load of CUs within a CU pool varies. This in turn determines how many jobs can be run real-time in parallel, and which devices has enough free resources to run a job.
CUs and CU ppol are managed by the Xilinx® FPGA resource manager (XRM). XRM is a software layer responsible for managing the hardware accelerators available in the system. XRM keeps track of total system capacity for each of the compute units (i.e. decoder, scaler, encoder…), ensures capacity for a given use case and prevents over-allocation.
The rest of this guide explains how to:
Assign jobs to specific devices using explicit device identifiers
Measure device load and determine where to run jobs using either manual or automated resource management techniques
System Considerations
On certain servers, it may be needed to reduce the stack size (using
ulimit -s 1000) in order to run more than 200 processes simultaneously.When splitting a job across two devices, the characteristics of the host server may impact overall performance as more data transfers are generally involved in this case.
Assigning Jobs to Specific Devices
By default a job is submitted to device 0. When running multiple jobs in parallel, device 0 is bound to run out of resources rapidly and additional jobs will error out due to insufficient resources. By using explicit device identifiers, the different components (decoder, scaler, encoder) of a job can be individually submitted to a specific device. This makes it easy and straightforward to leverage the entire video acceleration capacity of your system, regardless of the number of cards and devices.
The FFmpeg -lxlnx_hwdev and GStreamer dev-idx options can be used to specify the device on which a specific job component (decoder, scaler, encoder) should be run. This makes it possible to split a job across two devices by mapping some components of the job to one device and other components of the job to another device. This ability is useful when there are not enough compute resources to run the entire job on a single device. Typical use cases include 4K ladders or 1080p ladders with more outputs that can be scaled or encoded on a single device. When splitting a job across two devices, the video frames must be transfered from the first device to the host, and then from the host to the second device. When using FFmpeg, this transfer must be done explicitly using the xvbm_convert filter. When using GStreamer, this transfer is handled automatically by the plugins.
The FFmpeg -xlnx_hwdev option is similar to the -lxlnx_hwdev option, but it applies globally instead of locally. This option can used to specify the device on which all components of a given job should be run. The -xlnx_hwdev and -lxlnx_hwdev options can be used together. If present, the -xlnx_hwdev option sets the default device index for all job components. Any subsequent -lxlnx_hwdev option overwrites the device index for the particular component that it is set on.
Determining on which device(s) to run a job can be done using either the manual or automated methods described in the following sections.
Performance Considerations
For higher performance, Xilinx recommends running all the different components on the same device whenever possible. Splitting a job across multiple devices leads to extra data transfers to and from the host which may impact total performance.
Examples using Explicit Device IDs
FFmpeg example of two different jobs run on two different devices
In this example, two different FFmpeg jobs are run in parallel. The -xlnx_hwdev option is used to submit each job to a different device:
ffmpeg -xlnx_hwdev 0 -c:v mpsoc_vcu_h264 -i INPUT1.h264 -f mp4 -c:v mpsoc_vcu_hevc -y /dev/null &
ffmpeg -xlnx_hwdev 1 -c:v mpsoc_vcu_h264 -i INPUT2.h264 -f mp4 -c:v mpsoc_vcu_hevc -y /dev/null &
FFmpeg example of a 4K ladder split across two devices
In this example, a 4K ABR ladder with 6 outputs is split across two devices, as shown in the picture below:
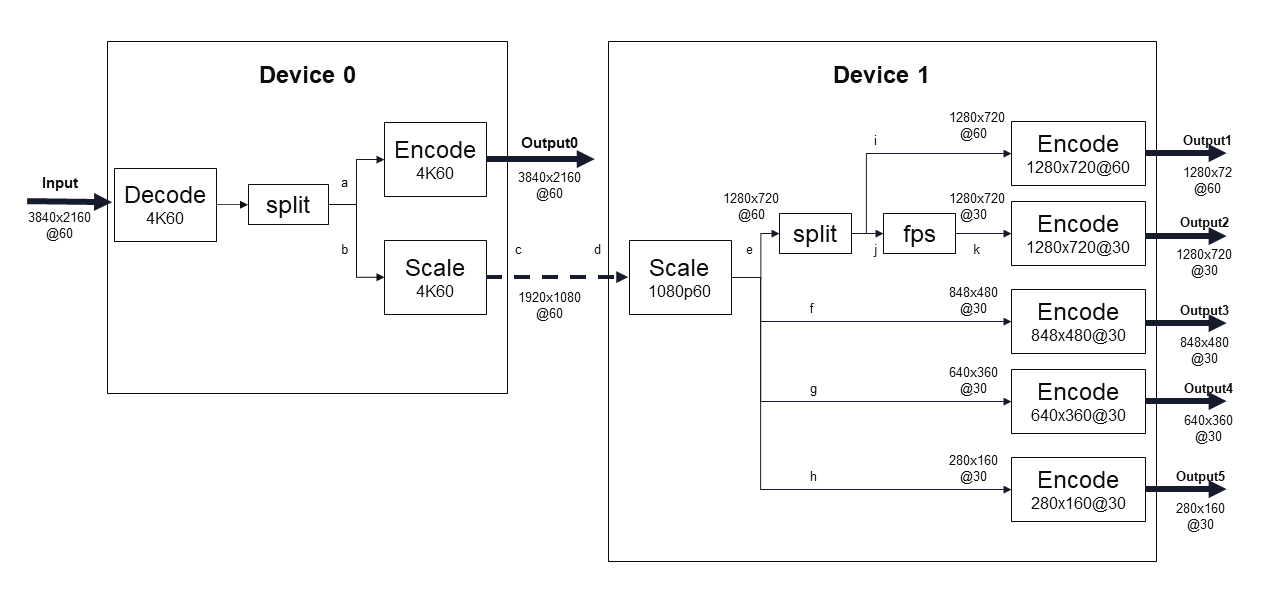
4K ABR ladder split across two devices
This 4K ladder can be implemented in FFmpeg with the command below. The -lxlnx_hwdev option is used to map each component of the FFmpeg job to the desired device. Two multiscale_xma filters are used since there are scaling operations on both devices. The output of the scaler on device 0 is transfered back to the host with the xvbm_convert filter. The same data is then automatically copied to the other device since it is used by the second multiscale_xma filter:
ffmpeg -re -lxlnx_hwdev 0 -c:v mpsoc_vcu_h264 -i INPUT.h264 -max_muxing_queue_size 1024 -filter_complex " \
  [0]split[a][b]; \
  [b]multiscale_xma=outputs=1:lxlnx_hwdev=0:out_1_width=1920:out_1_height=1080:out_1_rate=full [c]; [c]xvbm_convert[d]; \
  [d]multiscale_xma=outputs=4:lxlnx_hwdev=1:out_1_width=1280:out_1_height=720:out_1_rate=full: \
                                            out_2_width=848:out_2_height=480:out_2_rate=half: \
                                            out_3_width=640:out_3_height=360:out_3_rate=half: \
                                            out_4_width=288:out_4_height=160:out_4_rate=half [e][f][g][h]; \
  [e]split[i][j]; [j]fps=30[k]" \
  -map '[a]' -lxlnx_hwdev 0 -b:v 16M   -max-bitrate 16M   -level 4.2 -slices 4 -cores 4 -c:v mpsoc_vcu_h264 -c:a copy -max_interleave_delta 0 -f mp4 -y /dev/null \
  -map '[i]' -lxlnx_hwdev 1 -b:v 4M    -max-bitrate 4M    -level 4.2 -c:v mpsoc_vcu_h264 -c:a copy -max_interleave_delta 0 -f mp4 -y /dev/null \
  -map '[k]' -lxlnx_hwdev 1 -b:v 3M    -max-bitrate 3M    -level 4.2 -c:v mpsoc_vcu_h264 -c:a copy -max_interleave_delta 0 -f mp4 -y /dev/null \
  -map '[f]' -lxlnx_hwdev 1 -b:v 2500K -max-bitrate 2500K -level 4.2 -c:v mpsoc_vcu_h264 -c:a copy -max_interleave_delta 0 -f mp4 -y /dev/null \
  -map '[g]' -lxlnx_hwdev 1 -b:v 1250K -max-bitrate 1250K -level 4.2 -c:v mpsoc_vcu_h264 -c:a copy -max_interleave_delta 0 -f mp4 -y /dev/null \
  -map '[h]' -lxlnx_hwdev 1 -b:v 625K  -max-bitrate 625K  -level 4.2 -c:v mpsoc_vcu_h264 -c:a copy -max_interleave_delta 0 -f mp4 -y /dev/null
GStreamer example of a transcoding pipeline split across two devices
In this example, the dev-idx option is used to specify that the decoder should run on device 0 and that the encoder should run on device 1
gst-launch-1.0 filesrc location=bbb_sunflower_1080p_60fps_normal.264 ! h264parse ! vvas_xvcudec dev-idx=0 ! queue ! vvas_xvcuenc dev-idx=1 target-bitrate=8000 max-bitrate=8000 ! video/x-h264 ! fpsdisplaysink video-sink="filesink location=/tmp/xil_xcode_out_0.mp4" text-overlay=false sync=false -v
GStreamer example of a 4K ladder split across two devices
The GStreamer equivalent of the FFmpeg example described above is shown below. It uses dev-idx to map each component to the desired device:
gst-launch-1.0 filesrc num-buffers=-1 location=~/videos/bbb_sunflower_2160p_60fps_normal.mp4 \
      ! qtdemux ! queue ! h264parse \
      ! vvas_xvcudec dev-idx=0 avoid-output-copy=1 \
      ! queue \
      ! tee name=dectee \
      dectee. \
              ! queue \
              ! vvas_xvcuenc name=enc_2160p60_dev0 dev-idx=0 b-frames=2 target-bitrate=16000 max-bitrate=16000 num-slices=4 num-cores=4 \
              ! queue ! h264parse ! qtmux \
              ! fpsdisplaysink name=sink_xcode_scale_2160p60_dev0_83 video-sink="filesink location=/tmp/xil_xcode_scale_2160p60_dev__0.mp4" async=false text-overlay=false sync=false \
      dectee. \
              ! queue \
              ! vvas_xabrscaler dev-idx=0 ppc=4 scale-mode=2 enable-pipeline=1 avoid-output-copy=true name=sc1_0 \
              ! queue ! video/x-raw, width=1920, height=1080 \
              ! queue \
              ! tee name=sctee \
              sctee. \
                      ! queue \
                      ! vvas_xvcuenc name=enc_1080p60_dev1 dev-idx=1 target-bitrate=6000 max-bitrate=6000 \
                      ! queue ! h264parse ! qtmux \
                      ! fpsdisplaysink name=sink_xcode_scale_1080p60_dev1_83 video-sink="filesink location=/tmp/xil_xcode_scale_1080p60_dev__1.mp4" async=false text-overlay=false sync=false \
              sctee. \
                      ! queue \
                      ! vvas_xabrscaler dev-idx=1 ppc=4 scale-mode=2 avoid-output-copy=true name=sc2_1 \
                      sc2_1.src_0 \
                              ! queue ! video/x-raw, width=1280, height=720 \
                              ! tee name=tee_1 \
                              tee_1. \
                                ! queue ! videorate ! video/x-raw, framerate=60/1 \
                                ! vvas_xvcuenc name=enc_720p60_dev1 dev-idx=1 target-bitrate=4000 \
                                ! queue ! h264parse ! qtmux \
                                ! fpsdisplaysink name=sink_xcode_scale_720p60_dev1_83 video-sink="filesink location=/tmp/xil_xcode_scale_720p60_dev__1.mp4" async=false text-overlay=false sync=false \
                             tee_1. \
                                ! queue ! videorate ! video/x-raw, framerate=30/1 \
                                ! vvas_xvcuenc name=enc_720p30_dev1 dev-idx=1 target-bitrate=3000 \
                                ! queue ! h264parse ! qtmux \
                                ! fpsdisplaysink name=sink_xcode_scale_720p30_dev1_83 video-sink="filesink location=/tmp/xil_xcode_scale_720p30_dev__1.mp4" async=false text-overlay=false sync=false \
                      sc2_1.src_1 \
                              ! queue ! video/x-raw, width=848, height=480 \
                              ! videorate ! video/x-raw, framerate=30/1 \
                              ! vvas_xvcuenc name=enc_480p30_dev1 dev-idx=1 target-bitrate=2500 \
                              ! queue ! h264parse ! qtmux \
                              ! fpsdisplaysink name=sink_xcode_scale_480p30_dev1_83 video-sink="filesink location=/tmp/xil_xcode_scale_480p30_dev__1.mp4" async=false text-overlay=false sync=false \
                      sc2_1.src_2 \
                              ! queue ! video/x-raw, width=640, height=360 \
                              ! videorate ! video/x-raw, framerate=30/1 \
                              ! vvas_xvcuenc name=enc_360p30_dev1 dev-idx=1 target-bitrate=1250 \
                              ! queue ! h264parse ! qtmux \
                              ! fpsdisplaysink name=sink_xcode_scale_360p30_dev1_83 video-sink="filesink location=/tmp/xil_xcode_scale_360p30_dev__1.mp4" async=false text-overlay=false sync=false \
                      sc2_1.src_3 \
                              ! queue ! video/x-raw, width=288, height=160 \
                              ! videorate ! video/x-raw, framerate=30/1 \
                              ! vvas_xvcuenc name=enc_160p30_dev1 dev-idx=1 target-bitrate=625 \
                              ! queue ! h264parse ! qtmux \
                              ! fpsdisplaysink name=sink_xcode_scale_160p30_dev1_83 video-sink="filesink location=/tmp/xil_xcode_scale_160p30_dev__1.mp4" async=false text-overlay=false sync=false -v
NOTE: Use enable-pipeline=1 whenever there is a data copy required. In this example, on vvas_xbarscaler where data is copied from the host to the second device.
Additional Examples
Additional examples of how to run multiple processes using explicit device IDs can be found in the tutorials included in this repository:
Manual Resource Management
The card management tools included in the Xilinx Video SDK provide ways to query the status and utilization of the compute resources on the Xilinx devices. Using these tools the user can determine which resources are available and thereby determine on which device to submit a job (using explicit device identifies, as explained in the previous section).
Given that each device has a 2160p60 (4K) input and output bandwidth limit, the user is responsible for only submitting jobs which will not exceed the capacity of the specified device. If a job is submitted on a device where there are not enough compute unit resources available to support the job, the job will error out with a message about resource allocation failure.
The XRM and card management tools provide methods to estimate CU requirements and check current device load.
Checking System Load
To check the current loading of all the devices in your system, use the following command:
xrmadm /opt/xilinx/xrm/test/list_cmd.json
This will generate a report in JSON format containing the load information for all the compute unit (CU) resources. The report contains a section for each device in the system. The device sections contain sub-sections for each of the CUs (decoder, scaler, lookahead, encoder) in that device. For example, the load information for the encoder on device 0 may look as follows:
"device_0": {
    ...
    "cu_4": {
        "cuId         ": "4",
        "cuType       ": "IP Kernel",
        "kernelName   ": "encoder",
        "kernelAlias  ": "ENCODER_MPSOC",
        "instanceName ": "encoder_1",
        "cuName       ": "encoder:encoder_1",
        "kernelPlugin ": "/opt/xilinx/xma_plugins/libvcu-xma-enc-plg.so",
        "maxCapacity  ": "497664000",
        "numChanInuse ": "20",
        "usedLoad     ": "831472 of 1000000",
        "reservedLoad ": "0 of 1000000",
        "resrvUsedLoad": "0 of 1000000"
    },
The usedLoad value indicates how much of that resource is currently being used. The value will range from 0 (nothing running) to 1000000 (fully loaded). The reservedLoad value indicates how much of that resource is being reserved using XRM. The resrvUsedLoad value indicates how much of the reserved load is actually being used.
In the above example, the encoder is 83.14% utilized. An additional job may only be run on this device if it requires less than 17% of the encoder resources.
Insufficient Resources
If there are not enough compute unit resources available on the device to support a FFmpeg job, the job will error out with a message about resource allocation failure:
xrm_allocation: failed to allocate decoder resources from device 0
[MPSOC HEVC decoder @ 0x562c7695b200] xrm_allocation: resource allocation failed
In this case, you can check the system load (as described in the section below) and look for a device with enough free resources, or wait until another job finishes and releases enough resources to run the desired job.
Job Resource Requirements
The load of a given job can be estimated by taking the resolution of the job as a percentage of the 2160p60 (4K) maximum. For instance, a 1080p60 stream will require 25% of the resources available on a device.
In addition, it is possible to run FFmpeg with the -loglevel option set to debug to get information about the resource requirements for a given job. The messages generated in the transcript will look as follow:
---decoder xrm out: dec_load=250000, plugin=/opt/xilinx/xma_plugins/libvcu-xma-dec-plg.so, device=0, cu=6, ch=0
---encoder xrm out: enc_load=250000, plugin=/opt/xilinx/xma_plugins/libvcu-xma-enc-plg.so, device=0, cu=38, ch=0
Resource loads are reported with a precision of 1/1000000. In the above example, the job requires 25% of the decoder resources and 25% of the encoder resources on the device.
Automated Resource Management
The Xilinx Video SDK provides a mechanism to automatically determine how many instances of a given job can be submitted to the system and on which device(s) to dispatch each job instance. This mechanism relies on Job Descriptions files and a Job Slot Reservation tool which calculates the resources required for each job, determines on which device each job should be run and reserves the resources accordingly.
NOTE: A current limitation of this method is that only one job description file can be used at a time, and a job description file can only contain a single job description. The system will only manage multiple jobs if they match the same description. Simultaneously managing different job types is not supported currently. The jobs need to be stopped before a new job description can be loaded.
Video Transcode Job Descriptions
A video transcode job description provides information to the resource manager about what resources are needed to run a particular job. With this information, the resource manager can calculate the CU load for the specified job as well as the maximum possible number of jobs that can be run real-time in parallel.
A video transcode job description is specified through a JSON file and the key-value pairs specify the functions, formats, and resolutions needed.
- function
Which HW resource to use (DECODER, SCALER, ENCODER)
- format
Input/output format (H264, HEVC, yuv420p)
- resolution
Input/output height, width, and frame-rate as a numerator / denominator fraction
- job-count
Optional entry to specify the number of instances of the specified job which can run on one device. When this entry is used, the CU load is calculated based on the specified job-count. Any channel-load value is ignored. This option is useful to provide an accurate number of possible jobs in the case where the load calculation by XRM is optimistic. This can happen because device memory is currently not an XRM managed resource; and in the case of high-density low-resolution jobs, it is possible to run out device memory before running out of compute resources.
- channel-load
Optional entry to specify a different compute load for a given function than calculated by the resource manager. This option will be deprecated and removed in a future release. The job-count option should be used instead.
- resources
All the resources listed in this section of the job description will be allocated on the same device. If the job requires a single device, this is the section in which resources should be specified.
- additionalresources_1
Optional entry to specify the resources which need be allocated on a second device. If a job cannot fit on a single device and must be split across two devices, then the resources which should be allocated on the first device should be listed in the “resources” section and the resources which should be allocated on the second device should be listed in the “additionalresources_1” section.
Several examples of JSON job slot descriptions can be found in the /opt/xilinx/launcher/scripts/describe_job folder once the Xilinx Video SDK has been installed.
Below is the /opt/xilinx/launcher/scripts/describe_job/describe_job_h264.json example. This JSON example describes an ABR transcode job which uses a decoder, scaler, and encoder to generate 5 output renditions. The job-count entry is used to explicitly request 4 instances of this job per device:
{
    "request": {
        "name": "describe_job_h264",
        "request_id": 1,
        "parameters": {
            "name": "testjob",
            "job-count": 4,
            "resources":
            [
                {
                    "function": "DECODER",
                    "format":   "H264",
                    "resolution": { "input": { "width": 1920, "height": 1080, "frame-rate": { "num":60, "den":1} } }
                },
                {
                    "function": "SCALER",
                    "format":   "yuv420p",
                    "resolution":
                    {
                        "input": { "width": 1920, "height": 1080, "frame-rate": { "num":60, "den":1} },
                        "output":
                        [
                            { "width": 1280, "height": 720, "frame-rate": { "num":60, "den":1} },
                            { "width":  848, "height": 480, "frame-rate": { "num":60, "den":1} },
                            { "width":  640, "height": 360, "frame-rate": { "num":60, "den":1} },
                            { "width":  288, "height": 160, "frame-rate": { "num":60, "den":1} }
                        ]
                    }
                },
                {
                    "function": "ENCODER",
                    "format":   "H264",
                    "resolution": { "input": { "width": 1280, "height": 720, "frame-rate": { "num":60, "den":1} } }
                },
                {
                    "function": "ENCODER",
                    "format":   "H264",
                    "resolution": { "input": { "width": 1280, "height": 720, "frame-rate": { "num":30, "den":1} } }
                },
                {
                    "function": "ENCODER",
                    "format":   "H264",
                    "resolution": { "input": { "width":  848, "height": 480, "frame-rate": { "num":30, "den":1} } }
                },
                {
                    "function": "ENCODER",
                    "format":   "H264",
                    "resolution": { "input": { "width":  640, "height": 360, "frame-rate": { "num":30, "den":1} } }
                },
                {
                    "function": "ENCODER",
                    "format":   "H264",
                    "resolution": { "input": { "width":  288, "height": 160, "frame-rate": { "num":30, "den":1} } }
                }
            ]
        }
    }
}
Below is the /opt/xilinx/launcher/scripts/describe_job/testjob_4k_2dev.json example. This JSON example describes a 4K ABR transcode job split across two devices and generating 6 output renditions. The resources allocated on the first device are listed in the “resources” section and the resources allocated on the second device are listed in the “additionalresources_1” section. This job corresponds to the one pictured above in the Using Explicit Device IDs topic.
{
    "request": {
        "name": "testjob_4k_2dev",
        "request_id": 1,
        "parameters": {
            "name": "testjob",
            "resources":
            [
                {
                    "function": "DECODER",
                    "format":   "H264",
                    "resolution": { "input": { "width": 3840, "height": 2160, "frame-rate": { "num":60, "den":1} } }
                },
                {
                    "function": "SCALER",
                    "format":   "yuv420p",
                    "resolution":
                    {
                        "input": { "width": 3840, "height": 2160, "frame-rate": { "num":60, "den":1} },
                        "output":
                        [
                            { "width": 1920, "height": 1080, "frame-rate": { "num":60, "den":1} }
                        ]
                    }
                },
                {
                    "function": "ENCODER",
                    "format":   "H264",
                    "resolution": { "input": { "width":  3840, "height": 2160, "frame-rate": { "num":60, "den":1} } }
                }
            ],
            "additionalresources_1":
            [
                {
                    "function": "SCALER",
                    "format":   "yuv420p",
                    "resolution":
                    {
                        "input": { "width": 1920, "height": 1080, "frame-rate": { "num":60, "den":1} },
                        "output":
                        [
                            { "width": 1280, "height": 720, "frame-rate": { "num":60, "den":1} },
                            { "width":  848, "height": 480, "frame-rate": { "num":60, "den":1} },
                            { "width":  640, "height": 360, "frame-rate": { "num":60, "den":1} },
                            { "width":  288, "height": 160, "frame-rate": { "num":60, "den":1} }
                        ]
                    }
                },
                {
                    "function": "ENCODER",
                    "format":   "H264",
                    "resolution": { "input": { "width": 1280, "height": 720, "frame-rate": { "num":60, "den":1} } }
                },
                {
                    "function": "ENCODER",
                    "format":   "H264",
                    "resolution": { "input": { "width": 1280, "height": 720, "frame-rate": { "num":30, "den":1} } }
                },
                {
                    "function": "ENCODER",
                    "format":   "H264",
                    "resolution": { "input": { "width":  848, "height": 480, "frame-rate": { "num":30, "den":1} } }
                },
                {
                    "function": "ENCODER",
                    "format":   "H264",
                    "resolution": { "input": { "width":  640, "height": 360, "frame-rate": { "num":30, "den":1} } }
                },
                {
                    "function": "ENCODER",
                    "format":   "H264",
                    "resolution": { "input": { "width":  288, "height": 160, "frame-rate": { "num":30, "den":1} } }
                }
            ]
        }
    }
}
The next sections document the two different ways of using job descriptions to run multiple jobs across one or more devices:
The Job Slot Reservation Tool
The job slot reservation application takes as input a JSON job description. The JSON job description file provides information to the resource manager about what kind of transcode is intended to run on the card. With this information the resource manager calculates the CU load for the specified job as well as the maximum possible number of jobs that can be run real-time in parallel.
Once the maximum possible number of jobs is known, CUs and job slots are reserved, and corresponding reservation IDs are stored in a bash file at /var/tmp/xilinx/xrm_jobReservation.sh. A reservation ID is a unique identifier which is valid while the job slot reservation application is running. These reservation IDs are passed to individual FFmpeg or GStreamer processes via the XRM_RESERVE_ID environment variable. The FFmpeg or GStreamer processes then use this reservation ID to retrieve and use the corresponding CUs reserved by the job slot reservation tool.
If the job is split across two devices (by declaring an “additionalresources_1” section in the JSON job description), the xrm_jobReservation.sh file will also declare additional identifier for each of the two devices used by the job. These identifiers should be used with the -lxlnx_hwdev FFmpeg option or the dev-idx GStreamer option in when running the process.
The reserved resourced are released by ending the job reservation process. Reserved slots can be reused after an FFmpeg or GStreamer job finishes as long as the job reservation process is still running.
The source code of the job slot reservation application is included in the Github repository of Xilinx Video SDK and can be used as a starting point for developing custom orchestration layers.
Ill-formed JSON Job Descriptions
If you run the jobSlotReservation tool with a syntactically incorrect JSON description, you will see the following messages:
decoder plugin function=0 fail to run the function
scaler plugin function=0 fail to run the function
encoder plugin function=0 fail to run the function
This indicates that the job description is ill-formed and needs to be corrected.
Example requiring a single device per job
This example uses the /opt/xilinx/launcher/scripts/describe_job/describe_job.json file describing a 1080p ABR ladder running on a single device.
Setup the environment:
source /opt/xilinx/xcdr/setup.sh
Run the job slot reservation application with the desired JSON job description. For example:
jobSlotReservation /opt/xilinx/launcher/scripts/describe_job/describe_job.json

For describe_job.json, the possible number of job slots available = 8
--------------------------------------------------------------------------------------
The Job_slot_reservations are alive as long as this application is alive!
(press Enter to end)
--------------------------------------------------------------------------------------
The job slot reservation application creates a
/var/tmp/xilinx/xrm_jobReservation.shwithXRM_RESERVE_ID_{n}set to unique IDs generated by XRM (with n ranging from 1 to the number of possible job slots for the given job). Here is an example of this generated file:export XRM_RESERVE_ID_1=9 export XRM_RESERVE_ID_2=10 export XRM_RESERVE_ID_3=11 export XRM_RESERVE_ID_4=12 export XRM_RESERVE_ID_5=13 export XRM_RESERVE_ID_6=14 export XRM_RESERVE_ID_7=15 export XRM_RESERVE_ID_8=16
Launch individual FFmpeg processes in distinct shells after sourcing the
/var/tmp/xilinx/xrm_jobReservation.shfile and settingXRM_RESERVE_IDenvironment to a uniqueXRM_RESERVE_ID_{n}.For job 1, within a new terminal:
source /var/tmp/xilinx/xrm_jobReservation.sh
export XRM_RESERVE_ID=${XRM_RESERVE_ID_1}
ffmpeg -c:v mpsoc_vcu_h264 ...
For job 2, within a new terminal:
source /var/tmp/xilinx/xrm_jobReservation.sh
export XRM_RESERVE_ID=${XRM_RESERVE_ID_2}
ffmpeg -c:v mpsoc_vcu_h264 ...
And so forth for the other jobs.
Press Enter in the job reservation app terminal to release the resources after the jobs are complete.
Example requiring two devices per job
This example uses the /opt/xilinx/launcher/scripts/describe_job/testjob_4k_2dev.json file describing a 4K ABR ladder split across two devices.
Setup the environment:
source /opt/xilinx/xcdr/setup.sh
Run the job slot reservation application with the desired JSON job description. For example:
jobSlotReservation /opt/xilinx/launcher/scripts/describe_job/testjob_4k_2dev.json

For describe_job.json, the possible number of job slots available = 2
--------------------------------------------------------------------------------------
The Job_slot_reservations are alive as long as this application is alive!
(press Enter to end)
--------------------------------------------------------------------------------------
The job slot reservation application creates a
/var/tmp/xilinx/xrm_jobReservation.shwith XRM_RESERVE_ID_{n} set to unique IDs generated by XRM (with n ranging from 1 to the number of possible job slots for the given job). The file also setsvar_dev_{n}_0andvar_dev_{n}_1variables indicating, for each job {n}, the identifiers of the two devices which should be used. Here is an example of this generated file:export XRM_RESERVE_ID_1=3 var_dev_1_0=0 var_dev_1_1=1 export XRM_RESERVE_ID_2=4 var_dev_2_0=2 var_dev_2_1=1
Launch individual FFmpeg processes in distinct shells after sourcing the
/var/tmp/xilinx/xrm_jobReservation.shfile and settingXRM_RESERVE_IDenvironment to a uniqueXRM_RESERVE_ID_{n}. The use$var_dev_{n}_0and$var_dev_{n}_1as values for the-lxlnx_hwdevoptions on the FFmpeg command line.For job 1, within a new terminal:
source /var/tmp/xilinx/xrm_jobReservation.sh
export XRM_RESERVE_ID=${XRM_RESERVE_ID_1}
ffmpeg -lxlnx_hwdev ${var_dev_1_0} -c:v mpsoc_vcu_h264 ... -lxlnx_hwdev ${var_dev_1_1} -c:v mpsoc_vcu_h264 -f mp4  ...
For job 2, within a new terminal:
source /var/tmp/xilinx/xrm_jobReservation.sh
export XRM_RESERVE_ID=${XRM_RESERVE_ID_2}
ffmpeg -lxlnx_hwdev ${var_dev_2_0} -c:v mpsoc_vcu_h264 ... -lxlnx_hwdev ${var_dev_2_1} -c:v mpsoc_vcu_h264 -f mp4  ...
And so forth for the other jobs.
Press Enter in the job reservation app terminal to release the resources after the jobs are complete.
Automated Job Launching
The Job Slot Reservation tool automatically reserves job slots, but actual jobs still need to be manually launched using the generated reservations IDs. It is possible to create custom orchestration layers to automatically handle the reservation of job slots and the launching of jobs.
The Xilinx Video SDK includes two examples of “launcher” applications for FFmpeg and GStreamer, respectively. Source code for the FFmpeg Launcher example, the GStreamer Launcher and the Job Slot Reservation tool are included in the Github repository of Xilinx Video SDK and can be used as a starting point for developing custom orchestration layers.
The FFmpeg Launcher Example
The FFmpeg launcher is an example application which automates the dispatching of FFmpeg jobs across multiple devices. It simplifies the process of manually setting up XRM reservation IDs and launching FFmpeg for many video streams. The FFmpeg launcher takes a transcode job description, input source files, corresponding FFmpeg run commands and automatically launches child FFmpeg processes based on the job slot availability on the server. In case there are more input streams listed than available job slots, the excess are queued and launched when a job slot becomes available. Note that only a single launcher per server is supported.
Note
The FFmpeg launcher is only an example application. It is provided as an illustration of how an orchestration layer can use Job Descriptions, but it is not an official feature of the Xilinx Video SDK.
The following steps show how to use the FFmpeg launcher for an ABR transcode use case with the Xilinx Video SDK. In this use case, one encoded stream is transcoded to five unique renditions based on resolution, bit rate, and other variations.
Environment setup
source /opt/xilinx/xcdr/setup.sh
To run the FFmpeg launcher, use the following command:
launcher <source files file name> <run params file name>
Here is an example of the command:
launcher sources.txt /opt/xilinx/launcher/scripts/run_params/Run_ABR_h264_lowLatencyTranscode_mr_null.txt
sources.txtis a text file that lists the input stream names. The launcher parses this list and inserts the sources in the FFmpeg command after-ione after another and launches them as a separate process. A samplesources.txtis as follows.# List all sources here Input1.mp4 Video.flv Input2.h264
run_params.txtis a text file that consists of two fields. The first field is the video transcode job description, and the second field is the FFmpeg command line that needs to be launched and is matching the described job. Description of the job is given through a json file as described already in the previous sections. A samplerun_params.txtis as follows.job_description = /opt/xilinx/launcher/scripts/describe_job/describe_job.json cmdline = ffmpeg -c:v mpsoc_vcu_h264 -i -filter_complex "multiscale_xma=:outputs=4:out_1_width=1280:out_1_height=720:out_1_pix_fm t=vcu_nv12:out_2_width=848:out_2_height=480:out_2_pix_fmt=vcu_nv12:out_3_ width=640:out_3_height=360:out_3_pix_fmt=vcu_nv12:out_4_width=288:out_4_h eight=160:out_4_pix_fmt=vcu_nv12 [a][b][c][d]; [a]split[aa][ab]" -map '[aa]' -b:v 4M -max-bitrate 4M -c:v mpsoc_vcu_h264 -f h264 -y out_720p60.264 -map '[ab]' -r 30 -b:v 3M -max-bitrate 3M -c:v mpsoc_vcu_h264 -f h264 -y out_720p30.264 -map '[b]' -r 30 -b:v 2500K - max-bitrate 2500K -c:v mpsoc_vcu_h264 -f h264 -y out_480p30.264 -map '[c]' -r 30 -b:v 1250K -max-bitrate 1250K -c:v mpsoc_vcu_h264 -f h264 -y out_360p30.264 -map '[d]' -r 30 -b:v 625K -max-bitrate 625K -c:v mpsoc_vcu_h264 -f h264 -y out_160p30.264
The GStreamer Launcher Example
The GStreamer launcher is an example application which automates the dispatching of GStreamer jobs across multiple devices. It simplifies the process of manually setting up XRM reservation IDs and launching GStreamer for many video streams. The GStreamer launcher takes a transcode job description, input source files, corresponding GStreamer run commands and automatically launches child GStreamer processes based on the job slot availability on the server. In case there are more input streams listed than available job slots, the excess are queued and launched when a job slot becomes available. Note that only a single launcher per server is supported.
Note
The GStreamer launcher is only an example application. It is provided as an illustration of how an orchestration layer can use Job Descriptions, but it is not an official feature of the Xilinx Video SDK.
The following steps show how to use the GStreamer launcher for an ABR transcode use case with the Xilinx Video SDK. In this use case, one encoded stream is transcoded to five unique renditions based on resolution, bit rate, and other variations.
Environment setup
source /opt/xilinx/xcdr/setup.sh
To run the GStreamer launcher, use the following command:
launcher <source files file name> <run params file name>
Here is an example of the command:
launcher sources.txt /opt/xilinx/launcher/scripts/vvas_run_params/Run_1080p60_ABR_h264_lowLatencyTranscode_mr_null.txt
sources.txtis a text file that lists the input stream names. The launcher parses this list and inserts the sources in the GStreamer command one after another and launches them as a separate process. A samplesources.txtis as follows.# List all sources here Input1.mp4 Video.flv Input2.h264
run_params.txtis a text file that consists of two fields. The first field is the video transcode job description, and the second field is the GStreamer command line that needs to be launched and is matching the described job. Description of the job is given through a json file as described already in the previous sections. A samplerun_params.txtis as follows.job_description = /opt/xilinx/launcher/scripts/describe_job/describe_job.json cmdline = gst-launch-1.0 filesrc ! h264parse ! vvas_xvcudec num-entropy-buf=2 ! queue max-size-buffers=1 ! vvas_xabrscaler kernel-name="scaler:scaler_1" scale-mode=2 name=sc sc.src_0 ! queue max-size-buffers=1 ! video/x-raw, width=1280, height=720, format=NV12 ! queue max-size-buffers=1 ! tee name=t t. ! queue max-size-buffers=1 ! videorate ! video/x-raw, framerate=60/1 ! vvas_xvcuenc target-bitrate=4000 max-bitrate=4000 ! h264parse ! video/x-h264, profile=high, level=(string)4.2 ! fpsdisplaysink name=sink_720p60 video-sink="fakesink async=false" text-overlay=false fps-update-interval=5000 sync=false t. ! queue max-size-buffers=1 ! videorate ! video/x-raw, width=1280, height=720, framerate=30/1 ! vvas_xvcuenc target-bitrate=3000 max-bitrate=3000 ! h264parse ! video/x-h264, profile=high, level=(string)4.2 ! fpsdisplaysink name=sink_720p30 video-sink="fakesink async=false" text-overlay=false fps-update-interval=5000 sync=false sc.src_1 ! queue max-size-buffers=1 ! video/x-raw, width=848, height=480, format=NV12 ! videorate ! video/x-raw, framerate=30/1 ! vvas_xvcuenc target-bitrate=2500 max-bitrate=2500 ! h264parse ! video/x-h264, profile=high, level=(string)4.2 ! fpsdisplaysink name=sink_480p30 video-sink="fakesink async=false" text-overlay=false fps-update-interval=5000 sync=false sc.src_2 ! queue max-size-buffers=1 ! video/x-raw, width=640, height=360, format=NV12 ! videorate ! video/x-raw, framerate=30/1 ! vvas_xvcuenc target-bitrate=1250 max-bitrate=1250 ! h264parse ! video/x-h264, profile=high, level=(string)4.2 ! fpsdisplaysink name=sink_360p30 video-sink="fakesink async=false" text-overlay=false fps-update-interval=5000 sync=false sc.src_3 ! queue max-size-buffers=1 ! video/x-raw, width=288, height=160, format=NV12 ! videorate ! video/x-raw, framerate=30/1 ! vvas_xvcuenc target-bitrate=625 max-bitrate=625 ! h264parse ! video/x-h264, profile=high, level=(string)4.2 ! fpsdisplaysink name=sink_160p30 video-sink="fakesink async=false" text-overlay=false fps-update-interval=5000 sync=false -v
XRM Reference Guide
The Xilinx® FPGA resource manager (XRM) is the software which manages the hardware accelerators available in the system. XRM includes the following components:
xrmd: the XRM daemon, a background process supporting reservation, allocation, and release of hardware acceleration resources.xrmadmthe command line tool is used to interact with the XRM daemon (xrmd).a C Application Programming Interface (API)
Command Line Interface
The XRM xrmadm command line tool is used to interact with the XRM daemon (xrmd). It provides the following capabilities and uses a JSON file as input for each action:
Generate status reports for each device
Load and unload the hardware accelerators
Load and unload the software plugins
The XRM related files are installed under /opt/xilinx/xrm/ and device-specific XRM commands are available at /opt/xilinx/xcdr/scripts/xrm_commands/.
Setup
When sourced, the /opt/xilinx/xcdr/setup.sh script takes care of setting up the enviroment for the Xilinx Video SDK, including its XRM components:
The XRM daemon (
xrmd) is startedThe hardware accelerators (xclbin) and software plugins are loaded on the Xilinx devices
Generating Status Reports
xrmadm can generate reports with the status of each device in the system. This capability is particularly useful to check the loading of each hardware accelerator.
To generate a report for all the devices in the system:
xrmadm /opt/xilinx/xrm/test/list_cmd.json
To generate a report for a single device specified in the json file:
xrmadm /opt/xilinx/xrm/test/list_onedevice.json
A sample JSON file for generating a report for device 0 is shown below:
{
    "request": {
        "name": "list",
        "requestId": 1,
        "device": 0
    }
}
Loading/Unloading Hardware Accelerators
xrmadm can be used to load or unload the hardware accelerators on the programmable devices of the Alveo U30 card. The hardware accelerators must be reloaded after rebooting a card.
To load the hardware accelerators on a given device:
xrmadm /opt/xilinx/xcdr/scripts/xrm_commands/load_multiple_devices/load_device0_cmd.json
To unload the hardware accelerators from a given device:
xrmadm /opt/xilinx/xcdr/scripts/xrm_commands/unload_multiple_devices/unload_device_0_cmd.json
A sample JSON file for loading two devices (0 and 1) is shown below:
{
    "request": {
        "name": "load",
        "requestId": 1,
        "parameters": [
            {
            "device": 0,
            "xclbin": "/opt/xilinx/xcdr/xclbins/transcode.xclbin"
            },
            {
            "device": 1,
            "xclbin": "/opt/xilinx/xcdr/xclbins/transcode.xclbin"
            }
        ]
    }
}
Loading/Unloading Software Plugins
xrmadm can be used to load or unload the software plugins required to manage the compute resources. The software plugins perform resource management functions such as calculating CU load and CU max capacity. Once a plugin is loaded, it becomes usable by a host application through the XRM APIs. The XRM plugins need to be loaded before executing an application (such as FFmpeg/GStreamer) which relies on the plugins.
To load the plugins:
xrmadm /opt/xilinx/xcdr/scripts/xrm_commands/load_multi_u30_xrm_plugins_cmd.json
To unload the plugins:
xrmadm /opt/xilinx/xcdr/scripts/xrm_commands/unload_multi_u30_xrm_plugins_cmd.json
Controlling the xrmd Daemon
The following commands can be used to start, stop, restart, or get the status of the daemon:
sudo /opt/xilinx/xrm/tools/start_xrmd.sh
sudo /opt/xilinx/xrm/tools/stop_xrmd.sh
sudo /opt/xilinx/xrm/tools/restart_xrmd.sh
sudo systemctl status xrmd
C Application Programming Interface
XRM provides a C Application Programming Interface (API) to reserve, allocate and release CUs from within a custom application. For complete details about this programming interface, refer to the XRM API Reference Guide section of the documentation.