Using PyTorch Framework and MNIST
In this lab, you will use a design example, using PyTorch framework, available as part of the Vitis-AI-Tutorials.
In the following steps you will clone the Vitis-AI-Tutorials Git repository in your home directory and copy the 09-mnist_pyt directory in the ~/Vitis-AI_1_4_1 directory.
Open a new terminal window.
cd
git clone https://github.com/Xilinx/Vitis-AI-Tutorials.git
cp -r Vitis-AI-Tutorials/Design_Tutorials/09-mnist_pyt/ Vitis-AI_1_4_1/.
cd Vitis-AI_1_4_1/09-mnist_pyt/files
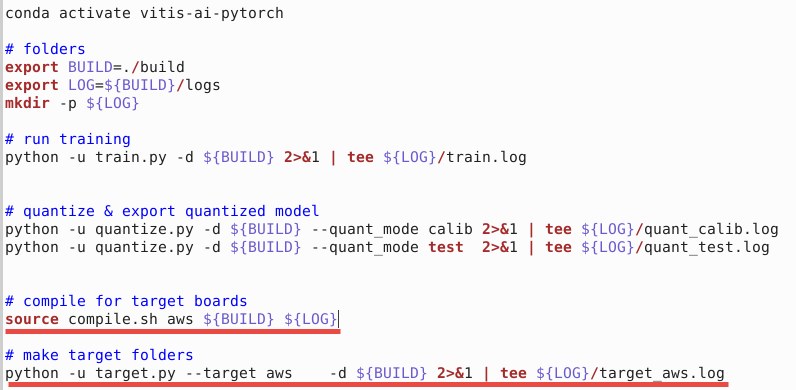
Edit run_all.sh
Edit run_all.sh to define AWS F1 as the target machine on which the application will run. Remove all lines in the compile section and then add
source compile.sh aws ${BUILD} ${LOG}.
Remove all lines under the make target folders section and then add
python -u target.py --target aws -d ${BUILD} 2>&1 | tee ${LOG}/target_aws.log.
The edited file content should look like:
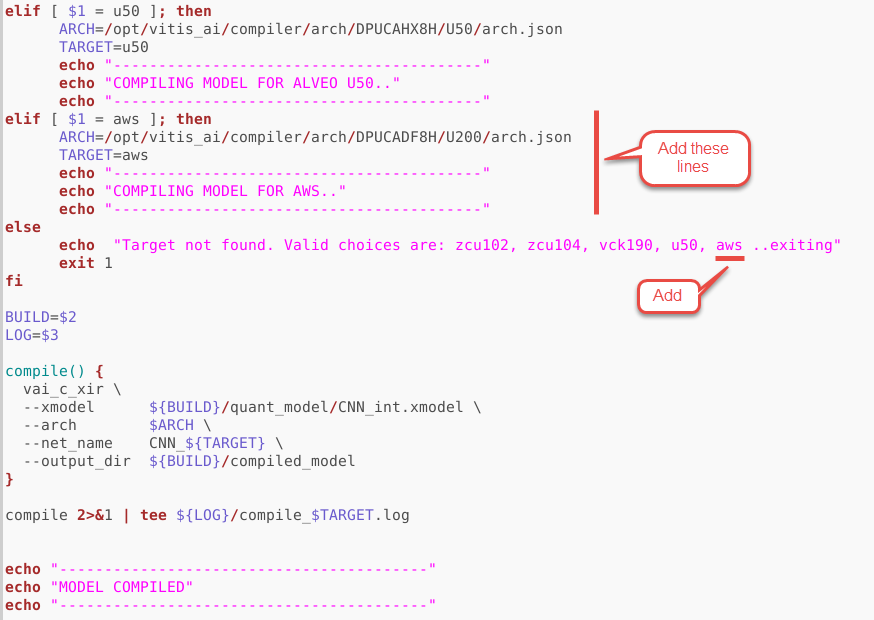
Edit compile.sh
Edit the compile.sh file to add aws as the target machine and define the target architecture’s json file. Note that AWS F1 has the similar FPGA as Alveo U200 board. Add following lines before the else section:
elif [ $1 = aws ]; then
      ARCH=/opt/vitis_ai/compiler/arch/DPUCADF8H/U200/arch.json
      TARGET=aws
      echo "-----------------------------------------"
      echo "COMPILING MODEL FOR AWS.."
      echo "-----------------------------------------"
Add aws after u50 as shown in the figure below:
Edit target.py
Edit the target.py file to pass the aws as the target architecture and board. Modify line 101 to match the following:
ap.add_argument('-t', '--target', type=str, default='aws', choices=['aws'], help='Target board type (aws). Default is aws')

Launch Docker Container 2.0.0.1103
Open another terminal window and Launch Docker Container 2.0.0.1103 that has the updated compiler for the PyTorch. The compiler in the 1.4.1.978 container has a bug and does not produce the correct result.
cd
cd Vitis-AI_1_4_1
./docker_run.sh xilinx/vitis-ai-cpu:2.0.0.1103
Activate Conda Environment.
conda activate vitis-ai-pytorch
Compile the model
In the docker window, make sure the current directory is /workspace/09-mnist_pt/files Train, quantize, and compile the model using the run_all.sh script.
cd /workspace/09-mnist_pyt/files
source run_all.sh
When done, it will have CNN_aws.xmodel file generated in the build/target_aws directory under the current directory. It will also copy the app_mt.py, Python application, and images directory.
Note that the shell script will go through three stages of training (Epoch): write the trained model f_model.pth into the ./build/float_model directory; quantize the model and generate CNN_int.xmodel in the ./build/quant_model/ directory; and finally generate the DPU compatible CNN_aws.xmodel in the ./build/target_aws directory
Launch Docker Container 1.4.1.978
Open another terminal window and Launch Docker Container.
cd /home/ubuntu/Vitis-AI_1_4_1
./docker_run.sh xilinx/vitis-ai-cpu:1.4.1.978
Activate Conda Environment and setup DPUCADF8H as DPU.
conda activate vitis-ai-pytorch
source /workspace/setup/alveo/setup.sh DPUCADF8H
Run example classification code
Run the application by executing the following two commands:
cd /workspace/09-mnist_pyt/files/build/target_aws
/usr/bin/python3 app_mt.py -m CNN_aws.xmodel
The application will be run on the F1 hardware and you should see the output similar to whats shown below.

You may want to close the docker images by typing exit in the respective image console.
Copyright© 2022 Xilinx