Matrix Multiplication lab
Introduction
This lab guides you through the steps involved in creating an AIE Graph that supports Matrix Multiplication for different data types.
Description of the lab
In this lab, you will add four different AIE kernels, each of them supporting a different data type to compute a Matrix Matrix multiplication of dimension 16x8 and 8x8. The supported data types are: float, int32, int16 and int8. Each kernel is written to fully utilize the vector processor data path.
Steps
Create a Vitis Project for the VCK5000 Versal Development Card
-
Verify that the tools and VCK5000 platform are setup correctly here
-
If you are not in the Vitis IDE already, start the Vitis IDE by running
vitis -workspace ~/xup_aie_workspaceNote, Vitis will use
~/xup_aie_workspaceas work directory -
In the Vitis GUI create a new application project
- Platform: xilinx_vck5000_gen4x8_qdma_2_202220_1
- Name: matmult
- Processor: ai_engine
- Domain: aie_domain
- Acceleration templates: Empty Application
Add source code for the AI Engine domain
-
In the Explore pane, right-click
matmult [ aie_domain ], then select Import Sources… -
In the Import Source window, click Browse…, then navigate to
$HOME/xup_aie_training/sources/matmult_lab/aieand click Open. -
Tick the aie box, then update the field Into folder: matmult
-
In the Explore pane, expand
matmult [ aie_domain ] > dataandmatmult [ aie_domain ] > srcReview the source files. A detailed description of the files can be found here
-
In the Explore pane, double-click
matmult [ aie_domain ] > matmult.prj -
In the Application Project Settings window, select the Top-Level File
-
In the File selection window, expand
matmult > srcand select graph.cpp, then click OK
Compile AI Engine kernel for Software Emulation
We are going to compile the AI Engine kernel and run software emulation to verify code correctness.
-
In the Application Project Settings window, set the active build configuration Emulation-SW
-
In the Explore pane, right-click on
matmult [ aie_domain ]and then select Build Project
Run SW Emulation - x86 Simulation
Software emulation (x86 Simulation) uses the files in the data folder as stimuli. We will get an output file with the results.
-
In the Explore pane, right-click on
matmult [ aie_domain ]and then select Run As > Launch SW Emulator. -
Once the simulation is completed, in the Explore pane, select at the same time both
matmult [ aie_domain ] > data > ref_outputc_float.txtandmatmult [ aie_domain ] > Emulation-SW > x86simulator_output > float_output.txt. Then, right-click on one of them and select Compare With > Each Other After Transformation -
In the Extra transformation commands window, enter the following command to remove timestamps and to remove the extra spaces, then click OK
grep -v T {0} | sed "s/^[ \t]*//" | sed "s/[ ^t]*$//" > {0}2 && mv {0}2 {0} -
A windows reporting no differences will appear
You can perform the same comparison for the other 3 data types
Compile and run AIE Simulation
This is still a software emulation (AIE Simulation), however the simulation takes into account the actual AI Engine array architecture. The AIE Simulation also uses files as input/outputs.
-
In the Application Project Settings window, set the active build configuration Emulation-AIE
-
In the Explore pane, right-click on
matmult [ aie_domain ]and then select Build ProjectThis compilation takes around 3-4 minutes
-
In the Explore pane, right-click on
matmult [ aie_domain ]and then select Run As > Run Configurations…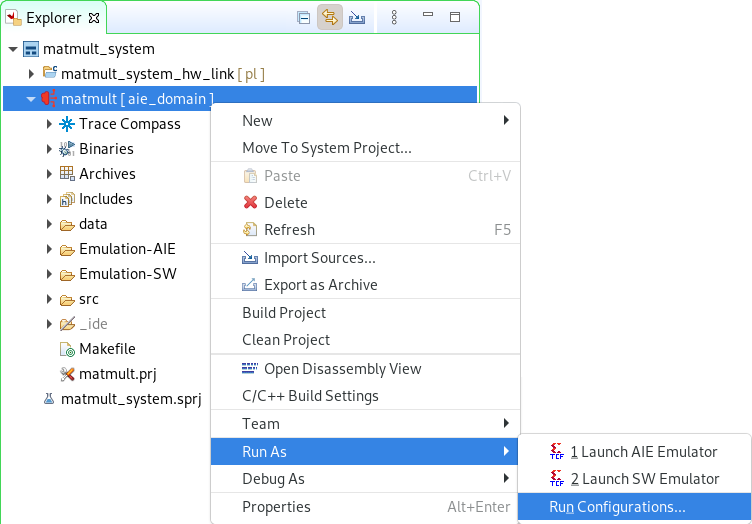
-
Double-click on the AI Engine Emulator. This will create a new run configuration
-
Select: Generate Trace, Generate Profile, Generate all reports for selected Active Cores(s) and tick all cores.
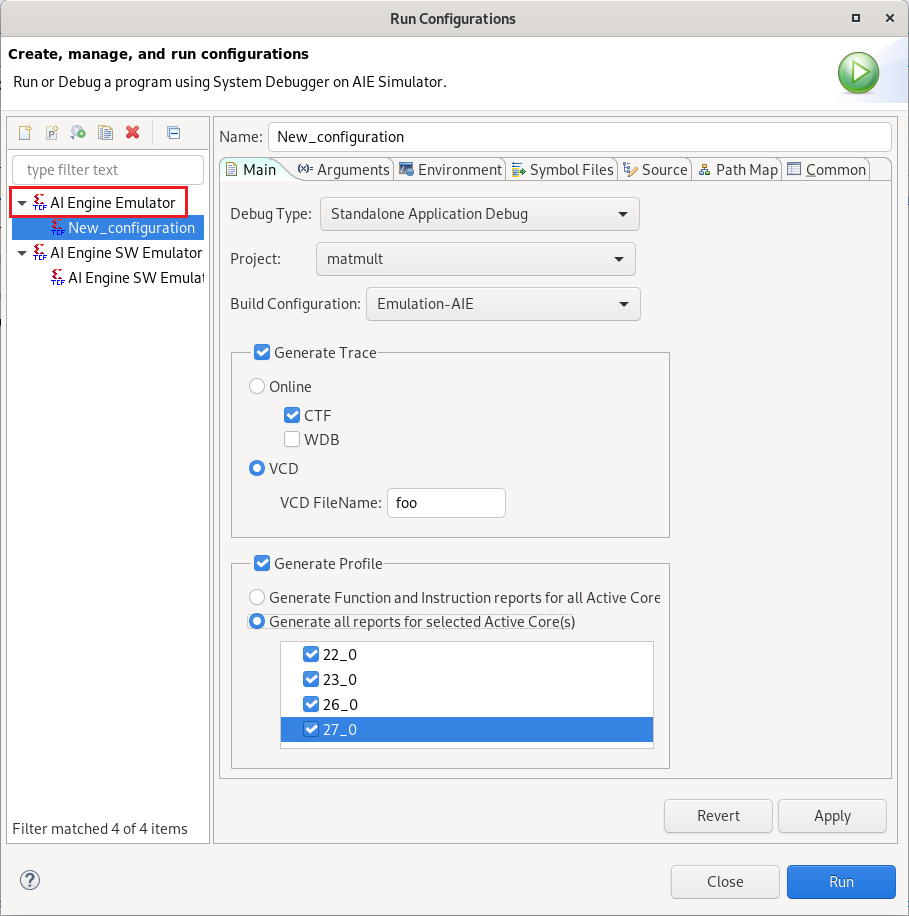
-
Click
Applyand thenRunThe emulation takes around 4-5 minutes
-
In the Explore pane, select at the same time both
matmult [ aie_domain ] > data > ref_outputc_float.txtandmatmult [ aie_domain ] > Emulation-AIE > aiesimulator_output > float_output.txt. Then, right-click on one of them and select Compare With > Each Other After Transformation -
In the Extra transformation commands window, enter the following command to remove timestamps and to remove the extra spaces, then click OK
grep -v T {0} | sed "s/^[ \t]*//" | sed "s/[ ^t]*$//" > {0}2 && mv {0}2 {0} -
A windows reporting no differences will appear
You can perform the same comparison for the other 3 data types
Explore AIE Graph with Vitis Analyzer
-
In the Assistant pane, double-click
matmult_system [System] > matmult [AIE] > Emulation-AIE > Run Summary (default)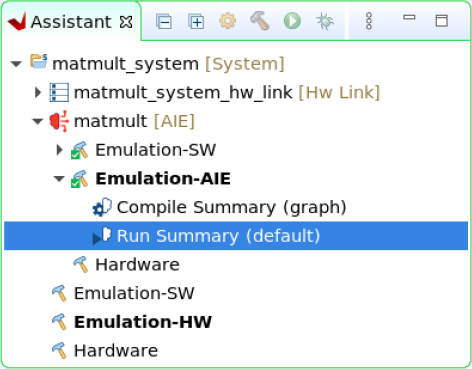
-
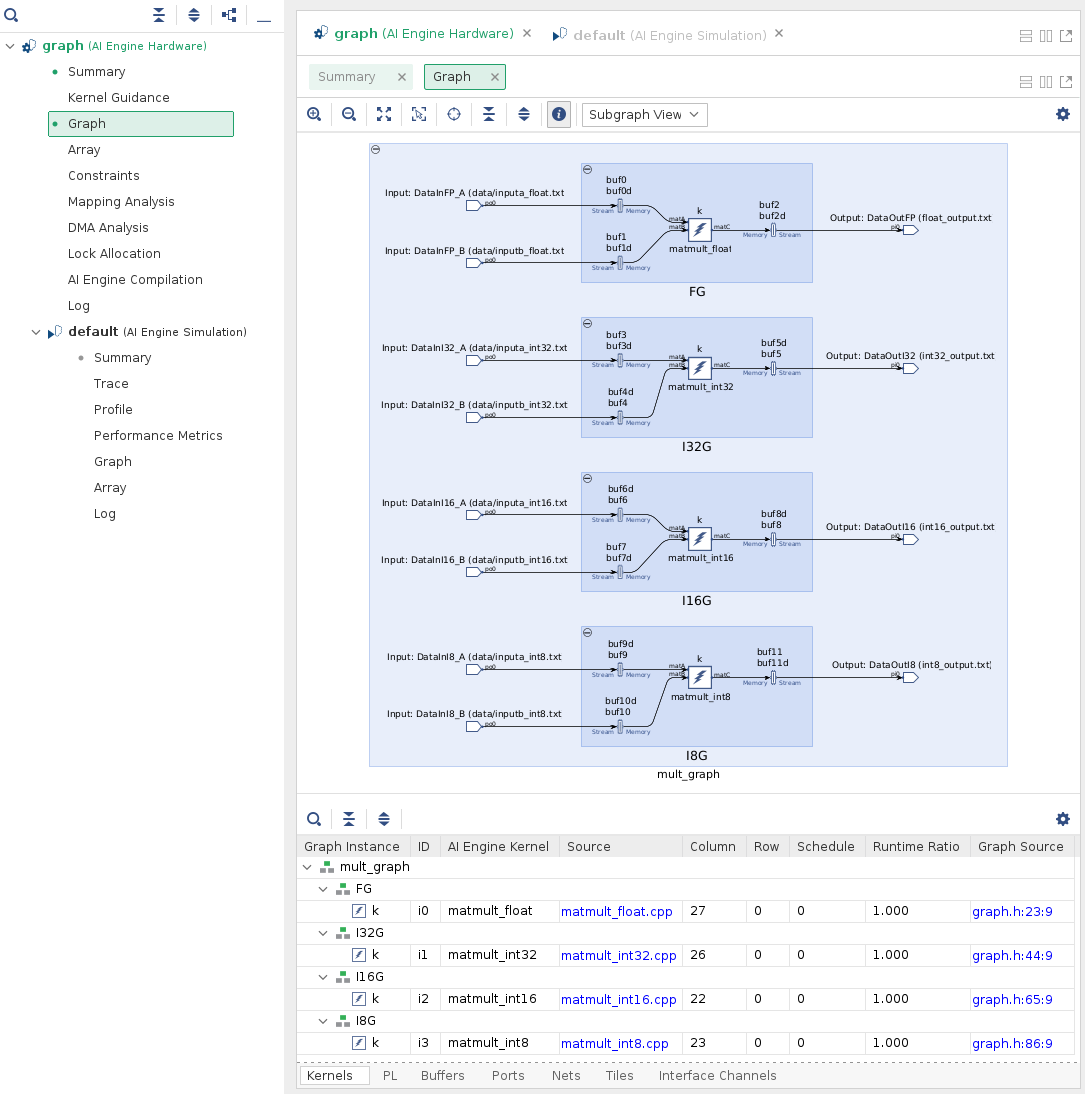
In the Vitis Analyzer open the
Graphtab -
Note that there are 4 subgraphs, one for each data type
-
Questions for the reader
Q1: How many AI Engine tiles are used? Where are they placed?
Q2: How many buffers are used? Where are they placed? What is their size?
Q3: Is any AI Engine tiles only used for its memory?
Q4: What is the AI Engine Frequency?
Q5: How many tiles are used for Buffers?
Q6: How many Interface channels are used for the ADF Input/Output?
Answers in the appendix
-
Recommended exploration for curious readers
E1: Explore the
Profiletab to find out more execution information in each AI Engine tileE2: Explore the Intermediate Representation of the code for each AI Engine tile. In Vitis, open the file
Emulation-AIE > Work > aie > ir > 22_0.llE3: Explore the assembly code for each AI Engine tile. In Vitis, open the file
Emulation-AIE > Work > aie > 22_0 > Release > 22_0.lst
Performance Metrics
If we analyze the AI Engine Simulation Tab in Vitis Analyzer, you can find Profile information for each AI Engine tile
-
Check the Total Function Time for Tile (22,1)
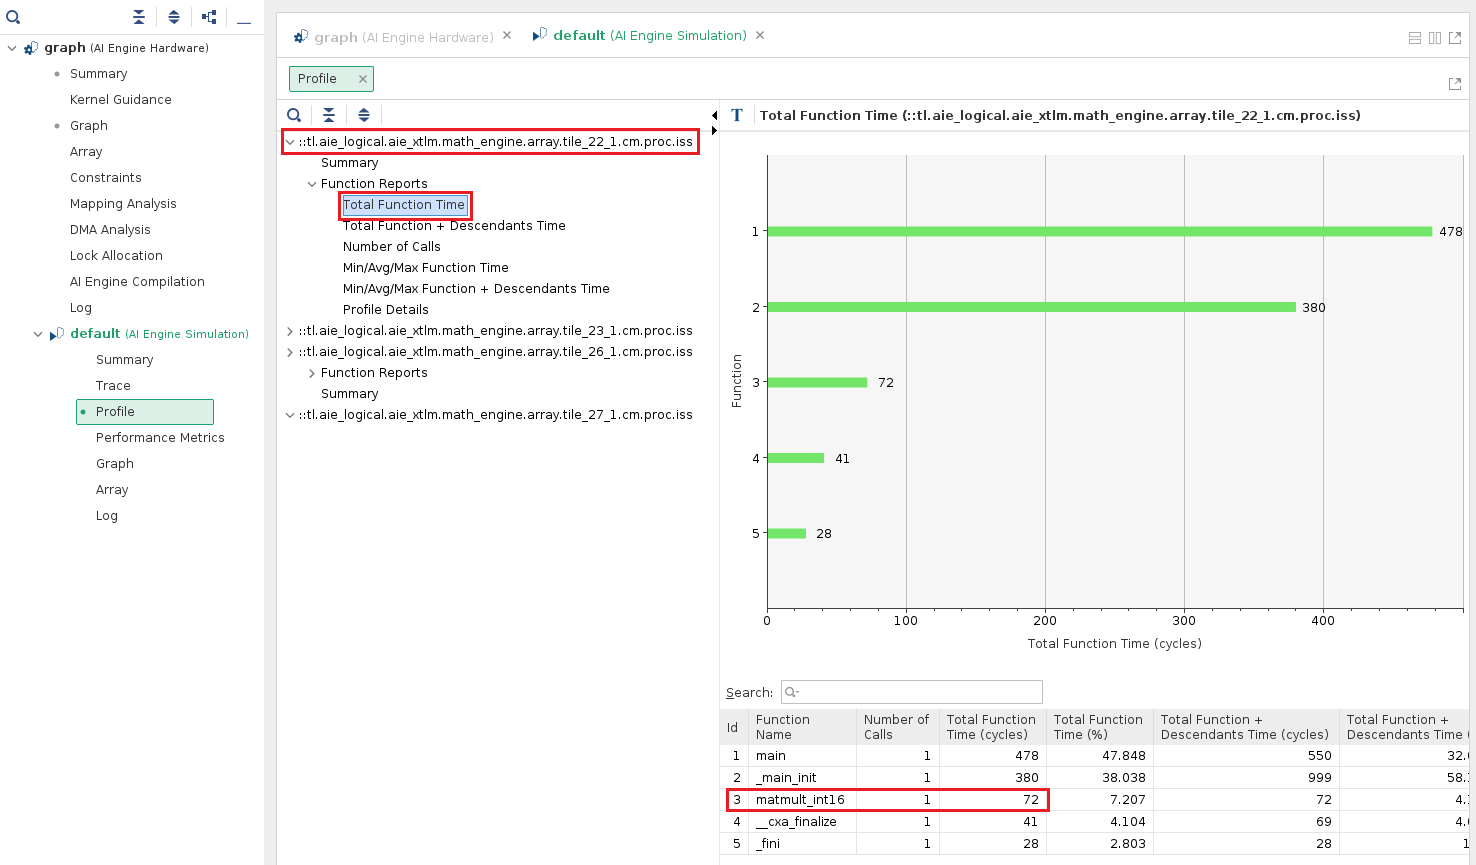
As you can see the matmult_int16 kernel takes 72 cycles to complete
Q7: How many cycles are spend on float, int32 and int8?
-
You can open the Trace, this reports all of the activity for the selected AI Engine Tiles
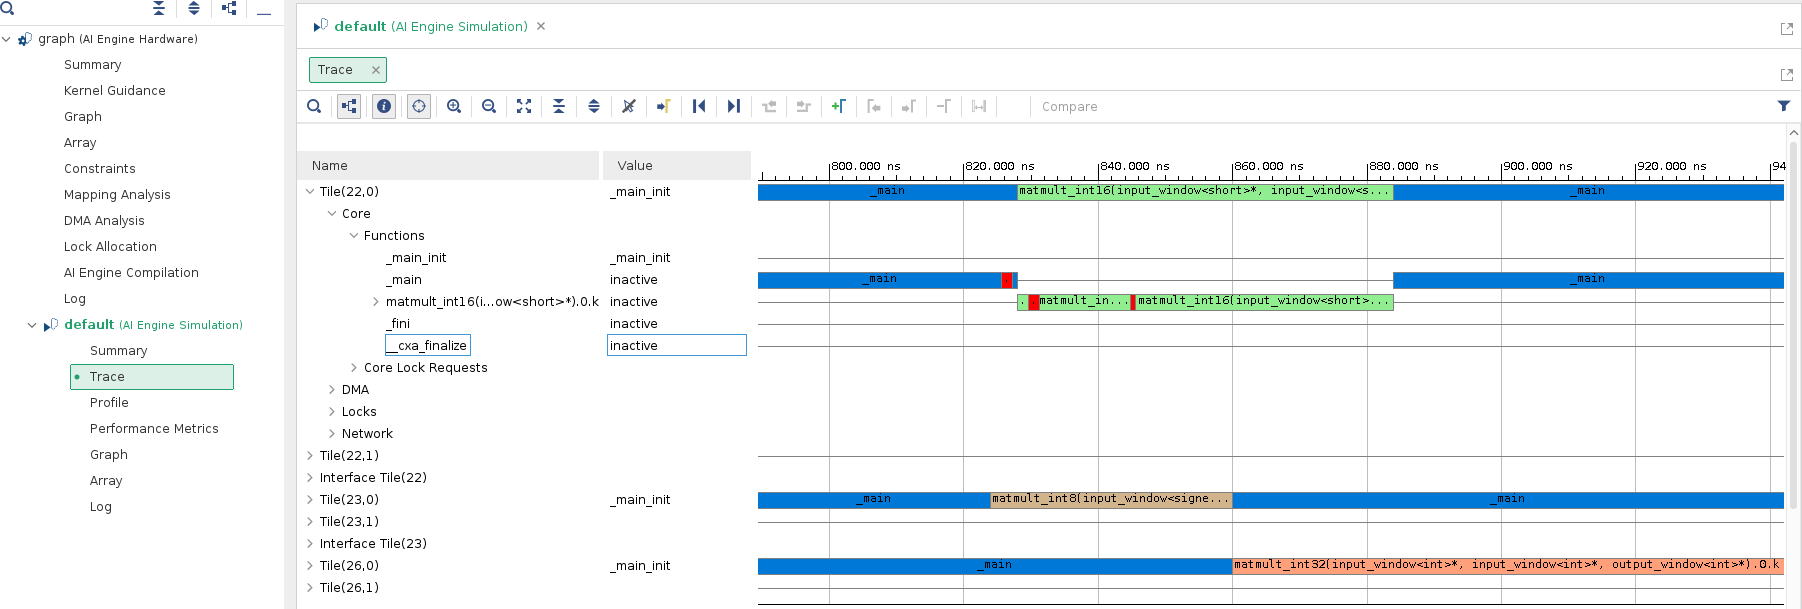
Note that for the matmult_int16 kernels there memory stalls (in red), but these are minimal. You can also explore the activity for the other Tiles.
The Profile and Trace will help you analyze the activity on your AIE kernel code, find bottlenecks, memory stalls, etc. These reports are key in helping you achieving maximum performance.
Change Runtime Ratio
-
Open the
graph.hfile and change the runtime ratio for I16G and I8G, line 104 and 105, to 45.MatMultInt16Graph<45> I16G; MatMultInt8Graph<45> I8G; -
Recompile aie_domain
-
Open the Compiled Summary
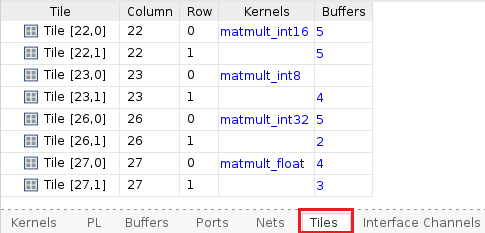
If you explore the Array tab, you can see that
matmult_int16andmatmult_int8kernels are now mapped to the Tile (22,1). This means that we only use 3 tiles for the kernels and 8 for the buffers, based on the summary information. -
Recommended exploration for curious readers
Change the runtime ratio of all kernels to 24. How many Tiles are used for the Kernels? How many Tiles are used for buffers?
Assignments for the Reader
The following assignments are optional, however they will help deepen your knowledge about the AIE programming model. No solution is provided for these assignments.
-
Implement a matrix multiplication kernel with mixed precision for mat A and mat B.
For instance, mat A is
int16and matBint8or vice versa. You can also considerint32andint16. Refer to AIE API Matrix Multiply documentation to find out supported shapes -
Using the existing kernels compute the result of a bigger matrix multiplication
For instance a Matrix Multiplication where A is 64x64 and B is 64x64. You can go one step further and use the cascade interface to further partition the multiplication between different Tiles
It is recommended that you increase the simulation cycle timeout.
If you are attending an in-person tutorial, you can request support from your instructor. Otherwise, open a GitHub issue
Build Hardware
Coming soon
Appendix
Answers
Q1: Four AI Engines are used
| ID | Kernel | Column | Row |
|---|---|---|---|
| i0 | matmult_float | 27 | 0 |
| i1 | matmult_int32 | 26 | 0 |
| i2 | matmult_int16 | 22 | 0 |
| i3 | matmult_int8 | 23 | 0 |
Q2: Three double buffers for each kernel are used, twelve double buffers in total
| ID | Column | Row | Bank(s) | Size |
|---|---|---|---|---|
| buf0 | 27 | 1 | 2 | 512 |
| buf1 | 27 | 0 | 2 | 256 |
| buf2 | 27 | 0 | 1 | 512 |
| buf3 | 26 | 0 | 0 | 512 |
| buf4 | 26 | 1 | 0 | 256 |
| buf5 | 26 | 0 | 1 | 512 |
| buf6 | 22 | 1 | 2 | 256 |
| buf7 | 22 | 0 | 0 | 128 |
| buf8 | 22 | 1 | 2 | 256 |
| buf9 | 23 | 1 | 0 | 128 |
| buf10 | 22 | 0 | 2 | 64 |
| buf11 | 23 | 1 | 2 | 128 |
Q3: Yes, based on the Tiles tab, you can see that AI Engine tile (27,1), (26,1), (23,1) and (22,1) are used only for its memory.
Q4: 1250 MHz. Find this in Summary tab within the Vitis Analyzer, AI ENGINE FREQUENCY
Q5: Seven. Find this in Summary tab within the Vitis Analyzer, AI ENGINE RESOURCE Utilization. Note that Tile (23,0) is not used to allocate memory
Q6: Twelve. Find this in Summary tab within the Vitis Analyzer, AI ENGINE RESOURCE Utilization
Q7:
| data type | Cycles |
|---|---|
| float | 257 |
| int32 | 202 |
| int16 | 60 |
| int8 | 34 |
For such small matrix sizes the overhead is significative. However, for larger matrices the efficiency of the code is much higher.
Increase Simulation Cycle Timeout
-
In the Explore pane, right-click on
matmult [ aie_domain ]and then select Run As > Run Configurations… -
Select Arguments and add
--simulation-cycle-timeout=200000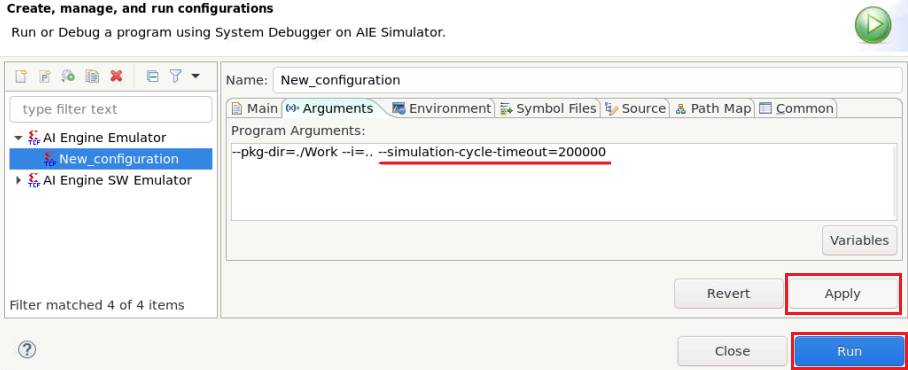
-
Click
Applyand thenRunThe emulation takes around 4-5 minutes
Increase Stack Size
-
Right-click
matmult [ aie_domain ], then select C/C++ Build Settings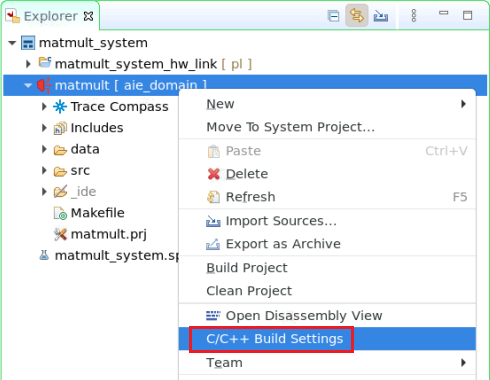
-
In the Properties for matmult windows, under C/C++ Build select
Settings, then make sure you select[All configurations] -
Under AIE C Compiler select Miscellaneous and set the
Stack Sizeto 2048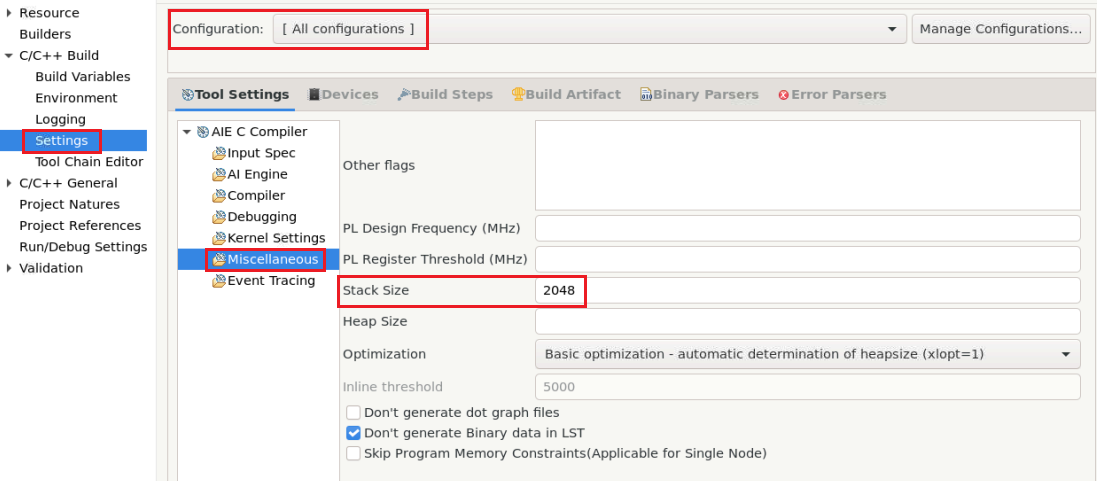
-
Click Apply and Close
-
Compile AIE code
Copyright© 2023 Advanced Micro Devices