Step 4: Test the Platform
Test 1: Read Platform Info
With Vitis environment setup, platforminfo tool can report XPFM platform information.
Click for detailed logs
# in zcu104_custom_pkg directory
platforminfo ./zcu104_custom/export/zcu104_custom/zcu104_custom.xpfm
==========================
Basic Platform Information
==========================
Platform:           zcu104_custom_platform
File:               <your path to>/zcu104_custom_platform.xpfm
Description:
A custom platform ZCU104 platform

=====================================
Hardware Platform (Shell) Information
=====================================
Vendor:                           xilinx
Board:                            zcu104_custom_platform
Name:                             zcu104_custom_platform
Version:                          0.0
Generated Version:                2020.2
Hardware:                         1
Software Emulation:               1
Hardware Emulation:               1
Hardware Emulation Platform:      0
FPGA Family:                      zynquplus
FPGA Device:                      xczu7ev
Board Vendor:                     xilinx.com
Board Name:                       xilinx.com:zcu104:1.1
Board Part:                       xczu7ev-ffvc1156-2-e

=================
Clock Information
=================
  Default Clock Index: 1
  Clock Index:         0
    Frequency:         100.000000
  Clock Index:         1
    Frequency:         200.000000
  Clock Index:         2
    Frequency:         400.000000


==================
Memory Information
==================
  Bus SP Tag: HP0
  Bus SP Tag: HP1
  Bus SP Tag: HP2
  Bus SP Tag: HP3
  Bus SP Tag: HPC0
  Bus SP Tag: HPC1

=============================
Software Platform Information
=============================
Number of Runtimes:            1
Default System Configuration:  zcu104_custom_platform
System Configurations:
  System Config Name:                      zcu104_custom_platform
  System Config Description:               zcu104_custom_platform
  System Config Default Processor Group:   xrt
  System Config Default Boot Image:        standard
  System Config Is QEMU Supported:         1
  System Config Processor Groups:
    Processor Group Name:      xrt
    Processor Group CPU Type:  cortex-a53
    Processor Group OS Name:   linux
  System Config Boot Images:
    Boot Image Name:           standard
    Boot Image Type:
    Boot Image BIF:            zcu104_custom_platform/boot/linux.bif
    Boot Image Data:           zcu104_custom_platform/xrt/image
    Boot Image Boot Mode:      sd
    Boot Image RootFileSystem:
    Boot Image Mount Path:     /mnt
    Boot Image Read Me:        zcu104_custom_platform/boot/generic.readme
    Boot Image QEMU Args:      zcu104_custom_platform/qemu/pmu_args.txt:zcu104_custom_platform/qemu/qemu_args.txt
    Boot Image QEMU Boot:
    Boot Image QEMU Dev Tree:
Supported Runtimes:
  Runtime: OpenCL
We can verify clock information and memory information are set as expected.
Test 2: Run Vector Addition Application
Vector addition is the simplest acceleration PL kernel. Vitis can create this application automatically. Running this test can check the AXI control bus, memory interface and interrupt setting in platform are working properly.
Creating Vector Addition Application
Open Vitis workspace you were using before.
Select File -> New -> Application Project.
Click next
Select zcu104_custom as platform, click next.
Name the project vadd, click next.
Set Domain to linux on psu_cortexa53, set Sys_root path to
<full_pathname_to_zcu104_custom_pkg>/pfm/sysroots/aarch64-xilinx-linux(as you created by running sdk.sh). Set the Root FS to rootfs.ext4 and Kernel Image to Image. These files are located inzcu104_custom_plnx/imagesdirectory, which are generated in Step 2. click next.Select System Optimization Examples -> Vector Addition and click finish to generate the application.
In the Explorer window double click the vadd.prj file to open it, change the Active Build configuration from Emulation-SW to Hardware.
Select vadd_system in Explorer window and Click Build icon in toolbar.
Note: If you cannot see the zcu104_custom platform we created, we can add it to platform list of New Project Wizard by selecting the add button and point to zcu104_custom_pkg/zcu104_custom directory.
Note: If you’d like to test this application in emulation mode, plese change Active Build configuration from Emulation-SW to Emulation-HW on Step 8.
Running Vector Addition Application on the Board
Copy zcu104_custom_pkg/vadd_system/Hardware/package/sd_card.img to local if Vitis is running on a remote server.
Write sd_card.img into SD Card with SD Card image writer applications like Etcher on Windows or dd on Linux.
Boot ZCU104 board with the SD card in SD boot mode.
Go to auto mounted FAT32 partition
cd /mnt/sd-mmcblk0p1Run vadd application
./vadd binary_container_1.xclbin
It should show program prints and XRT debug info.
TEST PASSED
Test Vector Addition Application in Emulation Mode (Optional)
Use Vitis menu -> Xilinx -> Start/Stop Emulator to launch QEMU. Project is vadd, configuration is Emulation-HW. Click Start. Wait for Linux to boot. Log in with root/root.
Right click vadd project (not the vadd_system system project), select Run as -> Launch on Emulator
The result will show on Console tab.
Loading: './binary_container_1.xclbin'
TEST PASSED
Test 3: Run a Vitis-AI Demo
This test will run a Vitis-AI test application in DPU-TRD to verify DPU function on our custom platform. The most instructions below follows Vitis-AI DPU-TRD document.
Create the design
Add Vitis-AI repository into Vitis IDE
Launch Vitis IDE if you have not. We can reuse the workspace of vadd application.
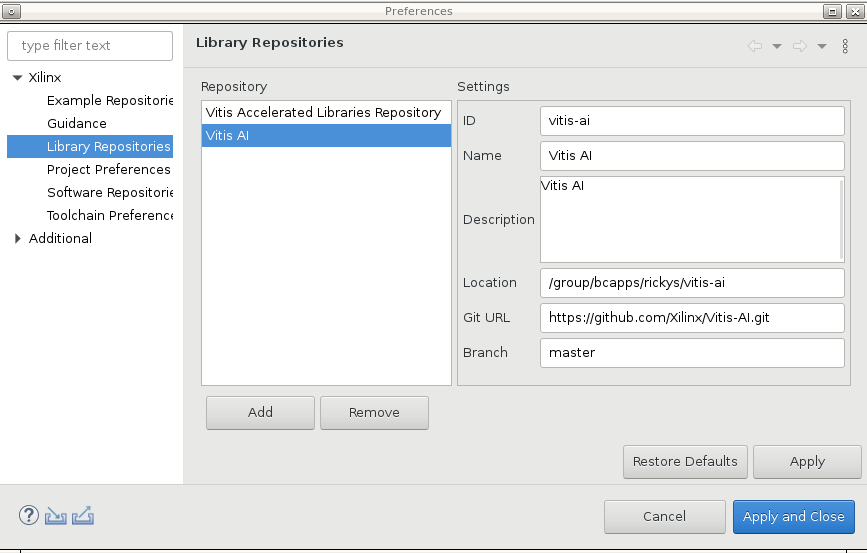
Open menu Window -> Preferences
Go to Library Repository tab
Add Vitis-AI:
Click Add button
Input ID: vitis-ai
Name: Vitis AI
Location: keep empty or assign a target download directory
Git URL: https://github.com/Xilinx/Vitis-AI.git
Branch: v1.3
Note: If Location is empty, Vitis IDE will clone the git repo to
~/.Xilinxdirectory. In this example, we set it to a directory with large storage capability due to home directory size limitation.Download the Vitis-AI library
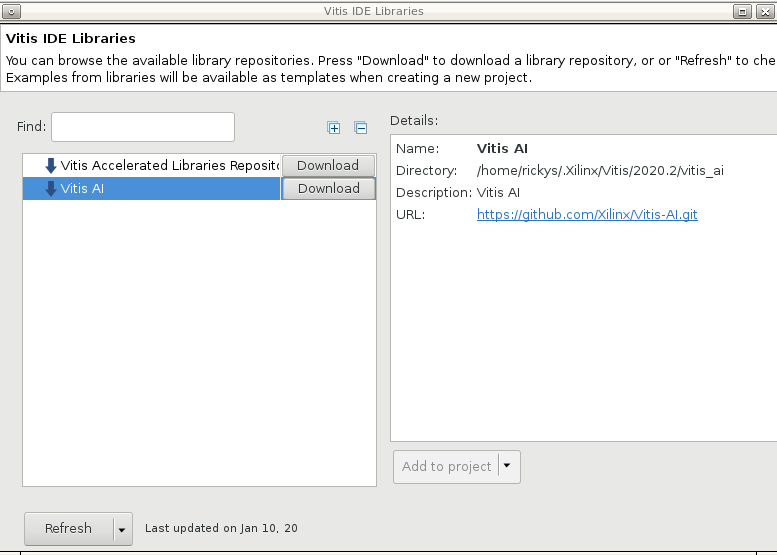
Open menu Xilinx -> Libraries
Find the Vitis-AI entry we just added. Click the Download button on it.
Wait until the download of Vitis-AI repository completes
Click OK to close this window.
Vitis IDE will check the upstream status of each repository. If there are updates, it will allow users to download the updates if the source URL is a remote Git repository.
Create a Vitis-AI design on our zcu104_custom_platform
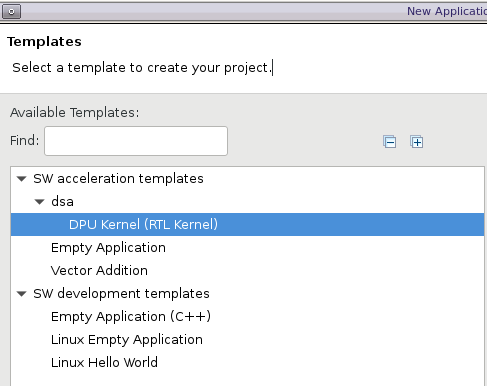
Go to menu File -> New -> Application Project
Click Next in Welcome page
Select platform zcu104_custom_platform. Click Next.
Name the project dpu_trd, click next.
Set Domain to linux on psu_cortexa53, set Sys_root path to
<full_pathname_to_zcu104_custom_pkg>/pfm/sysroots/aarch64-xilinx-linux(as you created by running sdk.sh). Set the Root FS to rootfs.ext4 and Kernel Image to Image. These files are located inzcu104_custom_plnx/imagesdirectory, which are generated in Step 2. click next.Select dsa -> DPU Kernel (RTL Kernel) and click Finish to generate the application.
Review and update DPU settings for ZCU104. The default created design has the DPU settings for ZCU102.
Open dpu_conf.vh from dpu_trd_kernels/src/prj/Vitis directory
Update line 37 from
URAM_DISABLEtoURAM_ENABLEPress Ctrl+S to save the changes.
Note: ZCU104 has ZU7EV device on board. It has less BRAM than ZU9EG on ZCU102 but it has URAM. Turning on URAM support can fulfill the on chip memory requirement by DPU.
Update system_hw_link for proper kernel instantiation
The DPU kernel requires two phase aligned clocks, 1x clock and 2x clock. The configuration is stored in dpu_trd/src/prj/Vitis/config_file/prj_config_gui. It sets up clock and AXI interface connections between the DPU kernel to the platform. This configuration file also sets up implementation strategy so that it works well for timing closure.
Here’s how to use it in our project.
Double click dpu_trd_system_hw_link.prj.
In Hardware Functions window, right click the binary container “dpu”, select Edit V++ Options
Input
--config ../../dpu_trd/src/prj/Vitis/config_file/prj_config_gui. Click OK.
Since ZCU104 has less LUT resources than ZCU102, it’s hard to meet timing closure target if we include the softmax IP in PL like ZCU102. The implementation would take quite a long time. The Vitis-AI DPU-TRD design removes the softmax IP in hardware for ZCU104. When the host application detects no softmax IP in hardware, it will calculate softmax with software. The result will be identical but the calculation time will be different. Since our target is to verify the platform, we will remove the softmax kernel in our test application.
Remove sfm_xrt_top instance by right clicking it and select Remove.
Update host code build options
Double click the system project file dpu_trd_system.sprj
Change Active Build Configuration to Hardware
Right click dpu_trd, the host application, select C/C++ Build Settings
Go to GCC Host Linker -> Libraries tab
Click + button on Library Search Path (-L)
Click workspace, select dpu_trd/src/app/samples/lib
Click OK. It generates the path
${workspace_loc:/${ProjName}/src/app/samples/lib}Click OK.
Adjust the search order to make sure the added path is above the SYSROOT path.
Click Apply and Close.
Note: the DPU design template automatically sets up the C++ standard to c++17 and adds libraries to link to. User needs to manually setup the library search path. The libraries in src/app/samples/lib are identical to the VART libraries that have been installed in the rootfs.
Update package options to add models into SD Card
Double click dpu_trd_system.sprj
Click … button on Package options
Input
--package.sd_dir=../../dpu_trd/src/appClick OK
All contents in the
--package.sd_dirassigned directory will be added to the FAT32 partition of the sd_card.img. We package samples and models for verification.The dpu_trd in the path name is the application project name in this example. If your project name is different, please update the project name accordingly.
Build the hardware design
Select the dpu_trd_system system project
Click the hammer button to build the system project
The generated SD card image is located at dpu_trd_system/Hardware/package/sd_card.img.
Note: Please refer to Vitis-AI document for details about Vitis-AI project creation flow.
Run Application on Board
Write image to SD
Copy the sd_card.img to a local workstation or laptop with SD card readers.
Write the image to SD card with balena Etcher or similar tools
Boot the board
Insert the SD card to ZCU104
Set boot mode to SD boot
Connect USB UART cable
Power on the board. It should boot Linux properly in a minute.
Resize ext4 partition
Connect UART console if it’s not connected.
On the ZCU104 board UART console, run
df .to check current available disk size
root@petalinux:~# df .
Filesystem           1K-blocks      Used Available Use% Mounted on
/dev/root               564048    398340    122364  77% /
Run
resize-part /dev/mmcblk0p2to resize the ext4 partition. You need to input Yes and **100% **for confirming the resize to utilize full of the rest of SD card.
root@petalinux:~# resize-part /dev/mmcblk0p2
/dev/mmcblk0p2
Warning: Partition /dev/mmcblk0p2 is being used. Are you sure you want to continue?
parted: invalid token: 100%
Yes/No? yes
End?  [2147MB]? 100%
Information: You may need to update /etc/fstab.

resize2fs 1.45.3 (14-Jul-2019)
Filesystem at /dev/mmcblk0p2 is mounted on /media/sd-mmcblk0p2; o[   72.751329] EXT4-fs (mmcblk0p2): resizing filesystem from 154804 to 1695488 blocks
n-line resizing required
old_desc_blocks = 1, new_desc_blocks = 1
[   75.325525] EXT4-fs (mmcblk0p2): resized filesystem to 1695488
The filesystem on /dev/mmcblk0p2 is now 1695488 (4k) blocks long.
Check available size again to verify that the ext4 partition size is enlarged.
root@petalinux:~# df . -h
Filesystem                Size      Used Available Use% Mounted on
/dev/root                 6.1G    390.8M      5.4G   7% /
Note: The available size would be different according to your SD card size.
Note: resize-part is a script we added in Step 2. It calls Linux utilities parted and resize2fs to extend the ext4 partition to take the rest of the SD card.
Copy dependency files to home folder
# Libraries
root@petalinux:~# cp -r /mnt/sd-mmcblk0p1/app/samples/ ~
# Model
root@petalinux:~# cp /mnt/sd-mmcblk0p1/app/model/resnet50.xmodel ~
# Host app
root@petalinux:~# cp /mnt/sd-mmcblk0p1/dpu_trd .
# Image to test
root@petalinux:~# wget https://raw.githubusercontent.com/Xilinx/Vitis-AI/v1.2.1/DPU-TRD/app/img/bellpeppe-994958.JPEG
Run the application
echo 6 > /proc/sys/kernel/printk #Reduce XRT debugging messages
env LD_LIBRARY_PATH=samples/lib XLNX_VART_FIRMWARE=/mnt/sd-mmcblk0p1/dpu.xclbin ./dpu_trd bellpeppe-994958.JPEG
It would show bell pepper has the highest possibility.
score[945]  =  0.992235     text: bell pepper,
score[941]  =  0.00315807   text: acorn squash,
score[943]  =  0.00191546   text: cucumber, cuke,
score[939]  =  0.000904801  text: zucchini, courgette,
score[949]  =  0.00054879   text: strawberry,
Here's the detailed prints with XRT debugging message
[  196.247066] [drm] Pid 948 opened device
[  196.250926] [drm] Pid 948 closed device
[  196.254833] [drm] Pid 948 opened device
[  196.258679] [drm] Pid 948 closed device
[  196.269515] [drm] Pid 948 opened device
[  196.273384] [drm] Pid 948 closed device
[  196.277243] [drm] Pid 948 opened device
[  196.281076] [drm] Pid 948 closed device
[  196.285073] [drm] Pid 948 opened device
[  196.288984] [drm] Pid 948 closed device
[  196.293230] [drm] Pid 948 opened device
[  196.297096] [drm] Pid 948 closed device
[  196.300963] [drm] Pid 948 opened device
[  196.307660] [drm] zocl_xclbin_read_axlf The XCLBIN already loaded
[  196.307672] [drm] zocl_xclbin_read_axlf 1cdede23-0755-458e-8dac-7ef1b3845fa4 ret: 0
[  196.317747] [drm] bitstream 1cdede23-0755-458e-8dac-7ef1b3845fa4 locked, ref=1
[  196.325431] [drm] Reconfiguration not supported
[  196.337206] [drm] bitstream 1cdede23-0755-458e-8dac-7ef1b3845fa4 unlocked, ref=0
[  196.337361] [drm] Pid 948 opened device
[  196.348581] [drm] Pid 948 closed device
[  196.352580] [drm] Pid 948 opened device
[  196.356638] [drm] bitstream 1cdede23-0755-458e-8dac-7ef1b3845fa4 locked, ref=1
[  196.356659] [drm] Pid 948 opened device
[  196.367712] [drm] Pid 948 closed device
[  196.371560] [drm] Pid 948 opened device
[  196.375507] [drm] bitstream 1cdede23-0755-458e-8dac-7ef1b3845fa4 locked, ref=2
[  196.375539] [drm] Pid 948 opened device
[  196.386590] [drm] Pid 948 closed device
[  196.390439] [drm] Pid 948 opened device
[  196.394331] [drm] bitstream 1cdede23-0755-458e-8dac-7ef1b3845fa4 locked, ref=3
[  196.394822] [drm] Pid 948 opened device
[  196.405867] [drm] Pid 948 closed device
[  196.409717] [drm] Pid 948 opened device
score[945]  =  0.992235     text: bell pepper,
score[941]  =  0.00315807   text: acorn squash,
score[943]  =  0.00191546   text:[  196.413579] [drm] bitstream 1cdede23-0755-458e-8dac-7ef1b3845fa4 locked, ref=4
cucumber, cuke,
score[939]  =  0.000904801  text: zucchini, co[  197.997865] [drm] bitstream 1cdede23-0755-458e-8dac-7ef1b3845fa4 unlocked, ref=3
urgette,
score[949]  =  0.00054879   text: strawberry,
[  198.010569] [drm] Pid 948 closed device
[  198.032534] [drm] bitstream 1cdede23-0755-458e-8dac-7ef1b3845fa4 unlocked, ref=2
[  198.032546] [drm] Pid 948 closed device
[  198.229797] [drm] bitstream 1cdede23-0755-458e-8dac-7ef1b3845fa4 unlocked, ref=0
[  198.229803] [drm] Pid 948 closed device
[  198.241056] [drm] bitstream 1cdede23-0755-458e-8dac-7ef1b3845fa4 unlocked, ref=0
[  198.241059] [drm] Pid 948 closed device
[  198.252434] [drm] Pid 948 closed device
Congratulations
We have completed creating a custom platform from scratch and verifying it with a simple vadd application and a relatively complex Vitis-AI use cases.
Please feel free to check more tutorials in this repository.
Copyright© 2020 Xilinx