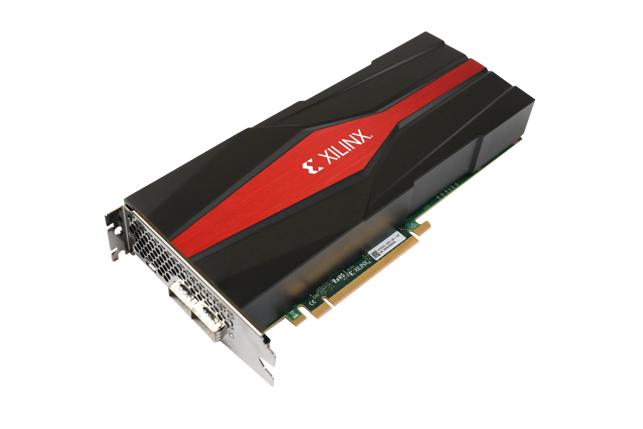
Quick Start Guide for VCK5000
The AMD DPUCVDX8H for Versal™ VCK5000 is a configurable computation engine dedicated to convolutional neural networks. It supports a highly optimized instruction set, enabling the deployment of most convolutional neural networks. The following instructions will help you to install the software and packages required to support VCK5000.
Prerequisites
System Requirements
Confirm that your development machine meets the minimum Host System Requirements.
Confirm that you have at least 100GB of free space in the target partition.
Applicable Targets
This quickstart is applicable to the VCK5000
For additional information on the VCK5000 see the VCK5000 User Guide
Quickstart
As a first step, it is recommended that you select the appropriate DPU configuration for your application:
No. |
Accelerator Card |
DPU IP |
|---|---|---|
1 |
VCK5000-PROD |
DPUCVDX8H_4pe_miscdwc |
2 |
VCK5000-PROD |
DPUCVDX8H_ISA1_F2W4_6PE_aieDWC |
3 |
VCK5000-PROD |
DPUCVDX8H_ISA1_F2W4_6PE_aieMISC |
4 |
VCK5000-PROD |
DPUCVDX8H_ISA1_F2W2_8PE |
This selection depends on several factors:
misc is selected if the models to be deployed leverage pooling and element-wise layers
dwc is selected if the models to be deployed leverage Depthwise Convolution (eg. MobileNets)
The number of pe or “processing engines” determines both performance and programmable logic resource utilization
If you are just getting started and are uncertain which to choose, you may wish to start with the DPUCVDX8H_4pe_miscdwc as it provides the most extensive operator support. Please refer to this user guide for more extensive details regarding selection.
VCK5000-PROD Card Setup
A script is provided to drive the VCK5000-PROD card setup process.
Note
You should run this script on the host machine, OUTSIDE of the Docker container. After the script has executed successfully, manually reboot the host server once. For data center DPUs, Vitis™ AI 3.0 specifically leverages the 2022.2 versions of the Vitis tools, VCK5000 platform, XRT and XRM.
This script will detect the operating system of the host, and will download and install the appropriate packages for that operating system. Please refer to Host System Requirements prior to proceeding.
Execute this script as follows:
[Host] $ cd <Vitis-AI install path>/Vitis-AI/board_setup/vck5000
[Host] $ source ./install.sh
The following installation steps are performed by this script:
XRT Installation. The Xilinx RunTime (XRT) is a combination of userspace and kernel driver components supporting PCIe accelerator cards such as the VCK5000.
XRM Installation. The Xilinx Resource Manager (XRM) manages and controls FPGA resources on the host. It is required by the runtime.
Installation of the VCK5000-PROD platform.
Installation of the DPU xclbin for the VCK5000-PROD platform.
After the script is executed successfully, use the XRT xbutil command to check that the installation was successful. The result should contain the correct information for System Configuration, XRT and Devices present.
[Host] $ /opt/xilinx/xrt/bin/xbutil examine
Note
Vitis AI 3.0 requires the use of a VCK5000-PROD card. Support for the pre-production VCK5000-ES1 card is not available in this release. If you do not have a production release card, you must use Vitis AI 1.4.1.
Clone the Vitis AI Repository
[Host] $ git clone https://github.com/Xilinx/Vitis-AI
Install Docker
Make sure that the Docker engine is installed according to the official Docker documentation.
The Docker daemon always runs as the root user. Non-root users must be added to the docker group. Do this now.
Verify Docker Installation
Perform a quick and simple test of your Docker installation by executing the following command. This command will download a test image from Docker Hub and run it in a container. When the container runs successfully, it prints a “Hello World” message and exits.
[Host] $ docker run hello-world
Finally, verify that the version of Docker that you have installed meets the minimum Host System Requirements by running the following command
[Host] $ docker --version
Pull Vitis AI Docker
In order to simplify this quickstart tutorial, we will utilize the Vitis-AI PyTorch CPU Docker to assess pre-built Vitis-AI examples, and subsequently perform quantization and compilation of our own model. The CPU docker image is generic, does not require the user to build the container, and has no specific GPU enablement requirements. More advanced users can optionally skip this step and jump to the Full Install Instructions but we would recommend that new users start with this simpler first step.
Pull and start the latest Vitis AI Docker using the following commands:
[Host] $ docker pull xilinx/vitis-ai-pytorch-cpu:latest
[Host] $ ./docker_run.sh xilinx/vitis-ai-pytorch-cpu:latest
Docker Container Environment Variable Setup
From inside the docker container, execute one of the following commands to set the required environment variables for the DPU. Note that the chosen xclbin file must be in the /opt/xilinx/overlaybins directory prior to execution. There are four xclbin files to choose from. Select the xclbin that matches your chosen DPU configuration.
For the 4PE 350MHz configuration with pooling, elementwise and depthwise convolution support:
[Docker] $ source /workspace/board_setup/vck5000/setup.sh DPUCVDX8H_4pe_miscdwc
For the 6PE 350MHz configuration with depthwise convolution support:
[Docker] $ source /workspace/board_setup/vck5000/setup.sh DPUCVDX8H_6pe_dwc
For the 6PE 350MHz configuration with pooling and elementwise support:
[Docker] $ source /workspace/board_setup/vck5000/setup.sh DPUCVDX8H_6PE_misc
For the 8PE 350MHz base configuration:
[Docker] $ source /workspace/board_setup/vck5000/setup.sh DPUCVDX8H_8pe_normal
Note
You must execute this setup script each time to re-enter Docker.
Run the Vitis AI Examples
Download vitis_ai_runtime_r3.0.0_image_video.tar.gz to your host.
Extract the
vitis_ai_runtime_r3.0.0_image_video.tar.gzpackage.
[Docker] $ cd ~
[Docker] $ tar -xzvf vitis_ai_runtime_r3.0.0_image_video.tar.gz -C Vitis-AI/examples/vai_runtime
Navigate to the example directory. Take
resnet50as an example.
[Docker] $ cd /worksapce/examples/vai_runtime/resnet50
Run the example.
[Docker] $ ./resnet50 /usr/share/vitis_ai_library/models/resnet50/resnet50.xmodel
The console should reflect the following output:
Image : 001.jpg
top[0] prob = 0.982662  name = brain coral
top[1] prob = 0.008502  name = coral reef
top[2] prob = 0.006621  name = jackfruit, jak, jack
top[3] prob = 0.000543  name = puffer, pufferfish, blowfish, globefish
top[4] prob = 0.000330  name = eel
These results reflect the classification of a single test image located in the ~/Vitis-AI/examples/vai_library/images directory.
PyTorch Tutorial
This tutorial assumes that Vitis AI has been installed and that the board has been configured as explained in the installation instructions above. For additional information on the Vitis AI Quantizer, Optimizer, or Compiler, please refer to the Vitis AI User Guide.
Quantizing the Model
Quantization reduces the precision of network weights and activations to optimize memory usage and computational efficiency while maintaining acceptable levels of accuracy. Inference is computationally expensive and requires high memory bandwidths to satisfy the low-latency and high-throughput requirements of Edge applications. Quantization and channel pruning techniques are employed to address these issues while achieving high performance and high energy efficiency with little degradation in accuracy. The Vitis AI Quantizer takes a floating-point model as an input and performs pre-processing (folds batchnorms and removes nodes not required for inference), and finally quantizes the weights/biases and activations to the given bit width.
Navigate to the cloned Vitis-AI directory and create a new workspace for your project. Here you will store the test dataset, models, and python scripts required for quantization.
[Host] $ cd ~/Vitis-AI
[Host] $ mkdir -p resnet18/model
Download the ImageNet 1000 (mini) dataset from Kaggle. This dataset is subset of the ILSVRC 2012-2017 dataset and comprises 1000 object classes, and contains 1,281,167 training, 50,000 validation, and 100,000 test images. You will need to create a Kaggle account to access this dataset. Move the downloaded archive.zip file into the created /Vitis-AI/resnet18 folder and unzip the dataset.
[Host] $ cd resnet18
[Host] $ unzip archive.zip
Your workspace directory should reflect the following:
├── archive.zip
│
├── model
│
└── imagenet-mini
        ├── train                    # Training images folder. Will not be used in this tutorial.
        │   └─── n01440764           # Class folders to group images.
        └── val                      # Validation images that will be used for quantization and evaluation of the floating point model.
            └─── n01440764
Navigate to the Vitis-AI directory and execute the following command to start Docker.
[Host] $ cd ..
[Host] ./docker_run.sh xilinx/vitis-ai-pytorch-cpu:latest
Note that when you start Docker appropriate as shown above, your
/workspacefolder will correspond to/Vitis-AIand your initial path in Docker will be/workspace. If you inspectdocker_run.shyou can see that the -v option is leveraged which links the Docker file system to your Host file system. Verify that you see the created/resnet18subfolder in your workspace:
[Docker] $ ls
Activate the vitis-ai-pytorch conda enviornment.
[Docker] $ conda activate vitis-ai-pytorch
Download the pre-trained resnet18 model from PyTorch to the docker environment and store it in the
modelfolder . This is the floating point (FP32) model that will be quantized to INT8 precision for deployment on the target.
[Docker] $ cd resnet18/model
[Docker] $ wget https://download.pytorch.org/models/resnet18-5c106cde.pth -O resnet18.pth
Note
The Vitis AI Model Zoo also provides optimized deep learning models to speed up the deployment of deep learning inference on adaptable AMD platforms. For this tutorial we have chosen to use an open-source PyTorch model to showcase that models from the community can also be deployed.
Copy the example Vitis AI ResNet18 quantization script to your workspace. This script contains the Quantizer API calls that will be executed in order to quantize the model.
[Docker] $ cd ..
[Docker] $ cp ../src/vai_quantizer/vai_q_pytorch/example/resnet18_quant.py ./
Your
workspace/resnet18directory should reflect the following:
├── archive.zip
│
├── model
│   └── resnet18.pth             # ResNet18 floating point model downloaded from PyTorch.
│
├── imagenet-mini
│   ├── train                    # Training images folder. Will not be used in this tutorial.
│   │   └─── n01440764           # Class folders to group images.
│   └── val                      # Validation images that will be used for quantization and evaluation of the floating point model.
│       └─── n01440764
│
└── resnet18_quant.py            # Quantization python script.
Inspect
resnet18_quant.py. Observe the parser arguments that can be passed to the script via command line switchessubset_lenquant_modedata_dirandmodel_dir. We will set thedata_dirandmodel_dirarguments to align with our directory structure. If you wish to avoid extraneous typing and are manually entering these commands, you can simply edit the script to suit your use case.
[Docker] $ vim resnet18_quant.py
Use the sequence
<esc> :q!to exit vim without saving.
Run the command below to evaluate the accuracy of the floating point model.
[Docker] $ python resnet18_quant.py --quant_mode float --data_dir imagenet-mini --model_dir model
You should observe that the accuracy reported is similar to
top-1 / top-5 accuracy: 69.9975 / 88.7586
Next, let’s run the Model Inspector to confirm that this model should be compatible with the target DPU architecture. Replace
DPUCVDX8H_4pe_miscdwcwith the appropriate architecture based on your original DPU architecture selection.
[Docker] $ python resnet18_quant.py --quant_mode float --inspect --target DPUCVDX8H_4pe_miscdwc --model_dir model
Run the command below to start quantization. Generally, 100-1000 images are required for quantization and the number of iterations can be controlled through the the
subset_lendata loading argument. In this case, 200 images are forward propagated through the network, and these images are chosen randomly from the validation image set. Note that the displayed loss and accuracy that are output from this process are not representative of final model accuracy.
[Docker] $ python resnet18_quant.py --quant_mode calib --data_dir imagenet-mini --model_dir model --subset_len 200
On most host machines this command should complete in less than 1 minute even with the CPU-only Docker. If you leverage the CUDA or ROCm Dockers on a compatible machine, the Quantization process will be accelerated considerably. Let’s take a look at the output:
[Docker] $ cd quantize_result
[Docker] $ ls
If the command ran successfully, the output directory
quantize_resultwill be generated, containing two important files:- -
ResNet.py The quantized vai_q_pytorch format model.
- -
Quant_info.json Quantization steps of tensors. Retain this file for evaluation of the quantized model./
- -
To evaluate the accuracy of the quantized model, return to the
/resnet18directory run the following commands. Note that on CPU-only host machines this command will take some time to complete (~20 minutes). If you are in a hurry, you can skip this step and move to the next.
[Docker] $ cd ..
[Docker] $ python resnet18_quant.py --model_dir model --data_dir imagenet-mini --quant_mode test
You should observe that the accuracy reported will be similar to top-1 / top-5 accuracy: 69.1308 / 88.7076. The net accuracy loss due to quantization is less than 1%.
To generate the quantized
.xmodelfile that will subsequently be compiled for the DPU, run the following command withbatch_sizeandsubset_lenarguments set to 1. For model export, both of these parameters should be set 1 as multiple iterations are not required.
[Docker] $ python resnet18_quant.py --quant_mode test --subset_len 1 --batch_size=1 --model_dir model --data_dir imagenet-mini --deploy
The resultant model resnet18_pt.xmodel can now be found in the resnet18/resnet18_pt folder.
Compile the model
The Vitis AI Compiler compiles the graph operators as a set of micro-coded instructions that are executed by the DPU. In this step, we will compile the ResNet18 model that we quantized in the previous step.
The compiler takes the quantized
INT8.xmodeland generates the deployableDPU.xmodelby running the command below. Note that you must modify the command to specify the appropriatearch.jsonfile for your target. For VCK5000 targets, these are located in the folder/opt/vitis_ai/compiler/arch/DPUCVDX8Hinside the Docker container.
[Docker] $ cd /workspace/resnet18
[Docker] $ vai_c_xir -x quantize_result/ResNet_int.xmodel -a /opt/vitis_ai/compiler/arch/DPUCVDX8H/VCK5000<XXX>/arch.json -o resnet18_pt -n resnet18_pt
If compilation is successful, the
resnet18_pt.xmodelfile should be generated according to the specified DPU architecture.
Create a new file with your text editor of choice and name the file
resnet18_pt.prototxt. Copy and paste the following lines of code:
model {
   name : "resnet18_pt"
   kernel {
         name: "resnet18_pt_0"
         mean: 103.53
         mean: 116.28
         mean: 123.675
         scale: 0.017429
         scale: 0.017507
         scale: 0.01712475
   }
   model_type : CLASSIFICATION
   classification_param {
          top_k : 5
          test_accuracy : false
          preprocess_type : VGG_PREPROCESS
   }
}
The
.prototxtfile is a Vitis™ AI configuration file that facilitates the uniform configuration management of model parameters. Please refer to the Vitis AI User Guide to learn more.We can now deploy the quantized and compiled model on the VCK5000 accelerator card.
Model Deployment
Copy the
resnet18_ptfolder into the/usr/share/vitis_ai_library/models/directory. This will locate your compiled model in the default Vitis AI Library example model directory, alongside the other Vitis AI example models. Our purpose in doing this is to simplify the commands that follow, in which we will execute the Vitis AI Library samples with our model.
2. The vitis_ai_library_r3.0.0_images.tar.gz and vitis_ai_library_r3.0.0_video.tar.gz packages contain test images and videos that can be leveraged to evaluate our quantized model and other pre-built Vitis-AI Library examples.
Download the packages.
[Docker] $ cd /workspace
[Docker] $ wget https://www.xilinx.com/bin/public/openDownload?filename=vitis_ai_library_r3.0.0_images.tar.gz -O vitis_ai_library_r3.0.0_images.tar.gz
[Docker] $ wget https://www.xilinx.com/bin/public/openDownload?filename=vitis_ai_library_r3.0.0_video.tar.gz -O vitis_ai_library_r3.0.0_video.tar.gz
Untar the files.
[Docker] $ tar -xzvf vitis_ai_library_r3.0.0_images.tar.gz -C examples/vai_library/
[Docker] $ tar -xzvf vitis_ai_library_r3.0.0_video.tar.gz -C examples/vai_library/
Enter the directory of the sample and then compile it.
[Docker] $ cd /workspace/examples/vai_library/samples/classification
[Docker] $ ./build.sh
Execute the single-image test application.
[Docker] $ ./test_jpeg_classification resnet18_pt /workspace/examples/vai_library/samples/classification/images/002.jpg
If you wish to do so, you can review the result.jpg file. OpenCV function calls have been used to overlay the predictions.
To run the video example, run the following command:
[Docker] $ ./test_video_classification resnet18_pt /workspace/examples/vai_library/seg_and_pose_detect/pose_960_540.avi -t 8
The output should be as follows:
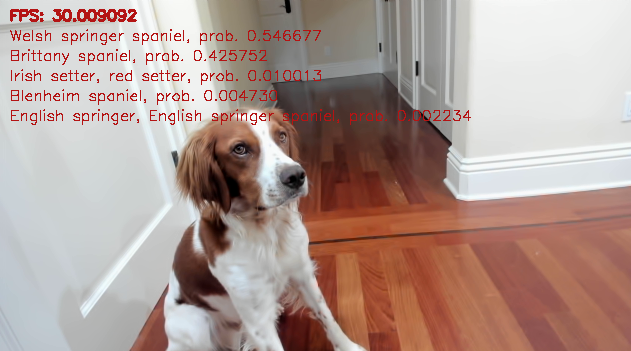
Congratulations! You have successfully quantized, compiled, and deployed a pre-trained model onto the VCK5000 accelerator card.