DPU IP Details and System Integration
About the DPU IP
AMD uses the acronym D-P-U to identify soft accelerators that target deep-learning inference. These “D eep Learning P rocessing U nits” are a vital component of the Vitis AI solution. This (perhaps overloaded) term can refer to one of several potential accelerator architectures covering multiple network topologies.
A DPU comprises elements available in the AMD programmable logic fabric, such as DSP, BlockRAM, UltraRAM, LUTs, and Flip-Flops, or may be developed as a set of microcoded functions that are deployed on the AMD AI Engine, or “AI Engine” architecture. Furthermore, in the case of some applications, the DPU is likely to be comprised of programmable logic and AI Engine array resources.
An example of the DPUCZ, targeting Zynq™ Ultrascale+™ devices is displayed in the following image:
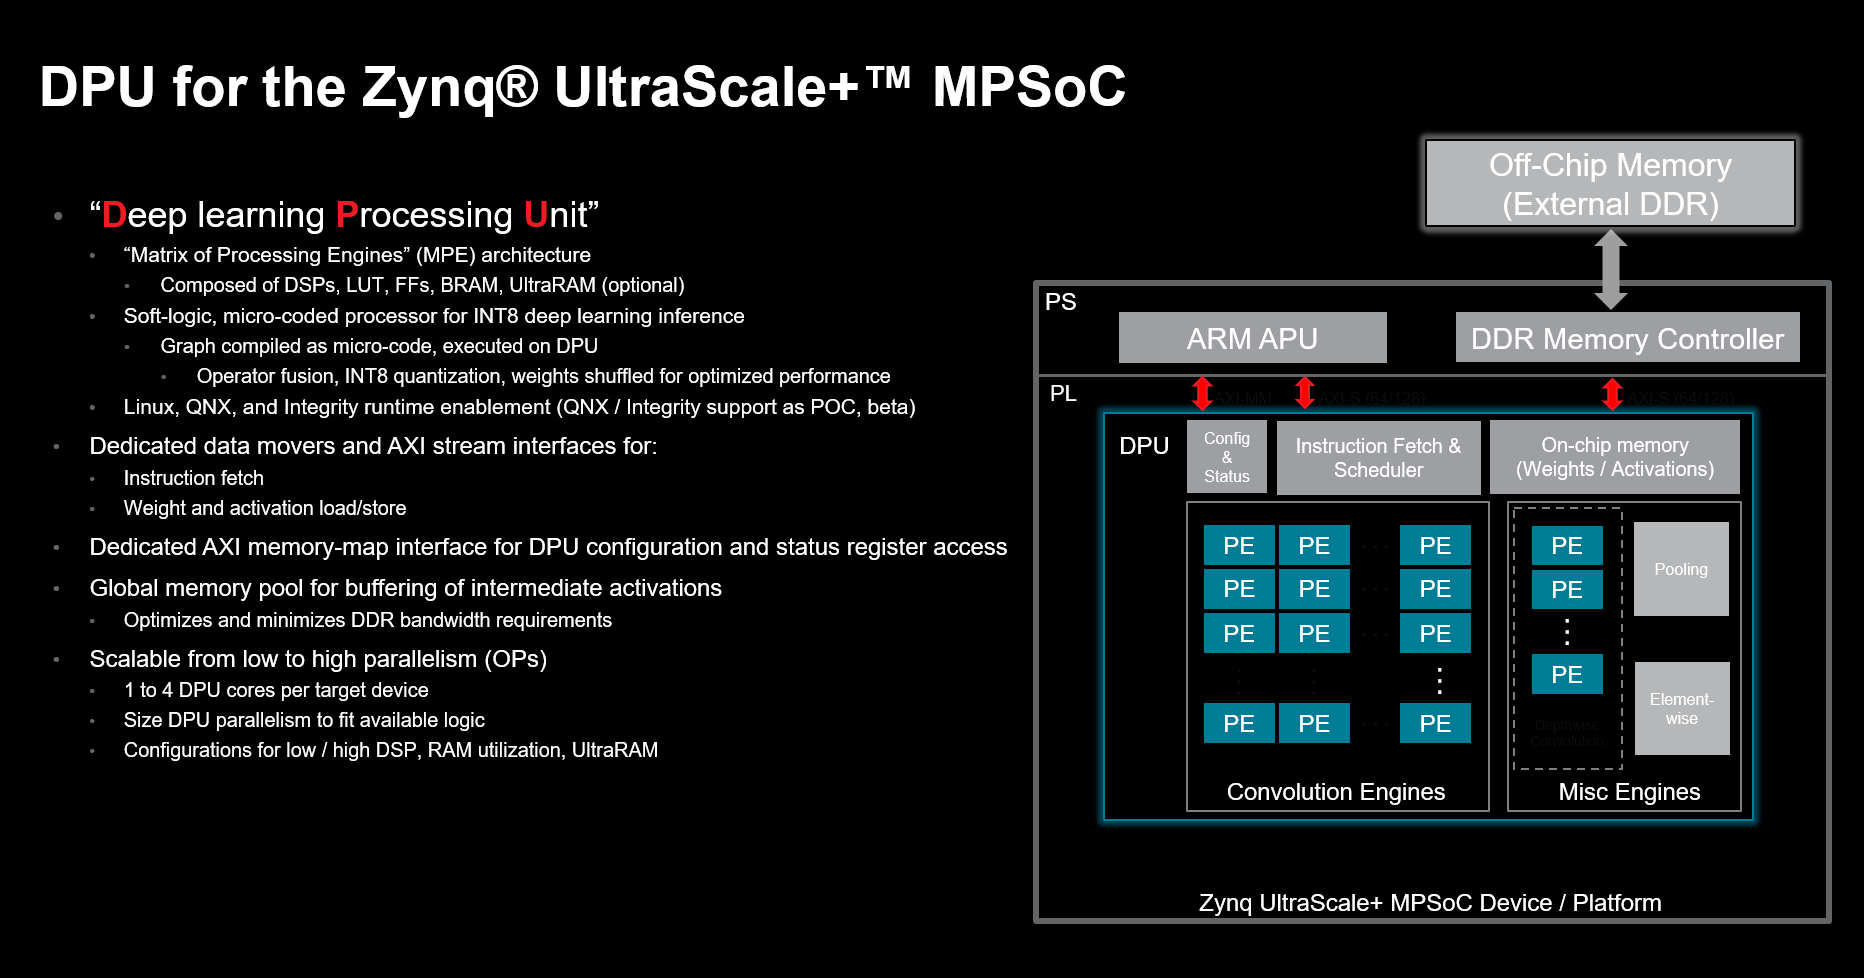
Features and Architecture of the Zynq Ultrascale+ DPUCZ
Vitis AI provides the DPU IP and the required tools to deploy both standard and custom neural networks on AMD adaptable targets:

Vitis AI 1000 Foot View
Vitis AI DPUs are general-purpose AI inference accelerators. A single DPU instance in your design can enable you to deploy multiple CNNs simultaneously and process multiple streams simultaneously. The Processing depends on the DPU having sufficient parallelism to support the combination of the networks and the number of streams. Multiple DPU instances can be instantiated per device. The DPU can be scaled in size to accommodate the requirements of the user.
The Vitis AI DPU architecture is called a “Matrix of (Heterogeneous) Processing Engines.” While on the surface, Vitis AI DPU architectures have some visual similarity to a systolic array; the similarity ends there. DPU is a micro-coded processor with its Instruction Set Architecture. Each DPU architecture has its own instruction set, and the Vitis AI Compiler compiles an executable .Xmodel to deploy for each network. The DPU executes the compiled instructions in the .Xmodel. The Vitis AI Runtime addresses the underlying tasks of scheduling the inference of multiple networks, multiple streams, and even multiple DPU instances. The mix of processing engines in the DPU is heterogeneous, with the DPU having different engines specialized for different tasks. For instance, CONV2D operators are accelerated in a purpose-built PE, while another process depthwise convolutions.
One advantage of this architecture is that there is no need to load a new bitstream or build a new hardware platform while changing the network. This is an important differentiator from Data Flow accelerator architectures that are purpose-built for a single network. That said, both the Matrix of Processing Engines and Data Flow architectures have a place in AMD designs. If you need a highly optimized, specialized Data Flow accelerator for inference, refer to the FINN & Brevitas solutions. Data Flow architectures based on FINN can support inference at line rates for high-speed communications and extremely high sample rates for inference in the RF domain. Neither of these two applications is a great fit for Vitis AI. The reality is that both of these flows are complementary, and support for both can play an essential role in customer product differentiation and future-proofing.
Vitis AI DPU IP and Reference Designs
Today, AMD DPU IPs are not incorporated into the standard Vivado™ IP catalog and instead, the DPU IP is released embedded in a reference design. Users can start with the reference design and modify it to suit their requirements. The reference designs are fully functional and can be used as a template for IP integration and connectivity as well as Linux integration.
The DPU IP is also is released as a separate download that can be incorporated into a new or existing design by the developer.
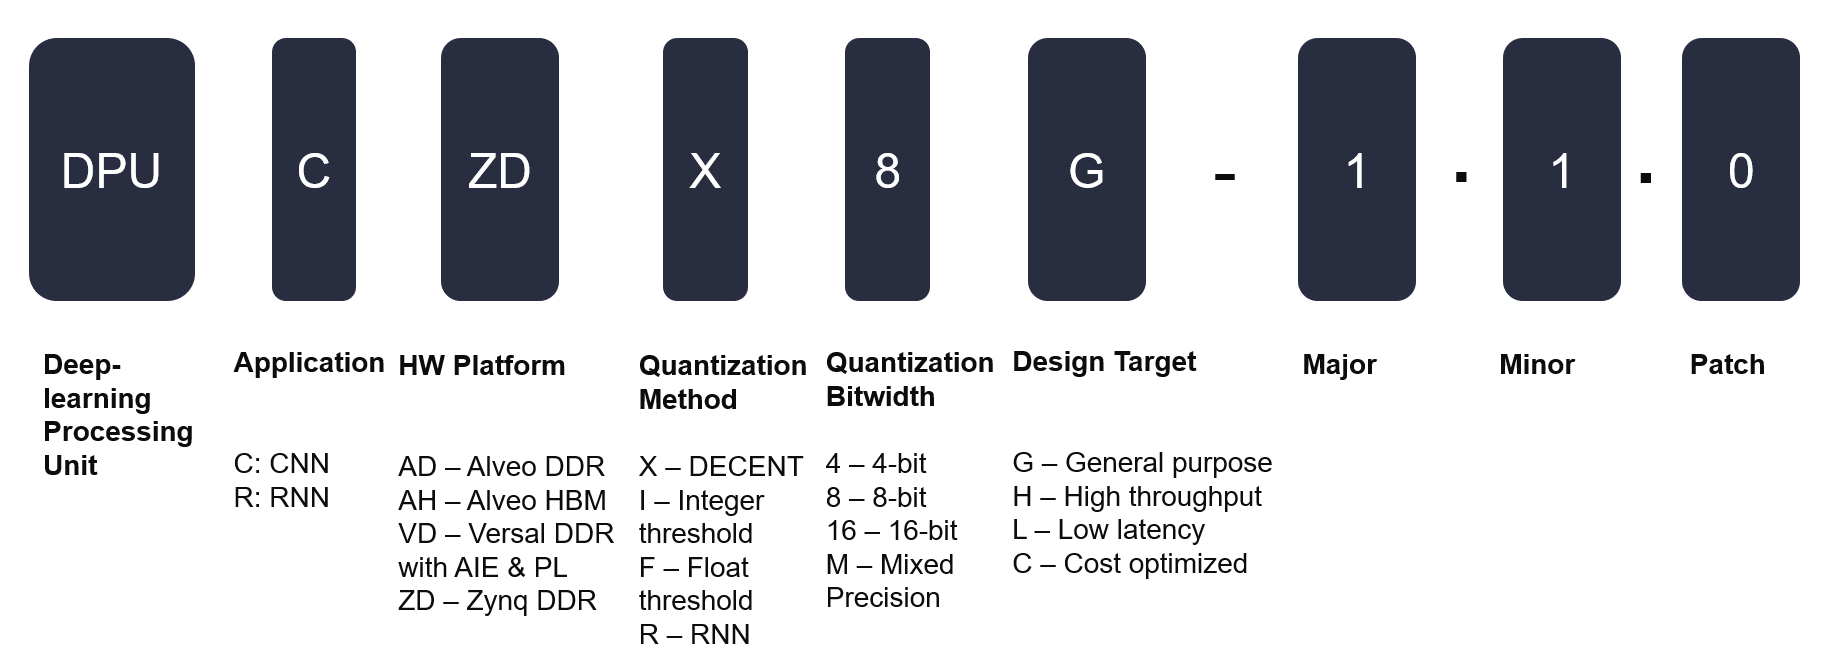
DPU Nomenclature
There are a variety of different DPUs available for different tasks and AMD platforms. The following decoder helps extract the features, characteristics, and target hardware platforms from a given DPU name.
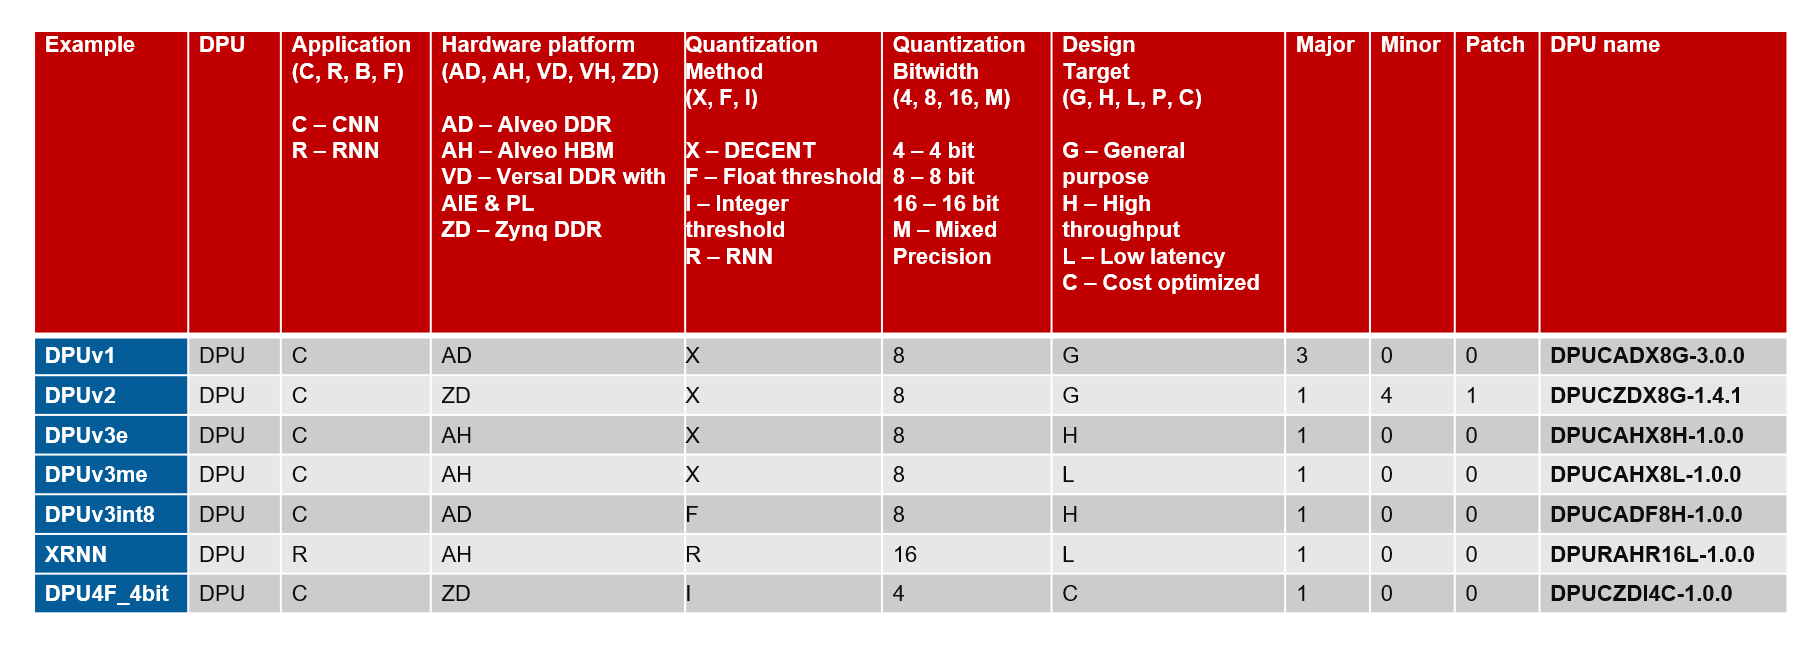
Historic DPU Nomenclature
As of the Vitis™ 1.2 release, the historic DPUv1/v2/v3 nomenclature was deprecated. To better understand how these historic DPU names map into the current nomenclature, refer to the following table:
DPU Options
Versal™ AI Core / AI Edge Series / Alveo V70: DPUCV2DX8G
The DPUCV2DX8G is a high-performance, general-purpose convolutional neural network(CNN) processing engine optimized for AMD Versal™ Adaptive SoC devices containing AI-ML tiles. This IP is user-configurable and exposes several parameters to configure the number of AI Engines used and programmable logic (PL) resource utilization.
Zynq™ UltraScale+™ MPSoC: DPUCZDX8G
The DPUCZDX8G IP has been optimized for Zynq UltraScale+ MPSoC. You can integrate this IP as a block in the programmable logic (PL) of the selected Zynq UltraScale+ MPSoCs with direct connections to the processing system (PS). The DPU is user-configurable and exposes several parameters which can be specified to optimize PL resources or customize enabled features.
Versal™ AI Core Series: DPUCVDX8G
The DPUCVDX8G is a high-performance general CNN processing engine optimized for the Versal AI Core Series. The Versal devices can provide superior performance/watt over conventional FPGAs, CPUs, and GPUs. The DPUCVDX8G is composed of AI Engines and PL circuits. This IP is user-configurable and exposes several parameters which can be specified to optimize AI Engines and PL resources or customize features.
Versal™ AI Core Series: DPUCVDX8H
The DPUCVDX8H is a high-performance and high-throughput general CNN processing engine optimized for the Versal AI Core series. Besides traditional program logic, Versal devices integrate high performance AI engine arrays, high bandwidth NoCs, DDR/LPDDR controllers, and other high-speed interfaces that can provide superior performance/watt over conventional FPGAs, CPUs, and GPUs. The DPUCVDX8H is implemented on Versal devices to leverage these benefits. You can configure the parameters to meet your data center application requirements.
Version and Compatibility
As the user must incorporate the IP into the Vivado IP catalog themselves, it is very important to understand that the designs and IP in the table below were verified with specific versions of Vivado, Vitis, Petalinux and Vitis AI. Please refer to Version Compatibility for additional information.
Note
It is anticipated that users may wish to leverage the latest release of Vitis AI, Vitis or Vivado with DPU IP that has not been updated in this release. For Adaptable SoC targets it is anticipated that the latest Vitis AI components such as Model Zoo models, Petalinux recipes, Quantizer, Compiler, VART and the Vitis AI Library can be directly leveraged by the user. However, updated reference designs will no longer be provided for minor (x.5) Vitis AI releases for MPSoC and Versal AI Core targets. Users are encouraged to use Vitis AI 3.0 for evaluation of those targets, and migrate to the Vitis AI 3.5 release if desired or necessary for production.
The table below associates currently available DPU IP with the supported target, and provides links to download the reference design and documentation. For convenience, a separate IP repo is provided for users who do not wish to download the reference design. The IP is thus included both in the reference design, but also is available as a separate download.
IP and Reference Designs
Users can download the DPU IP and reference design for their target platform from the Vitis AI Github.
Integrating the DPU
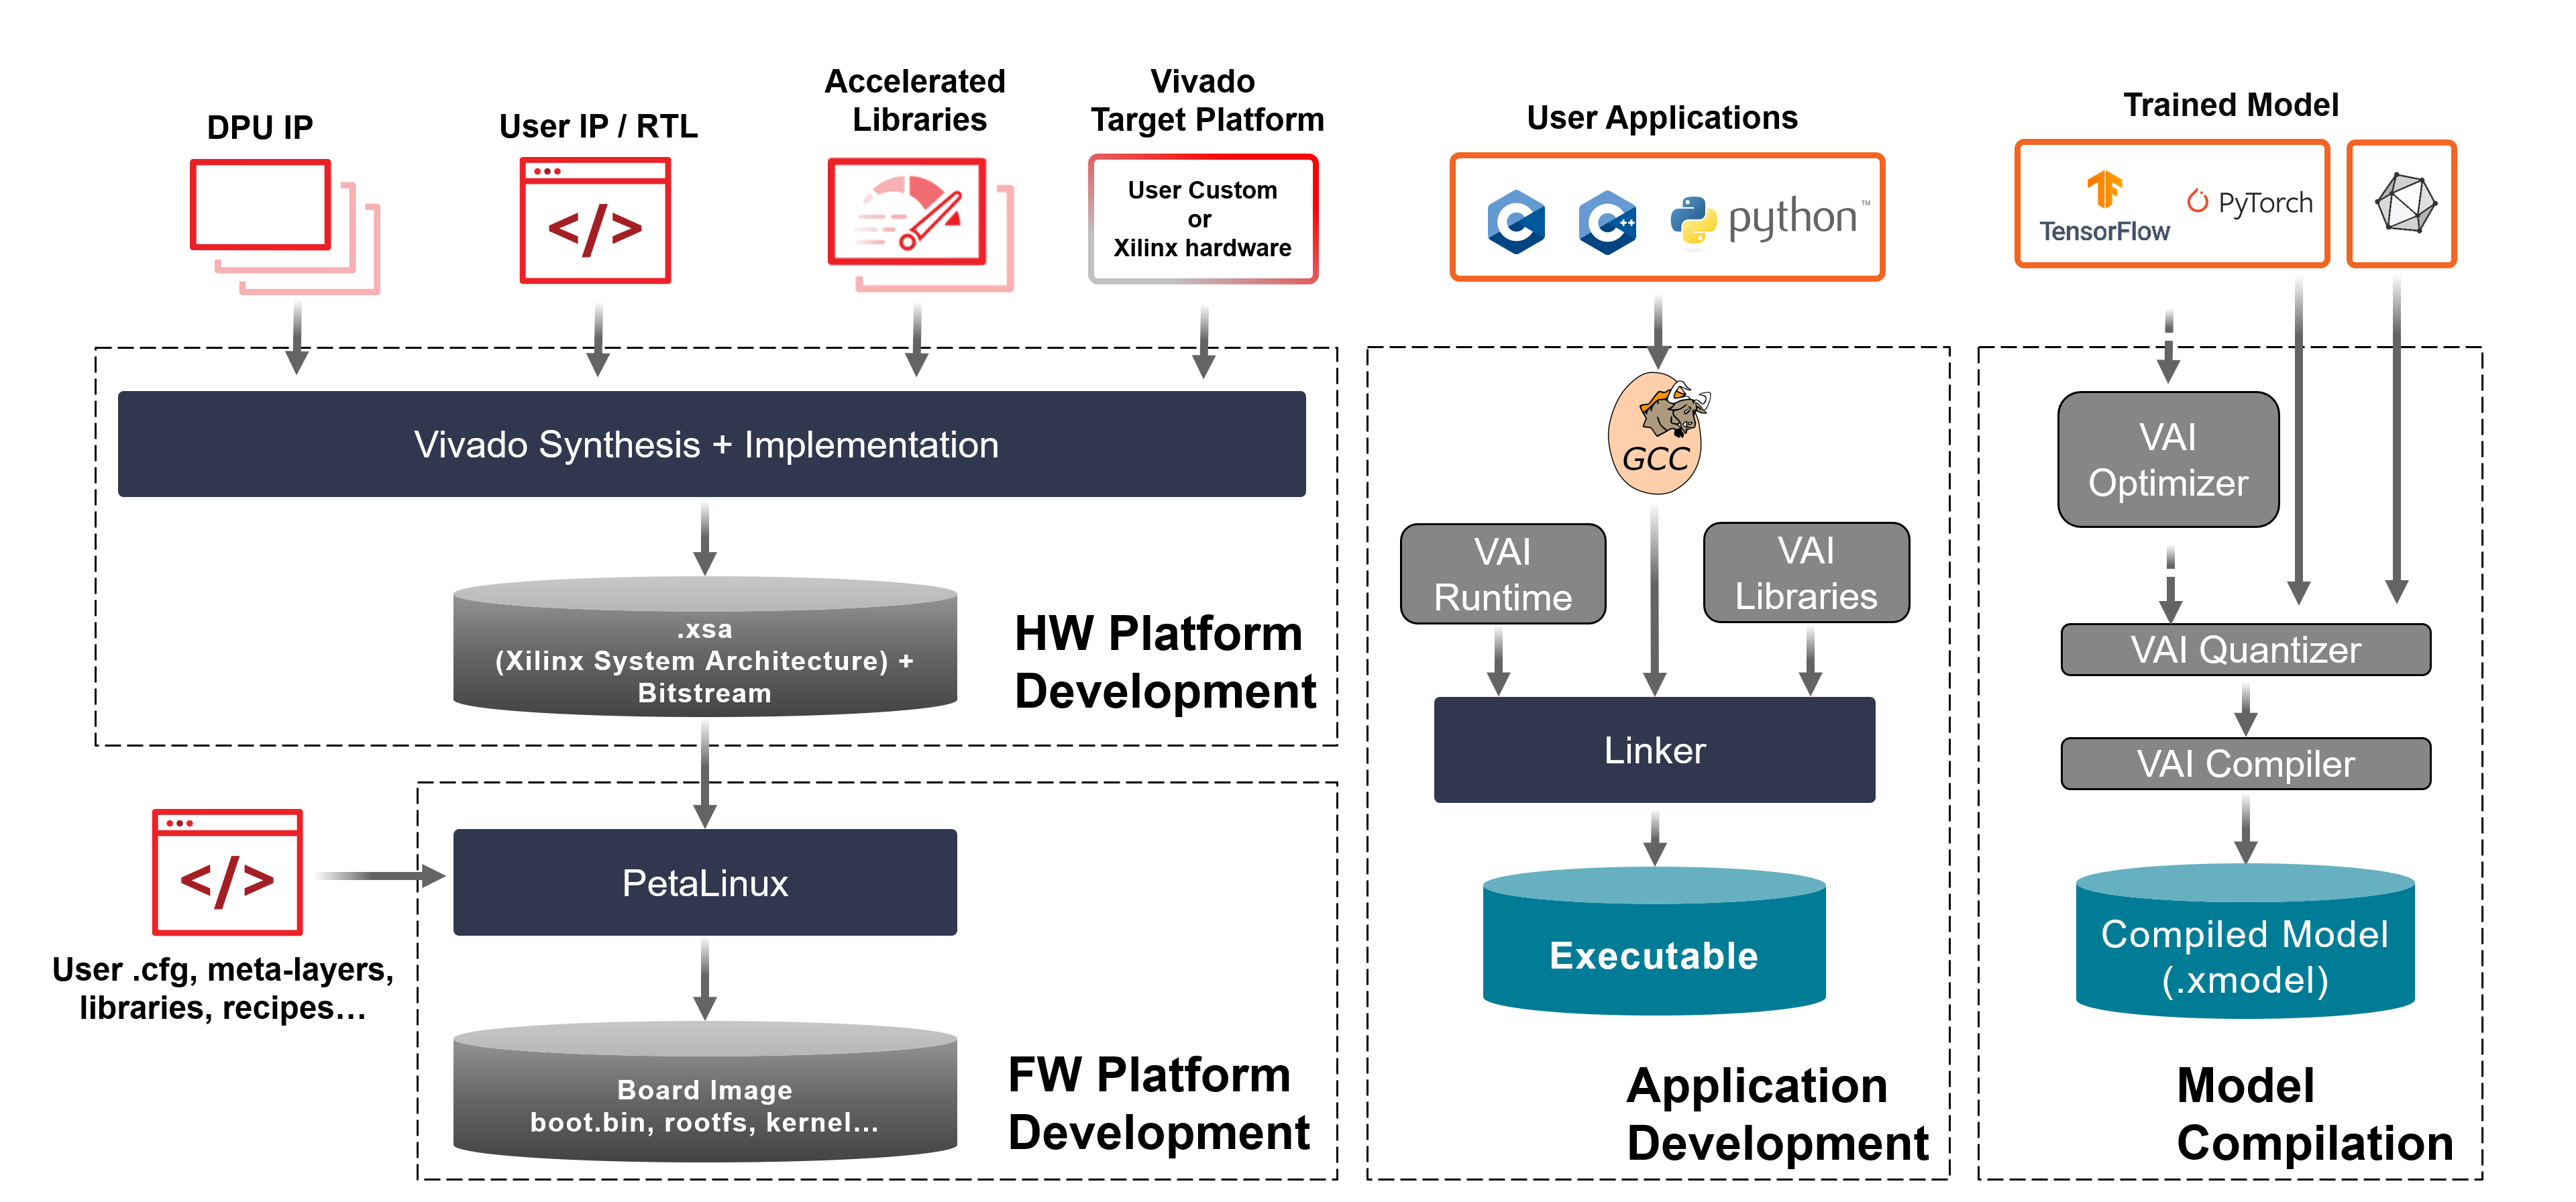
The basic steps to build a platform that integrates a Vitis™ AI DPU are as follows:
1. A custom hardware platform is built using the Vitis software platform based on the Vitis Target Platform. The generated hardware includes the DPU IP and other kernels. In the Vitis AI release package, pre-built SD card images (for ZCU102/104, KV260, VCK190 and VEK280) and Versal shells are included for quick start and application development. You can also use the AMD Vitis™ or Vivado™ flows to integrate the DPU and build the custom hardware to suit your need.
2. The Vitis AI toolchain in the host machine is used to build the model. It takes the pre-trained floating models as the input and runs them through the AI Optimizer (optional), AI Quantizer and AI Compiler.
3. You can build executable software which runs on the built hardware. You can write your applications with C++ or Python which calls the Vitis AI Runtime and Vitis AI Library to load and run the compiled model files.
Vitis Integration
The Vitis™ workflow specifically targets developers with a software-centric approach to AMD SoC system development. Vitis AI is differentiated from traditional FPGA flows, enabling you to build FPGA acceleration into your applications without developing RTL kernels.
The Vitis workflow enables the integration of the DPU IP as an acceleration kernel that is loaded at runtime in the form of an xclbin file. To provide developers with a reference platform that can be used as a starting point, the Vitis AI repository includes several reference designs for the different DPU architectures and target platforms.
In addition, a Vitis tutorial is available which provides the end-to-end workflow for creating a Vitis Platform for ZCU104 targets.

Vivado Integration
The Vivado™ workflow targets traditional FPGA developers. It is important to note that the DPU IP is not currently integrated into the Vivado IP catalog. Currently, in order to update support the latest operators and network topologies at the time of Vitis AI release, the IP is released asynchronously as a reference design and IP repository.
For more information, refer to the following resources:
To integrate the DPU in a Vivado design, see this tutorial.
A quick-start example that assists you in deploying VART on Embedded targets is available here.
Vitis AI Linux Recipes
Yocto and PetaLinux users will require bitbake recipes for the Vitis AI components that are compiled for the target. These recipes are provided in the source code folder.
Yocto and PetaLinux users will require bitbake recipes for the Vitis AI components that are compiled for the target. These recipes are provided in the source code folder.
Important
For Vitis AI releases >= v2.0, Vivado users (Zynq™ Ultrascale+™ and Kria™ applications) must compile VART standalone without XRT. However, Vitis users must compile VART with XRT (required for Vitis kernel integration). All designs that leverage Vitis AI require VART, while all Alveo and Versal™ designs must include XRT. By default, the Vitis AI Docker images incorporate XRT. Perhaps most important is that the Linux bitbake recipe for VART assumes by default that you are leveraging the Vitis flow. If you are leveraging the DPU in Vivado with Linux, you must either leverage vart_3.0_vivado.bb or, comment out the line PACKAGECONFIG:append = " vitis" in the vart_3.0.bb recipe in order to ensure that you are compiling VART without XRT. Failing to do so will result in runtime errors when executing VART APIs. Specifically, XRT, which is not compatible with Vivado will error out when it attempts to load an xclbin file, a kernel file that is absent in the Vivado flow. Finally, be sure to only include one of the two bitbake recipes in the Petalinux build folder!
There are two ways to integrate the Vitis™ AI Library and Runtime in a custom design:
Build the Linux image using Petalinux, incorporating the necessary recipes.
Install Vitis AI 3.0 to the target leveraging a pre-built package at run time. For details of this procedure, please see Vitis AI Online Installation
Vitis AI Online Installation
Runtime
If you have an updated version of the Vitis AI Runtime (perhaps you have made changes to the source code) and simply wish to install the update to your target without rebuilding Petalinux, follow these steps.
Copy the board_setup/[TARGET] folder to the board using scp, where [TARGET] = {mpsoc, vck190} and [IP_OF_TARGET] is the IP address of the target board.
scp -r board_setup/[TARGET] root@[IP_OF_TARGET]:~/Log in to the board using ssh. You can also use the serial port to login.
Now, install the Vitis AI Runtime.
cd ~/[TARGET]
bash target_vart_setup.sh
Library
Note
The Vitis AI 3.0 RPM packages are now available.
To install the Vitis AI Library on your target you can attempt the following procedure. This procedure may be useful if you have a custom hardware target that you wish to enable.
Verify what version, if any, of the Vitis AI Library is currently installed on the target.
[Target] $ cat /etc/yum.repos.d/oe-remote-repo-sswreleases-rel-v2022-generic-rpm.repo
The result will be similar to the following:
[oe-remote-repo-sswreleases-rel-v2022-generic-rpm-cortexa72_cortexa53]
name=OE Remote Repo: sswreleases rel-v2022 generic rpm cortexa72_cortexa53
baseurl=http://petalinux.xilinx.com/sswreleases/rel-v2022/generic/rpm/cortexa72_cortexa53  (contains vai2.5 and vai3.0 rpm packages)
gpgcheck=0
Execute the command to install the latest version of the Vitis AI Library.
[Target] $ dnf install vitis-ai-library
If a version of the Vitis AI Library is installed on the target, the result will be similar to the following.
Last metadata expiration check: 2:18:44 ago on Sun Jun 25 20:53:29 2023.
Package vitis-ai-library-3.0-r0.0.cortexa72_cortexa53 is already installed.
Dependencies resolved.
Nothing to do.
Complete!
If you need to remove the installed Vitis AI Library, execute this command.
[Target] $ dnf remove vitis-ai-library
The result will be similar to the following:
Transaction Summary
============================================================================================================================
Remove  1001 Packages

Freed space: 857 M
Is this ok [y/N]: y

Erasing… please wait a while

and then “dnf install vitis-ai-library”:

============================================================================================================================
Package          Architecture        Version    Repository                                                            Size
============================================================================================================================
Installing:
vitis-ai-library cortexa72_cortexa53 3.0-r0.0   oe-remote-repo-sswreleases-rel-v2022-generic-rpm-cortexa72_cortexa53 3.2 M
Installing dependencies:
python3-protobuf cortexa72_cortexa53 3.17.3-r0.0
oe-remote-repo-sswreleases-rel-v2022-generic-rpm-cortexa72_cortexa53 291 k
target-factory   cortexa72_cortexa53 3.0-r0.0   oe-remote-repo-sswreleases-rel-v2022-generic-rpm-cortexa72_cortexa53  98 k
unilog           cortexa72_cortexa53 3.0-r0.0   oe-remote-repo-sswreleases-rel-v2022-generic-rpm-cortexa72_cortexa53  25 k
vart             cortexa72_cortexa53 3.0-r0.0   oe-remote-repo-sswreleases-rel-v2022-generic-rpm-cortexa72_cortexa53 697 k
xir              cortexa72_cortexa53 3.0-r0.0   oe-remote-repo-sswreleases-rel-v2022-generic-rpm-cortexa72_cortexa53 754 k

Transaction Summary
============================================================================================================================
Install  6 Packages

Total download size: 5.0 M
Installed size: 28 M
Is this ok [y/N]: y

Please wait a while

Installed:
  python3-protobuf-3.17.3-r0.0.cortexa72_cortexa53                target-factory-3.0-r0.0.cortexa72_cortexa53
  unilog-3.0-r0.0.cortexa72_cortexa53                             vart-3.0-r0.0.cortexa72_cortexa53
  vitis-ai-library-3.0-r0.0.cortexa72_cortexa53                   xir-3.0-r0.0.cortexa72_cortexa53

Complete!
Optimization for MPSoC Targets
For custom MPSOC targets you can optionally run zynqmp_dpu_optimize.sh to optimize board settings.
The script runs automatically after the board boots up with the official image. But you can also find the
dpu_sw_optimize.tar.gzin DPUCZDX8G.tar.gz.cd ~/dpu_sw_optimize/zynqmp/ ./zynqmp_dpu_optimize.sh
Linux Devicetree Bindings
When using the PetaLinux flow, the Linux Devicetree nodes for the DPU are automatically generated. If modifications are made to the DPU IP parameters in the hardware design, changes to the .xsa must be propagated to PetaLinux in order to ensure that the corresponding changes to the Devicetree bindings are propagated to the software platform.
It is recognized that not all users will leverage PetaLinux. Users choosing to deviate from the PetaLinux flow (eg, Yocto users) may require additional resources. The following are suggested for additional reading:
In addition, it is worth noting that documentation for the Vitis AI DPUCZ Devicetree bindings can be found here . These are relevant only to the DPUCZ.
Rebuilding the Linux Image With Petalinux
Most developers will need to build a Petalinux or Yocto Vitis AI 3.0 image for their platform. You can obtain the recipes for Vitis AI 3.0 in the following two ways:
Using
recipes-vitis-aiin this repo.Upgrading the Petalinux eSDK.
Using recipes-vitis-ai
Note
recipes-vitis-ai enables Vitis flow by default. Recipes for both Vivado and Vitis are provided. In the Vivado recipe, the following line is commented out:
#PACKAGECONFIG_append = " vitis"
Copy the
recipes-vitis-aifolder to<petalinux project>/project-spec/meta-user/cp Vitis-AI/src/petalinux_recipes/recipes-vitis-ai <petalinux project>/project-spec/meta-user/
Delete either
recipes-vitis-ai/vart/vart_3.0.bborrecipes-vitis-ai/vart/vart_3.0_vivado.bbdepending on workflow that you have selected for your design. If you userecipes-vitis-ai/vart/vart_3.0_vivado.bbplease rename itrecipes-vitis-ai/vart/vart_3.0.bb.Edit
<petalinux project>/project-spec/meta-user/conf/user-rootfsconfigfile, appending the following lines:CONFIG_vitis-ai-library CONFIG_vitis-ai-library-dev CONFIG_vitis-ai-library-dbg
Source PetaLinux tool and run
petalinux-config -c rootfscommand. Select the following option.Select user packages ---> Select [*] vitis-ai-library
Then, save it and exit.
Run
petalinux-build.cp Vitis-AI/src/petalinux_recipes/recipes-vai-kernel <petalinux project>/project-spec/meta-user/
Using Upgrade Petalinux eSDK
Run the following commands to upgrade PetaLinux.
source <petalinux-v2022.2>/settings
petalinux-upgrade -u ‘http://petalinux.xilinx.com/sswreleases/rel-v2022/sdkupdate/2022.2_update1/’ -p ‘aarch64’
Following this upgrade, you will find vitis-ai-library_3.0.bb recipe in <petalinux project>/components/yocto/layers/meta-vitis-ai.
For details about this process, refer to Petalinux Upgrade.
Note
2022.2_update1 will be released approximately 1 month after Vitis 3.0 release. The name of 2022.2_update1 may be changed. Modify it accordingly.
Model Memory Requirements and the Linux CMA
Contiguous memory is required for the deployment of models on the DPU. It is thus important that developers understand that they have to allocate memory accordingly. If this is not evaluated, the user may find that model deployment fails. One sign that this is a problem is that an error is issued when attempting to execute the model. Below is an example:
Out of memory: Killed process 12349 (python3) total-vm:1943752kB, anon-rss:1142200kB, file-rss:1284kB, shmem-rss:0kB, UID:0 pgtables:3808kB oom_score_adj:0
Out of memory: Killed process
This section provides guidelines on estimating the CMA memory space required for model deployment. To perform this estimation, you will need to run xdputil on the neural network of interest.
$ xdputil xmodel ./somemodel.xmodel -l
The reg info section of the output of this command provides details of various registers and their corresponding sizes.
...
"reg info":[
                {
                        "name":"REG_0",
                        "context type":"CONST",
                        "size":5310976
                },
                {
                        "name":"REG_1",
                        "context type":"WORKSPACE",
                        "size":2182976
                },
                {
                        "name":"REG_2",
                        "context type":"DATA_LOCAL_INPUT",
                        "size":150528
                },
                {
                        "name":"REG_3",
                        "context type":"DATA_LOCAL_OUTPUT",
                        "size":1024
                }
        ],
        "instruction reg":45600
Here is what each register represents:
REG_0with context typeCONSTrefers to the weights and biases used in the model.REG_1with context typeWORKSPACErefers to the space required to store intermediate results.REG_2with context typeDATA_LOCAL_INPUTrefers to the space required by the input.REG_3with context typeDATA_LOCAL_OUTPUTrefers to the space required by the output.
The instruction reg value represents the space required by the DPU (Deep Learning Processing Unit) instructions. All sizes are specified in bytes.
Note
Some large networks may have additional registers (for example, REG_4, REG_5). The context type indicates the kind of space required. If additional registers are listed, the developer must incorporate these into their assessment.
Note
In the previous example, xdputil reports that REG_3 will use 1024 bytes. However, the actual memory requirement may be implementation and kernel dependent. The exercise of understanding the use of the Linux Contiguous Memory Allocator for their specific kernel and implementation is left for the user. Below is a simple example that illustrates some of the factors that the user may need to consider.
Let’s consider an implementation in which the minimum CMA page size is 4096 bytes. This allocation for REG_3 may be achieved using PAGE_ALIGN(1024). The PAGE_ALIGN function rounds up an address or memory size to the next multiple of 4096 (or the PAGE_SIZE), adds 4095, and clears the low 12 bits.
For the formulas provided below, the following additional terms must be defined:
T threads represent the number of model instances (usually 1 instance per thread).
dpu_cores indicate the number of DPU cores. If the number of model instances is less than the number of DPU cores, not all the DPU cores are used. The value of dpu_cores is calculated as the minimum of the number of DPU cores and the number of model instances.
dpu_cores = min (number of dpu cores, number of single model instances)
In the formulas below, note that:
const_space = PAGE_ALIGN (
CONSTspace)work_space = sum of all PAGE_ALIGN (each
WORKSPACEspace)in_space = sum of all PAGE_ALIGN (each
DATA_LOCAL_INPUTspace)out_space = sum of all PAGE_ALIGN (each
DATA_LOCAL_OUTPUTspace)instr_space = PAGE_ALIGN (
instruction regspace)
Note
When using the DPUCZDX8G IP, am additional fixed chunk of 5MB CMA memory is required if the user enables hardware Softmax.
Example 1:
When running B batches with T threads and D dpu_cores the required CMA can be computed as follows:
CMA (min required) = const_space + instr_space + B * (D * work_space + T * (in_space + out_space))
Example 2:
When running two neural networks (model1 and model2) with B batches, D dpu_cores, T1 threads for model1, and T2 threads for model2, the required CMA can be computed as follows:
Note
Use xdputil to run each model. D1 & D2 need to be calculated separately.
CMA (min required for model1) = const_space1 + instr_space1 + B * (D1 * work_space1 + T1 * (in_space1 + out_space1))
CMA (min required for model2) = const_space2 + instr_space2 + B * (D2 * work_space2 + T2 * (in_space2 + out_space2))
CMA (min total) = required CMA for model1 + required CMA for model2