QSPI to PXE/TFTP Boot
Introduction
The prioritized boot order for U-Boot is specified in BootFW U-Boot page. The last device in the prioritized list is Ethernet using DHCP/PXE. There is existing PXE support in U-Boot to support Ethernet booting. This document provides instructions for TFTP booting on Starter Kits using Ethernet/DHCP/PXE. Instructions are provided for booting both PetaLinux and Ubuntu via PXE. Their TFTP server setup differs, but the on-target steps are the same.
This example uses K26 on KR260 as an example, but the same steps can be taken for other starter kits as well as K24, as long as names of the SOM or Starter Kits are replaced appropriately.
Setup Requirements
This document assumes that you have had experience booting Linux on the Starter Kit via other boot methods (SD by default), are familiar with how to interact with the Starter Kit via the serial port, and have updated the bootfw on the Starter Kit. If not, go through Booting Linux on the KV260 or Booting Linux on the KR260 before following the steps in this document.
If booting using Yocto, this assumes that you are familiar with generating artifacts with instructions from Kria Yocto support.
If booting PetaLinux, this also assumes that you are familiar with PetaLinux and have installed the appropriate version of PetaLinux on the Linux host computer. Refer to the PetaLinux Tools Documentation: Reference Guide (UG1144) for more information on PetaLinux and download page for installation files. Ubuntu booting does not need PetaLinux tools.
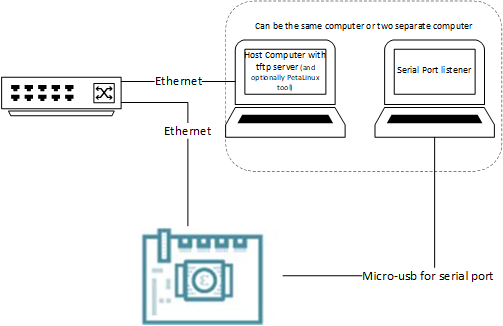
In this example, you use a host computer with a tftp server to host files required to boot Linux on Starter Kits. Connect the Starter Kit’s PS Ethernet port to local network. Connect a host computer to the same local network. If booting PetaLinux, this host computer needs to be a Linux host running the PetaLinux toolchain. If booting Ubuntu, this host computer can be Windows or Linux. Lastly, connect the Starter Kit’s micro-USB port to a computer (can be the same host computer or a different one) to interact with U-Boot through the serial port.
Linux Host Computer Setup
Depending on if you are booting with Yocto, PetaLinux, or Ubuntu, choose one of the following sections:
Linux Host Computer Setup for Yocto
On the Linux host computer, follow the instructions in Kria Yocto Support, and generate the bitbake recipe kria-image-full-cmdline for the target machine. That creates a pxeboot config file in the $yocto_workspace/build/tmp/deploy/images/<machine name>/pxelinux.cfg/default file with the following content:
LABEL Linux
KERNEL Image
FDT system.dtb
INITRD petalinux-initramfs-image-<machinename>.cpio.gz.u-boot
pxelinux.cfg/default refers to files that can be found in $yocto_workspace/build/tmp/deploy/images/. It is using the initramfs generated, which is a smaller file system that allows Linux to boot to a place where it can look for existing rootfs in other locations such as eMMC or a SD card. If you want to boot to the log in prompt purely through pxeboot, replace petalinux-initramfs-image-<machinename>.cpio.gz.u-boot with kria-image-full-cmdline-<machinename>.cpio.gz.u-boot.
When using MACHINE = k26-smk or k24-smk, by default, system.dtb is pointing to a shared dtb for the SOM that does not have information about the carrier card. Keeping the dtb as is will boot, but it will not have any CC peripheral support such as Ethernet. The dtb files with CC peripheral support can be found in devicetree/SMK-zynqmp-sck-<CC_board>.dtb. Pick the device tree for your target Starter Kit, and update the FDT in /tftpboot/pxelinux.cfg/default to point to that dtb file. If using MACHINE = k26-smk-kv, k26-smk-kr, or k24-smk-kd, system.dtb points to the device tree blob that has CC peripheral support that you will not need to change.
Now set up a TFTP server on the Linux host computer. Make sure to point to $yocto_workspace/build/tmp/deploy/images/<machine name>/ as the TFTP folder and start the server. The IP address of the Linux host computer; refer to it as <host ip>.
Linux Host Computer Setup for PetaLinux
On the Linux host computer, download a PetaLinux BSP for the target Stater Kit, create a project, and configure the project for TFTP:
petalinux-create -t project -s xilinx-<board>-<version>-<timestamp>.bsp
cd xilinx-<board>-<version>
petalinux-config
    # in petalinux-config window, do:
        # Image Packaging Configuration > Root File System Type > change to NFS
        # exit out of config and let it configure
By default, PetaLinux uses the /tftpboot folder for nfs/tftp. Create the folder and change permissions before building:
sudo mkdir /tftpboot
sudo chmod 766 /tftpboot
petalinux-build
This creates a /tftpboot/pxelinux.cfg/default file with the following content:
LABEL Linux
KERNEL Image
FDT system.dtb
INITRD ramdisk.cpio.gz.u-boot
/tftpboot/pxelinux.cfg/default refers to files found in /tftpboot.
NOTE: It is using the ramdisk generated, which is a smaller initram that allows Linux to boot to a place where it can look for existing rootfs in other locations such as eMMC or a SD card. If you want to boot to the log in prompt purely through pxeboot, replace
ramdisk.cpio.gz.u-bootwithrootfs.cpio.gz.u-boot.
Now set up a TFTP server on the Linux host computer. Make sure to point to /tftpboot/ as the TFTP folder and start the server. Note the IP address of the Linux host computer; it is referred to as <host ip>.
Host Computer Setup for Ubuntu
Because Ubuntu does not require a PetaLinux tool chain, either a Linux host or Windows host computer can be used for Ubuntu PXE booting. The released an Ubuntu image packages the kernel image, initrd, and many device tree blobs into a flat image.fit. PXE booting does not use a boot script to automatically select the device tree required for the board. Therefore, you need to regenerate an image.fit file that selects the right configuration for the target Starter Kit. This is done on target with the following steps.
Program an Ubuntu image into a SD card and boot. After booting, note the following files on target:
sudo -s
ls -l /boot/firmware/image.fit
ls -l /boot/firmware/boot.scr.uimg
ls -l /boot/initrd.img
ls -l /usr/share/flash-kernel/its/image-kria.its
Open the .its file, which is the recipe to build the flat image.fit file:
vi /usr/share/flash-kernel/its/image-kria.its
There are pointers to kernel, initrd, and device trees. To update the default device tree PXE booting picks, this line needs to be updated from default = "conf-zynqmp-smk-k26-revA"; to the configuration appropriate for the target Starter Kit. To figure out which configuration is appropriate for the target Starter Kit, find the Starter Kit type and revision, and look at which configuration that revision uses in /boot/firmware/boot.scr.uimg.
The type and revision of the Starter Kit is printed out by U-Boot upon booting. For example, this is the print-out for a KR260 board, rev1 Starter Kit SOM, and rev1 carrier card:
        U-Boot 2023.01 (Mar 29 2023 - 13:08:40 +0000)

        CPU:   ZynqMP
        Silicon: v3
        Chip:  xck26
        Detected name: zynqmp-smk-k26-xcl2g-rev1-sck-kr-g-rev1
        Model: ZynqMP KR260 revB
        Board: Xilinx ZynqMP
        DRAM:  2 GiB (effective 4 GiB)
        PMUFW:  v1.1
        Xilinx I2C FRU format at nvmem0:
        Manufacturer Name: XILINX
        Product Name: SMK-K26-XCL2G
        Serial No: XFL1WXS12XXF
        Part Number: 5057-04
        File ID: 0x0
        Revision Number: 1
        Xilinx I2C FRU format at nvmem1:
        Manufacturer Name: XILINX
        Product Name: SCK-KR-G
        Serial No: XFL1ETNCCIJ4
        Part Number: 5100-01
        File ID: 0x0
        Revision Number: 1
        EL Level:       EL2
        Secure Boot:    not authenticated, not encrypted
        Core:  136 devices, 34 uclasses, devicetree: fit
        NAND:  0 MiB
        MMC:
        Loading Environment from nowhere... OK
        In:    serial
        Out:   serial
        Err:   serial
        Bootmode: QSPI_MODE
In /usr/share/flash-kernel/its/image-kria.its, rev 1 does not have its own specific configuration. To find the configuration that rev 1 KR260 uses, look at the /boot/firmware/boot.scr.uimg file on target, and observe the following:
                        elif test "${card1_name}" = "SCK-KR-G"; then
                                if test "${card1_rev}" = "B" || test "${card1_rev}" = "1"; then
                                        # revB dtb also supports rev1 dtb
                                        boot_conf=#conf-smk-k26-revA-sck-kr-g-revB
This means the boot_conf conf-smk-k26-revA-sck-kr-g-revB supports rev1 KR260. Therefore, update /usr/share/flash-kernel/its/image-kria.its from:
default = "conf-zynqmp-smk-k26-revA";
to:
default = "conf-smk-k26-revA-sck-kr-g-revB";
Save and regenerate image.fit with the right configuration using the flash-kernel command:
flash-kernel
ls -l /boot/firmware/image.fit # note new timestamp
reboot #reboot to force write to SD card and test new kernel
Unplug the SD card from target, and view the SD card content on the host computer. There is an image.fit file on the SD card’s boot partition. Copy that file into a <ubuntu_tftp>/ folder on the host computer. In the same folder, create the <ubuntu_tftp>/pxelinux.cfg/default file, and populate the file with this content:
LABEL Linux_ubuntu
KERNEL image.fit
Now set up a TFTP server on the host computer. Make sure to point to <ubuntu_tftp>/ as the TFTP folder, and start the server. Note the IP address of the Linux host computer; it is referred to as <host ip>.
Setting Up TFTP on the Server
Each host computer might have different steps to set up TFTP servers.
With a Windows host, this guide has been tested with using the SolarWinds’ TFTP server. Windows’ firewall settings might need to be adjusted to allow for TFTP servers.
With an Ubuntu host, this guide was tested using tftpd-hpa package.
You are free to use other TFTP server programs that work.
Boot Starter Kit Using PXE
Make sure that the Starter Kit has the latest bootfw for the tool version in QSPI. Power on the Starter Kit; it will boot from the boot images in QSPI. Observe the serial port output on the computer with the serial port connection. Press “enter” at U-Boot to enter the U-Boot command line. On the U-Boot command line, set serverip variable to that of tftp server:
setenv serverip <host ip>
NOTE: By default, saveenv is not enabled in U-Boot. This means that serverip needs to be set up every reboot.
The following step is optional. Verify the connection to the server:
dhcp # setup Ethernet and ip address on target, this is done automatically during PXE booting
ping $serverip # confirm ethernet connection to host
In the “boot priority order” section of boot handoff page (code here), PXE is the last priority. This means if there are boot images in eMMC, SD, or USB, they are used to boot first. If there are no boot images on any of those devices, a simple boot command leads to PXE to be chosen, and it retrieves pxelinux.cfg/default from /tftpboot folder on the host computer and start booting.
If there are other images in other devices that is more prioritized by U-Boot, then direct U-Boot to choose the PXE boot using the following commands:
run bootcmd_pxe
If using Yocto/PetaLinux and using the larger rootfs, the kernel and rootfs should load and boot to login prompt to PetaLinux, indicating a successful PXE boot. If using the initram, and a SD card with full rootfs is plugged into the SD slot, the preceding steps boot using the kernel image from the tftp server and grab the full rootfs image from the SD card and boot to the login prompt.
If using Ubuntu, the image.fit file contains a small initram; the Starter Kit boots into BusyBox and has limited functionality. If a SD card with full rootfs is plugged into the SD slot, the preceding steps boot using the kernel image from the tftp server and grab the full rootfs image from the SD card instead of BusyBox initrd.
Copyright © 2023-2025 Advanced Micro Devices, Inc.