How-to Rebuild an AVED Design for Yourself
This is a getting started guide for the AMD Alveo Versal™ Example Design (AVED) to be used with the provided AVED source code on GitHub. The source code consists of a hardware design, firmware library, and a host operating system driver and utility application. This guide details downloading the appropriate source code for your card and rebuilding the complete design. After running through these steps, you will have created a pdi that can be installed on your system.
Before You Begin
Build Dependencies
Tools
Use the AMD Vivado™ version associated with the AVED release
Python 3.6.8
System Memory Requirements
64GB
Hardware Test Dependencies
The Example Design has been tested with the operating systems in the following table. AVED may work with other versions of these operating systems, but they have not been tested. All supported operating systems are tested with general access versions (GA). Ubuntu Hardware Enablement (HWE) is not supported. By default, HWE is disabled by Ubuntu Server versions and enabled by desktop versions.
Operating System | Architecture | Supported Versions | Kernel Version |
|---|---|---|---|
| Ubuntu | x86_64 | 22.04 | 5.4.0 5.15.0 |
| RHEL | x86_64 | 8.3 | 4.18.0 |
Note: root/sudo permissions are required.
Install Python from python.org
To install Python, navigate to: https://www.python.org/downloads/. Locate and install the latest Python 3.6.8 or newer for your operating system.
Download the Source Code
Get the latest AVED installation package for your Alveo card.
Refer to the AVED release table to find the latest example design version. The AVED Git Release Tag will direct you to the tagged source code in GitHub. The AVED Deployment Archive is a zipped AVED installation package; it is pre-built from the tagged source code using the Vivado tool version noted in the table.
Clone the latest tagged AVED source code repository that applies to your Alveo card. Confirm that you cloned the repository to a development server with sufficient system memory to build AVED, either locally on the server or remotely through LSF.
Make a note of the listed Vivado tool version used to build this source code, as AVED has been verified to build with this tool version. You will use the same Vivado version to build AVED.
In this example, we will clone the AVED repo with the tag “amd_v80_gen5x8_exdes_1_20231204” (which has been verified with Vivado 2023.2) and we will build the AVED design for the V80 card. The high-level directory structure will look similar to the following:
AVED
├── deploy
│   └── scripts
├── fw
│   └── AMC
├── gen_design.py
├── hw
│   ├── amd_v80_gen5x8_23.2_exdes_1
│   ├── amd_v80p_gen5x8_23.2_exdes_1
│   └── hw_version.json
├── scripts
│   ├── pkg.py
│   ├── setup.py
│   ├── step_deploy.py
│   ├── step_fw.py
│   ├── step_hw.py
│   └── step_pdi.py
└── sw
    ├── AMI
    └── xbtest
Build the Design
The following steps will guide you through setting up your Vivado environment and building an AVED V80 pdi from the cloned source code.
Set up the desired version of Vivado in your environment by sourcing the
settings64.(c)shscript from your Vivado install directory.# for csh $ source settings64.csh # for bash $ source settings64.sh
Navigate to the top-level AVED directory, where the
gen_design.pyscript is located. Thegen_design.pyscript (supported by the python scripts in the/scriptsdirectory) will be used to build the design in a series of steps, including the hardware build, AMC firmware build, pdi generation, and deployment archive creation (optional).Run the gen_design.py script to build the AVED V80 hardware and AMC firmware with all of the xbtest IP (excluding xbtest power). Implementation time is approximately a few hours.
Three configuration JSON files are provided for V80 and V80P, which define different hardware build configurations. For this example, you will use
conf_xbtest.json.For more information on the build script and the provided configuration JSON files, refer to AVED Build Scripts.
# For V80, build AVED using the xbtest configuration JSON file in the /amd_v80_gen5x8_23.2_exdes_1 directory.
# (To build the same configuration for the V80P, point to the conf_xbtest.json file in the /amd_v80p_gen5x8_23.2_exdes_1 directory instead.)
# By omitting the optional --deploy switch, gen_design.py will run through hardware build, AMC firmware build, and pdi generation. The deployment archive is not generated.
# The optional --output_dir <output dir> switch will allow you to set the path to the output directory. If unspecified, it will default to ./output/amd_v80[p]_gen5x8_23.2_exdes_1/<date>_<time>

$ ./gen_design.py --conf_json ./hw/amd_v80_gen5x8_23.2_exdes_1/conf_xbtest.json
The following steps will guide you through building the AMI software from the cloned source code.
On your development server, navigate to the gen_package.py script in <AVED cloned repo>/sw/AMI
Run gen_package.py, which will build the software and package it. After successfully building, the software package will be in <AVED>/sw/AMI/output/<timestamp>. Copy this to your deployment server
On your deployment server, install the AMI package.
# development server
$ cd <AVED>/sw/AMI
$ python3 gen_package.py

# deployment server
$ sudo apt install <path/to/ami_xxx.deb>
Review the Generated Output
By default, the gen_design.py script creates an output directory structure within the AVED directory (e.g. AVED/output/amd_v80_gen5x8_23.2_exdes_1/<date_time>/), which may also be noted as <output_dir> in subsequent instructions for simplicity. This
output directory is where the build takes place. As the build flow progresses, separate sub folders are created containing the output products of each of the build flow steps. A brief log will be printed to the terminal window to indicate the
script’s progress as it starts each step (”INFO: [GEN_DESIGN-26] ... Starting step: hw.”) and completes each step ("INFO: [GEN_DESIGN-27] End of step hw."). After the script successfully completes, your output directory should look like the
following:
output
└── amd_v80_gen5x8_23.2_exdes_1
    └── <date_time>*
        ├── bkp_design
        │   ├── conf.json
        │   ├── deploy
        │   ├── fw
        │   ├── gen_design.py
        │   ├── hw
        │   └── scripts
        ├── config_dump.json
        ├── export.sh
        ├── fw
        │   ├── amc.elf
        │   └── fpt.bin
        ├── hw*
        │   ├── bd_gen
        │   ├── prj
        │   ├── static.xsa
        |   └── xbtest*
        |        ├── metadata*
        |        │   ├── user_metadata.json*
        |        │   ├── xbtest_metadata.json*
        |        │   └── xbtest_pfm_def.json*
        |        └── test*
        |            ├── gtm_prbs.json* (V80 only)
        |            ├── gtyp_prbs.json* (V80 only)
        |            ├── memory.json*
        |            ├── mmio.json*
        |            ├── power.json*
        |            ├── stress.json*
        |            └── verify.json*
        ├── log
        │   ├── bootgen_design_pdi.log
        │   ├── build_amc.log
        │   ├── build_fpt_bin.log
        │   ├── build_hw.log
        │   ├── build_hw_vivado.jou
        │   ├── build_hw_vivado.log
        │   ├── fpt_setup_pdi_gen.log
        │   └── gen_design.log
        └── pdi
            ├── design.pdi
            ├── fpt_setup_amd_v80_gen5x8_23.2_exdes_1_<date>.pdi
            └── pdi_combine.bif

Note: The generated directories and files noted with a '*' will be used later in hardware testing. Copy these files to your deployment server, preserving the directory structure. If targeting V80P, the gtm_prbs.json and gtyp_prbs.json xbtest tests are not present, as it does not have GTs.
The <output_dir>/hw directory contains the Vivado project. It is recommended that you open this project (with the following command) to explore the Vivado Block Design for this build.
$ vivado <output_dir>/hw/prj/prj.xpr &
After the Vivado IDE launches with the specified project, find IP INTEGRATOR in the Flow Navigator pane, and click on “Open Block Design”.
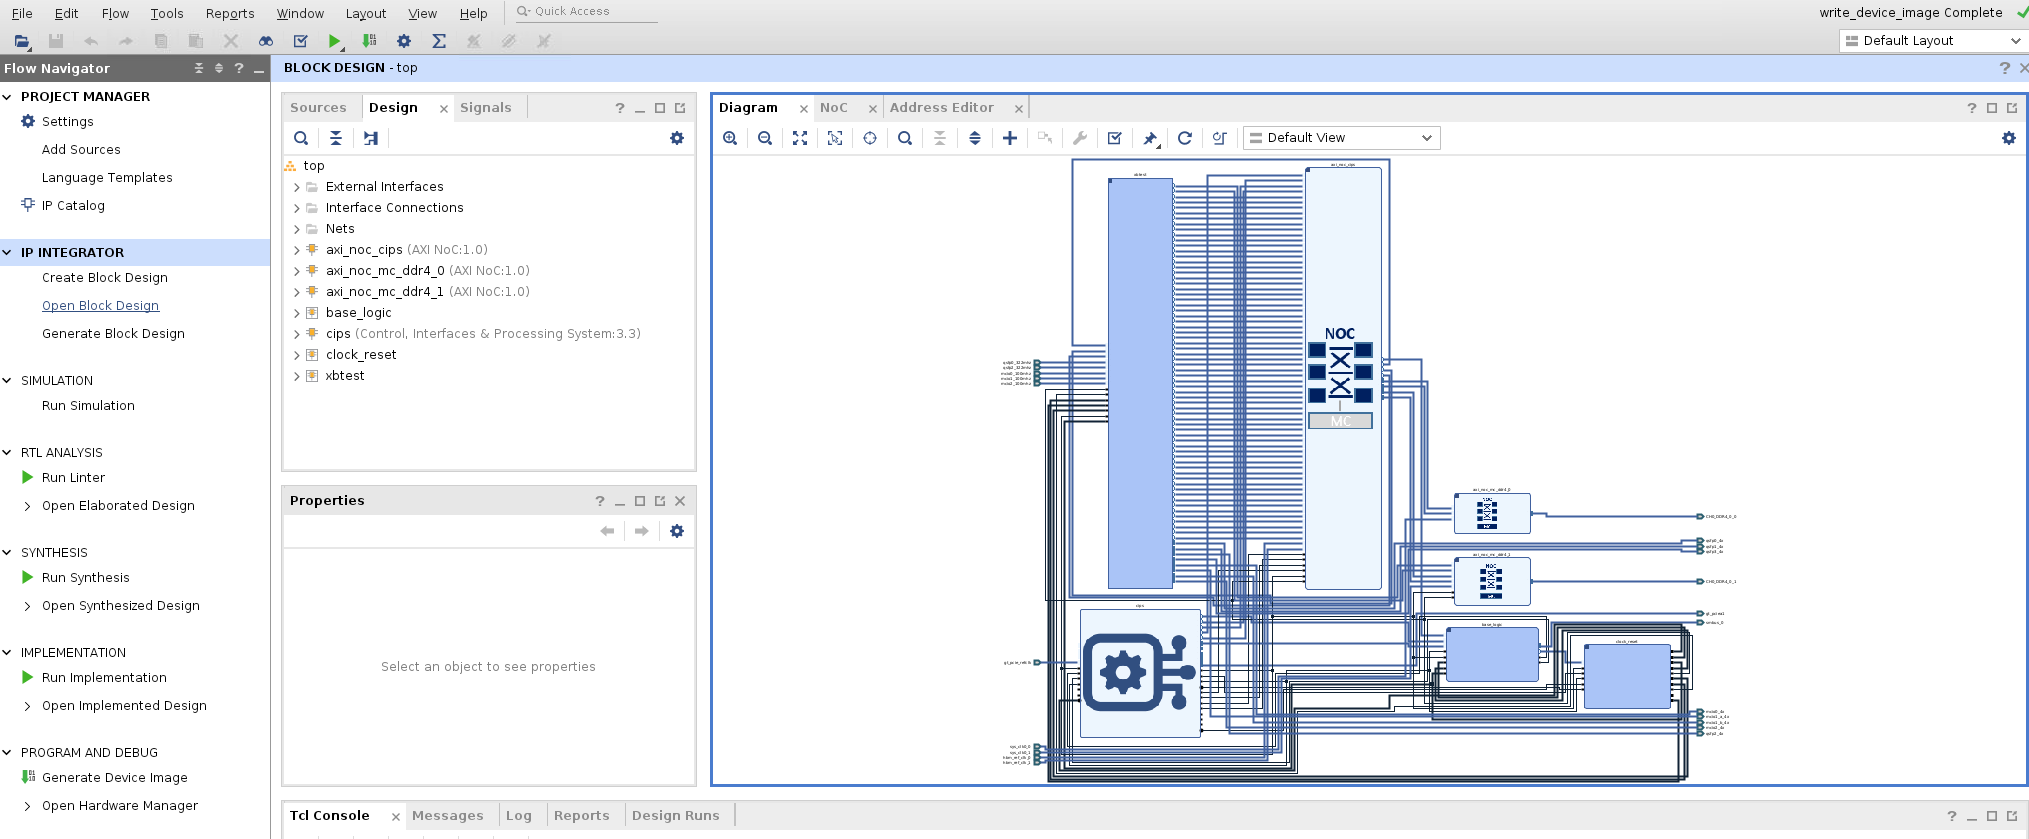
Cross reference this Vivado design with the AVED Hardware Design documentation to get a better understanding of the the AVED design.
Jumping back to the build directory, the /fw directory contains the output of the AMC firmware build, and the /pdi directory contains the PDI’s which combine the hardware and firmware together.
The design.pdi in the pdi directory can be used as an alternative pdi to experiment with when familiarizing yourself with the process of updating the flash using the AMI cfgmem commands. We will explore that next.
Programming and Testing the Design
In this section, you will use the AMI cfgmem_program command to program your new design.pdi to flash, and then run the xbtest verify test. As a prerequisite, complete the steps on How-to install and run a pre-built AVED design on an ALVEO card to verify your deployment server and Alveo card are properly set up, and note the card BDF which you will use to program the pdi.
To program the pdi to flash, your deployment server will need access to the new design.pdi. You will use the AMI cfgmem_program command, specifying the card BDF, path to the design.pdi, and which flash partition to program. In this example, the BDF
is 21:00.0 and the pdi will be programmed to flash partition 0. Successful programming is indicated by the message “OK. Image has been programmed successfully.” A hot reset is automatically performed to boot the updated design in partition 0. The
incoming UUID may be reported as “N/A” if no UUID metadata is provided with the PDI. This is normal behavior and does not affect the programming.
# usage: sudo ami_tool cfgmem_program -d <bdf> -i <pdi path> -p <flash partition number>

$ sudo ami_tool cfgmem_program -d 21:00.0 -p 0 -i /home/builds/latest/design.pdi

----------------------------------------------
Device | 21:00.0
----------------------------------------------
Current Configuration
----------------------------------------------
UUID   | 7abb30003bcd08cd0ff247eaaede3d52
----------------------------------------------
Incoming Configuration
----------------------------------------------
UUID      | N/A
Path      | /home/builds/latest/design.pdi
Partition | 0
----------------------------------------------
Are you sure you wish to proceed? [Y/n]: Y

Updating base flash image...
[####################################################################################################] 100% -
Image programming complete.
Will do a hot reset to boot into partition 0. This may take a minute...

OK. Image has been programmed successfully.
***********************************************
Hot reset has been performed into partition 0.
***********************************************
To run xbtest, your deployment server will need access to the design.pdi and xbtest directories denoted by a ‘*’ in the file tree above.
Preserve the xbtest directory structure when copying these files from your development server to your deployment server.
Copy the design.pdi into the directory structure below
<date_time>/
└── hw
    ├── design.pdi
    └── xbtest
        ├── metadata
        │   ├── user_metadata.json
        │   ├── xbtest_metadata.json
        │   └── xbtest_pfm_def.json
        └── test
            ├── gtm_prbs.json
            ├── gtyp_prbs.json
            ├── memory.json
            ├── mmio.json
            ├── power.json
            ├── stress.json
            └── verify.json
Next, create the environment variable AMD_XBTEST_LIBS to point to this directory. This will allow xbtest to find the metadata and testcases for your build. Refer to Set up xbtest in other locations for more details.
$ setenv AMD_XBTEST_LIBS <path>/<date_time>
Finally, run the xbtest verify test as you did previously. In this example, the card BDF is 21:00.0.
# usage: xbtest -d <bdf> -c <testcase>

$ xbtest -d 21:00.0 -c verify
Next Steps
This getting started guide outlined the steps to download the AVED source code, build one configuration of the AVED V80, program the pdi, and test the built design with xbtest. If you would like to explore other available hardware test commands, see:
For a deeper dive into the AVED hardware configurations available out-of-the-box, read the Hardware Design chapter and refer to AVED Build Scripts.
Page Revision: v. 37