Kria Vitis Acceleration (Version: Vitis 2022.1)
Kria K26 SOM is the fastest path to achieving whole application acceleration at the edge. The K26 SOM combines high AI performance with the adaptability necessary to keep up with evolving algorithms and sensor requirements. It is based on the UltraScale+ MPSoC technology, similar to the ZCU104 evaluation board.
IMPORTANT: Use the KV260 Getting Started Guide to set up all the necessary hardware required for this tutorial.
Objective
The Kria Vitis acceleration tutorial aims to enable software application developers, system software designers, and system hardware designers by providing the following:
An end-to-end Kria Vitis Application development flow.
Introduction to the Kria hardware development flow
Introduction to the Kria application development flow
SmartCam Application
The KV260 Vision AI Starter Kit introduces you to the pre-built accelerated applications. The pre-built applications for AI and software developers, give you a head start to develop your target end applications. SmartCam is one of the pre-built applications. This tutorial builds the SmartCam application from the ground up, which teaches you the end-to-end Kria Vitis Application development flow. SmartCam implements face detection with network and display functionality. It has built-in machine learning for applications such as pedestrian detection, face detection, and people counting with local display and RTSP streaming. The SmartCam application leverages the Gstreamer, a pipeline-based multi-media framework that links various media processing systems to create workflows. The Vitis Video Analytics SDK leverages the ease of use of the GStreamer framework to build seamless streaming pipelines for AI-based video and image analytics and several other solutions without needing any understanding of FPGA or other development environment complexities. VVAS provides several hardware accelerators for various functionalities and highly optimized GStreamer plug-ins meeting most of the requirements of video analytics and transcoding solutions. The following figure provides a high-level system architecture for the SmartCam application. The SmartCam application workflow is as follows:
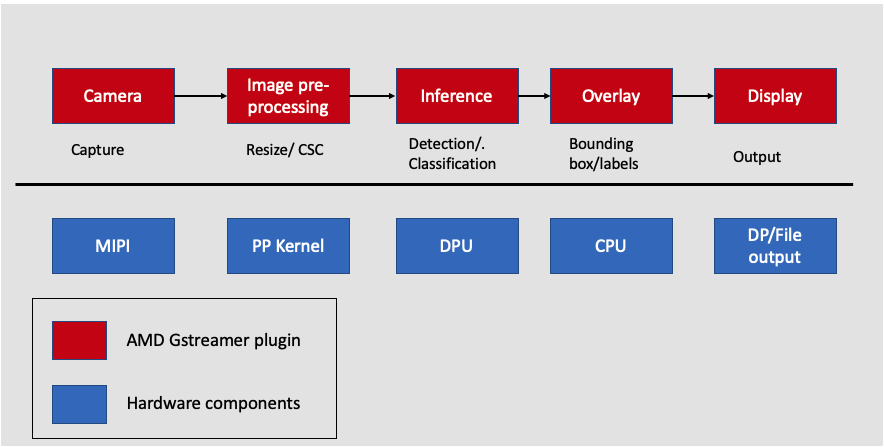
Input camera: Streaming data comes over the MIPI camera, which is captured and sent to the next Gstreamer pipeline. The capture is performed by the VVAS plug-in.
AI Pre-processing: The captured frames are sent to the image pre-processing step, where the input image can be pre-processed before inference. The pre-processing is performed by the pre-processing kernel, which is a hardware component.
AI Inference: After pre-processing, the frame is sent for inference which is performed on the DPU, which is a hardware component.
AI Rendering: The next step is to overlay the inference, which is performed on the CPU by the VVAS plug-in.
Output Display: Finally, VVAS presents various options to output the results, such as rendering the output with the bounding boxes on the screen, saving the output to the local disk, and so on.
Tutorial Details
This tutorial builds the smart camera application from the ground up. It is divided into two steps.
Image Resizing Application
In this step, you build an image resizing application that leverages the Vitis Vision library and control it using the AMD VVAS plug-ins. The image resizing application implements a resize kernel on the FPGA, which reads an input image from the MIPI camera and converts it to a BGR format of user-defined size. VVAS running on the CPU reads the resize output and uses the VVAS file output plug-in to write to the disk. The PYUV player is used to view the BGR output.
ML Inference
In this step, you extend the image resizing hardware pipeline with a DPU inference unit to perform a ML inference to complete the SmartCam application. Instead of sending the resized output to CPU to write to the disk, in this step, you send the resizing output to the DPU Engine on the FPGA to perform the ML inference. Once the inference is performed, the VVAS running on the CPU uses the VVAS overlay and kmssink plug-ins to perform the ML Overlay and display operations.
Download the Files
Download the tutorial files from the Server link into the tutorial_1 directory.
mkdir tutorial
mv kria_accel_flow_22_1.zip tutorial
cd tutorial
unzip kria_accel_flow_22_1.zip
Software Setup
The tutorial requires the following software setup:
20022.1 Vitis and Vivado tools
2022.1 PetaLinux tools. Refer to the PetaLinux Installation Steps section in in the PetaLinux Tools Documentation: Reference Guide (UG1144)
Download and install the PYVU Player
Download and install Balena Etcher
Hardware Requirements
KV260 Board and power supply
A microSD card for transferring the boot image
A USB-A to micro-B cable (that is, a micro-USB cable), which supports data transfer
An IAS Camera Module for capturing the image
A DisplayPort/HDMI cable to connect to a monitor
Ethernet cable for required internet access
Next Step
The next step is the Vitis Acceleration Flow overview.
Copyright © 2023-2025 Advanced Micro Devices, Inc.