Running on the KV260 Board
This tutorial assumes you has followed the Getting started with Kria SOM starter Kit. This tutorial explains the setup required for running designs on the Starter Kit.
Log in as root user.
xilinx-kv260-starterkit-20222:~$ sudo su -l root
<password>
In the PetaLinux firmware step, you used the fpgamanager class to store the binaries at
/lib/firmware/xilinx/tutorial dir. Perform the following steps to view the files:root@xilinx-kv260-starterkit-20222:~# ls /lib/firmware/xilinx/tutorial/ shell.json tutorial.bit.bin tutorial.dtbo tutorial.xclbin
Navigate to
/opt/xilinx/kv260-smartcam/share/vvas/facedetect/preprocess.json.cd /opt/xilinx/kv260-smartcam/share/vvas/facedetect/ vi preprocess.json
Open the
preprocess.jsonfile, and change the xclbin file name and location."xclbin-location":"/lib/firmware/xilinx/tutorial/tutorial.xclbin",
Launching the Application
Prior to executing the newly installed application available at /opt/xilinx/bin, the FPGA firmware (PL bitstream + device tree overlay + PL drivers) needs to be loaded using xmutil utility commands. Use the following steps to load the image resizing accelerated application firmware on the Vision AI Starter Kit.
Run the following command to list the existing application firmware available on the Vision AI Starter Kit. Verify the tutorial app in the listapps.
xmutil listapps
                     Accelerator          Accel_type                            Base           Base_type      #slots(PL+AIE)         Active_slot

                k26-starter-kits            XRT_FLAT                k26-starter-kits            XRT_FLAT               (0+0)                  -1
                        tutorial            XRT_FLAT                        tutorial            XRT_FLAT               (0+0)                  -1
Run the following command to unload the default “kv260-dp” application firmware.
xmutil unloadapp
Run the following command to load the image resizing accelerated application firmware. Ignore the warning commands.
xmutil loadapp tutorial
************************
***LOG FILE*************
************************

Nov 19 09:23:09 xilinx-kv260-starterkit-20221 kernel: OF: overlay: WARNING: memory leak will occur if overlay removed, property: /__symbols__/al5d
Nov 19 09:23:09 xilinx-kv260-starterkit-20221 kernel: OF: overlay: WARNING: memory leak will occur if overlay removed, property: /__symbols__/zocl
Nov 19 09:23:09 xilinx-kv260-starterkit-20221 kernel: debugfs: Directory '4-003c' with parent 'regmap' already present!
Nov 19 09:23:09 xilinx-kv260-starterkit-20221 kernel: zocl-drm axi:zyxclmm_drm: IRQ index 8 not found
tutorial: loaded to slot 0
root@xilinx-kv260-starterkit-20221:~# Nov 19 09:23:12 xilinx-kv260-starterkit-20221 kernel: xilinx-video axi:isp_vcap_csi: Entity type for entity 80000000.csiss was not initialized!
Run the Image Resizing Application
Place the AR1335 camera module pointing towards your face and run the Image Resizing Application accelerated app. The command runs for three-four minutes and automatically terminates. Because the monitors do not support lower resolutions, the output is captured in a file. The command performs the following operations:
MIPI camera reads an input video of NV12 format, of size 1920x1080 pixels, which is specified using the following command. The description of the v4l2src0 plugin is described in the VVAS plug-in step.
media-device=/dev/media0 v4l2src0::io-mode=dmabuf v4l2src0::stride-align=256 v4l2src0::num-buffers=1000 ! video/x-raw, width=1920, height=1080, format=NV12, framerate=30/1The pre-processing acceleration kernel converts it to a BGR format and performs a resizing algorithm of 224*224 size, which is specified using the following command:
vvas_xmultisrc kconfig="/opt/xilinx/kv260-smartcam/share/vvas/facedetect/preprocess.json" ! video/x-raw, width=224, height=224, format=BGRThe output is written to the disk using the filesink command
filesink location=capture1.bgr. Thecapture.bgris viewed using the Pyuv player in the next step.gst-launch-1.0 mediasrcbin media-device=/dev/media0 v4l2src0::io-mode=dmabuf v4l2src0::stride-align=256 v4l2src0::num-buffers=1000 ! video/x-raw, width=1920, height=1080, format=NV12, framerate=30/1 ! queue ! vvas_xmultisrc kconfig="/opt/xilinx/kv260-smartcam/share/vvas/facedetect/preprocess.json" ! video/x-raw, width=224, height=224, format=BGR ! queue ! filesink location=capture1.bgr
************************
***LOG FILE*************
************************

Setting pipeline to PAUSED ...
Resize: mean_r=128.000000
Resize: mean_g=128.000000
Resize: mean_b=128.000000
Resize: scale_r=1.000000
Resize: scale_g=1.000000
Resize: scale_b=1.000000
Pipeline is live and does not need PREROLL ...
Pipeline is PREROLLED ...
Setting pipeline to PLAYING ...
New clock: GstSystemClock
Got EOS from element "pipeline0".
Execution ended after 0:00:38.397433844
Setting pipeline to NULL ...
Freeing pipeline ...
Viewing in the PYUV Player
In this step, you view the captured image in the PYUV player.
Copy the file to the user-Linux space where the PYUV player is installed.
Copy to PetaLinux home directory:
root@xilinx-kv260-starterkit-20222:~# cp capture1.bgr /home/petalinux/
From a different terminal, use the following command to copy to the user Linux machine where the PYVU player is installed:
scp -O petalinux@10.0.0.63:/home/petalinux/*.bgr .
petalinux@10.0.0.63's password: <>
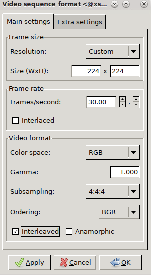
Launch the PYUV player, select the “All files” option, and open the
capture1.bgrfile. Configure the PYUV player with the following settings and view the video:
Next Steps
This completes the Image resizing Application. The next step is adding the ML pipeline to the Image resizing pipeline. Follow the ML Inference tutorial
Copyright © 2023-2025 Advanced Micro Devices, Inc.