Configure Vitis
Overview
Within xclbin_generate workflow, Vitis™ uses different files:
Required Vitis TCL hook Post system linker:
To connect extra clock.
To connect extra signal (power CU).
Optional TCL hooks.
Extra place and route constraints: LOC, pBlock (optional).
Required Vitis options file:
Link to TCL hooks.
Vivado settings:
Place and route strategy.
LSF.
You should use the templates generated during the initialization phase (see Workflows initialization).
Required Vitis TCL hooks
Post system linker TCL hook: postsys_link.tcl
Updates of Post system linker TCL hook template: postsys_link.tcl are done in procedure postsys_link_body.
Connect continuous clock
xbtest should be used with a platform created with subsystem v2.0 (or greater). This sets of IP’s ensures a standard clocking structure across platform. It contains the User Clocking Subsystem (UCS). This IP creates the 2 clocks used by any Vitis CU (including xbtest). The UCS can throttle (slow down) the CU clocks when the board is reaching its power or temperature limits.
To ensure reliable measurements, xbtest internal timer can’t be slowed down. So xbtest requires stable clocks. The continuous (non-throttled) version of each clock can be output by the UCS subsystem and needs to be connected to each CU. This is done via a Post system linker TCL hook: postsys_link.tcl.
If you don’t connect the continuous clocks to the CUs, xbtest SW will report an error.
As described in following sections, you can use and update the generated Post system linker TCL hook template: postsys_link.tcl or alternatively create the commands from scratch.
Using generated template
In Post system linker TCL hook template: postsys_link.tcl, update the call to the procedure (connect_continuous_clocks) according to:
Presence or absence of UCS subsystem.
UCS subsystem version and instance name.
connect_continuous_clocks <ucs_name> <ucs_version>
By default, in the template, the connection of continuous clocks is set for UCS subsystem v3.0 and instance named ulp_ucs. Update according to your platform.
# connect_continuous_clocks ulp_ucs 0; # No UCS present, continuous clock is not supported
# connect_continuous_clocks ulp_ucs 2; # UCS subsystem version v2
connect_continuous_clocks ulp_ucs 3; # UCS subsystem version v3
The following table describes the supported value of connect_continuous_clocks procedure inputs:
Input |
Value |
Description |
|---|---|---|
|
/ |
The UCS may not be called |
|
0 |
No UCS present: continuous clock is not supported. The CU continuous inputs clock will be connected to Vitis CU clocks. |
2 |
UCS subsystem version v2:
|
|
3 |
UCS subsystem version v3:
|
Create commands from scratch
If you have access to a Vivado project of the platform, you can identify the UCS name, version or simply create the TCL commands to connect continuous clocks from scratch. For example, for UCS subsystem v2:
Open the project.
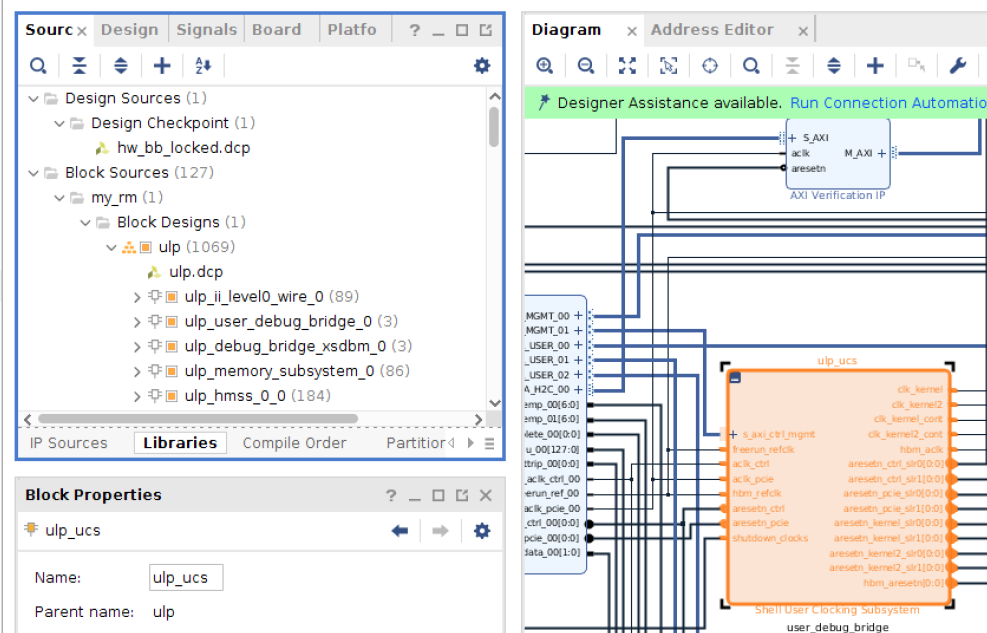
Open block diagram of the dynamic region (called
ulp).Double-click on the UCS instance to re-customize it. In the following example, the instance is called
ulp_ucs:
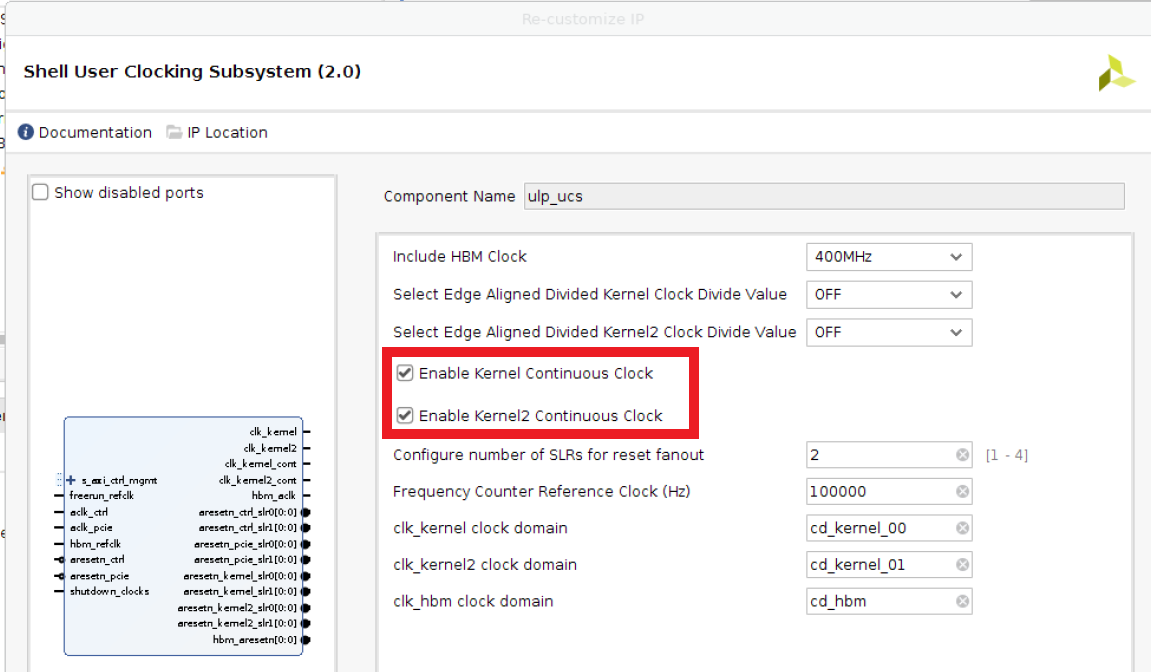
ulp_ucsinstance¶Enable both
kernelandkernel2continuous clocks:
Customize
ulp_ucs¶This will create two new ports
clk_kernel_contandclk_kernel2_cont.In the block diagram, connect them
ap_clk_contandap_clk_2_contport of all xbtest IP.Check the TCL console window to get the equivalent TCL command of the manual steps you’ve just done.
Add these commands in your Post system linker TCL hook: postsys_link.tcl.
Overwrite cascaded power CU connectivity
By default, when destination power CUs are specified (see power: Power CU configuration), they are automatically connected to the first source power CU found in the Generated Vitis options file: vpp_link.ini.
You can override the default connections in your Post system linker TCL hook: postsys_link.tcl for any destination power CU:
Disconnect clock and control signals from default a source power CU.
Connect clock and control signals from new source power CU of same power: Power CU configuration type.
The following ports of must be connected:
Source power CU port |
Destination power CU port |
|---|---|
|
|
|
|
|
|
|
|
|
|
|
|
Note
The format of power CU name is krnl_powertest_slr<slr_idx>_1 where <slr_idx> represents the index of the SLR where the CU is located.
For example:
Power CU in SLR0 is called
krnl_powertest_slr0_1.Power CU in SLR1 is called
krnl_powertest_slr1_1.
Optional TCL hooks
Other TCL hooks may be defined to be used as different steps of the Vitis™ build flow. Refer to Vitis documentation for how to define them.
Examples of Pre-placer TCL hook: place_design_pre.tcl and Pre-router TCL hook: route_design_pre.tcl used to help meeting timing requirements are provided in xclbin timing closure tips.
Template & place holder Pre-placer TCL hook template: place_design_pre.tcl and Pre-router TCL hook template: route_design_pre.tcl can also be used as reference: see Templates description.
Pre-router TCL hook: route_design_pre.tcl
TODO
Generated Vitis options file: vpp_link.ini
This file is automatically generated by the xclbin_generate workflow.
It contains the following Vitis options:
Clock configuration:
Clock frequency.
Disable clock frequency scaling.
SLR assignment of each CU.
One PLRAM connection per CU.
Memory connections (for memory CU).
CU inter-connections:
Verify CU watchdog alarm.
Power CU default connectivity.
Vitis options file: vpp.ini
You can add extra Vitis™ options via the INI file Vitis options file: vpp.ini (see vpp_options_dir parameter in Wizard configuration JSON file: wizard_cfg.json).
This is passed to Vitis linker with --config command line option of v++. You can use and updated generated Vitis options file template: vpp.ini.
Important
The content of Vitis options file: vpp.ini provided using vpp_options_dir overwrites any value set by xclbin_generate workflow in the Generated Vitis options file: vpp_link.ini.
Make sure there are no conflicts.
These extra Vitis configurations are typically used to set referenced to for example:
TCL hooks:
Post system linker TCL hook: postsys_link.tcl (required) or other optional TCL hooks.
Vivado implementation directives:
xbtest_wizarddoes not use any directive by default. Those can be added by the user if needed.
Refer to Vitis documentation for supported Vitis options.
remote_ip_cache
Vitis™ caches intermediate synthesis result. In case of successive builds, the synthesis can be speeded up by reusing previous synthesized block.
Tell Vitis to store the cache under <xbtest_build>/xclbin_generate/output/<dev_platform>/remote_ip_cache folder by adding the following to your Vitis options file: vpp.ini (at the top of the file).
remote_ip_cache=../../../remote_ip_cache/
Where:
<xbtest_build>represents the xbtest build source directory (e.g.path/to/your/xbtest/src/hw/build_source/xbtest_wizard_v6_0/).
<dev_platform>is provided with command line option--xpfm. For example: Ifpath/to/xilinx_u55c_gen3x16_xdma_3_202210_1.xpfmis provided, then<dev_platform>is set withxilinx_u55c_gen3x16_xdma_3_202210_1. Ifpath/to/hw.xsais provided, then<dev_platform>is set withhw. Ifpath/to/your/xilinx-u250-gen3x16-xdma-4.1-202210-1-dev-1-3512975.noarch.rpmis provided, then<dev_platform>is set withxilinx-u250-gen3x16-xdma-4.1-202210-1-dev-1-3512975.noarch.
Relative Paths
The xclbin_generate workflow copies the files in the configuration directory into the run directory.
It is recommended to set all paths in the configuration relatively to the xclbin_generate output directory so xbtest_wizard and Vitis™ can use these local copies instead of the source files directly.
In Vitis options file: vpp.ini, use relative path to run directory: ../../
[advanced]
param=compiler.userPostSysLinkOverlayTcl=../../vpp_cfg/postsys_link.tcl

[vivado]
prop=run.impl_1.STEPS.PLACE_DESIGN.TCL.PRE=../../vpp_cfg/place_design_pre.tcl
prop=run.impl_1.STEPS.ROUTE_DESIGN.TCL.PRE=../../vpp_cfg/route_design_pre.tcl